Post # 68 The Chieftain’s Hatch does the M4A1, we review it: A great Hatch!
The video comes in two parts.
The subject of the video is Black Magic, a small hatch, late production M4A1 if the turret came on it, though the turret or gun mount could be from other tanks. When it comes to restored Sherman tanks, I think being concerned about matching numbers is not a thing that seems to be worried about, and since it was so well designed and built, parts readily interchange. This sherman started life as a canadian Grizzly, basically totally the same as an M4A1 with an extra small hatch in the hull floor.
This tank has almost all the quick fix upgrades, the extra armor over the hull ammo boxes but lacks the cheek armor on the turret, and the turret may, I can’t tell for sure, have the cast in cheek armor, meaning it almost for sure didn’t come on the hull. It also lacks the armor plates added in front of the driver and co drivers positions, that the Chieftain calls “sheet metal”. It also has some late Sherman stuff, either added by the restorers, or by a depot rebuild later in the tanks life. The spot light, and ‘gun crutch’, or travel lock as normal people use were not on most small hatch shermans. Also the all around vision cupola would not be found on these tanks during WWII.
The Tom Jentz tangent.
The Idea that the Sherman was no more reliable than any other tank, well, I don’t buy it. I like Mr Jentz’s work, and to some degree, his books helped inspire this site, since there was so little info on the web with really detailed info on the Sherman other than the Sherman Minutia site. I don’t think he really knows much about the Sherman if he thinks tanks like Panther and Tiger just needed more spare parts to be as reliable as the Sherman, it is a ridiculous idea. I do not think there was a single part on the Sherman that had a 500 kilometer life span, and that’s double the Panthers final drives.
First:The Chieftain himself has done Hatch posts on reports from the British, about how much more reliable, the M4A4 Sherman was than the Cromwell, even when both had full crews working to keep them running. both tanks were run thousands of miles, something late war German tanks could not do.
Second: Inone of his own Hatches talks about the French experience with the mighty panther showed they averaged 150 kilometers per final drive set! Much less if the crew was hard on them. There was no major automotive component including the oil, that had to be changed every 150 kilometers on any model of Sherman.
Third: This will focus on the Panther, since it was a major part of Germany’s late war armored force, and how terrible it was. This tank didn’t have just one flaw that should have disqualified it for production it had at least five. It was generally poorly reliable across all its automotive components, along with the final drive, 2500 kilometers for the motor and 1500 for the tranny were hugely optimistic and most of these tanks broke down and or were destroyed before they had to refuel. You had to take the whole drivers and co drivers compartment apart and the top of the hull off to change a transmission! Don’t get me started on the weak turret drive system that Rube Goldberg would have loved. The ‘wonderful’ dual torsion bar suspension and interleaved road wheels would cause any maintenance nazi to find the nearest US Line and surrender instead of working on it!
. . .
Another thing to note, you can see the holes drilled vertically in the suspension bogies, these are the tops of the holes the bolts that hold the suspension caps on go into. They were covered up with body filler by the factory, but on most restored and old Shermans the filler is gone, and they don’t fill the holes.
Note: the odd groove in the center of the rear Hull casting, this wasn’t done on all M4A1 tanks, and may have been unique to General Steel castings.
On the problems with the R975, I have not heard of complaints about the engine being easy to blow, and would be very surprised if the throttle wasn’t governed to prevent it. On having to crank the engine before starting, I have it on good authority, that the crew could just start the tank and run it for a few minutes every 45 minutes to an hour to avoid having to hand crank the motor.
Many of units removed the sand shields in ETO to prevent problems with mud.
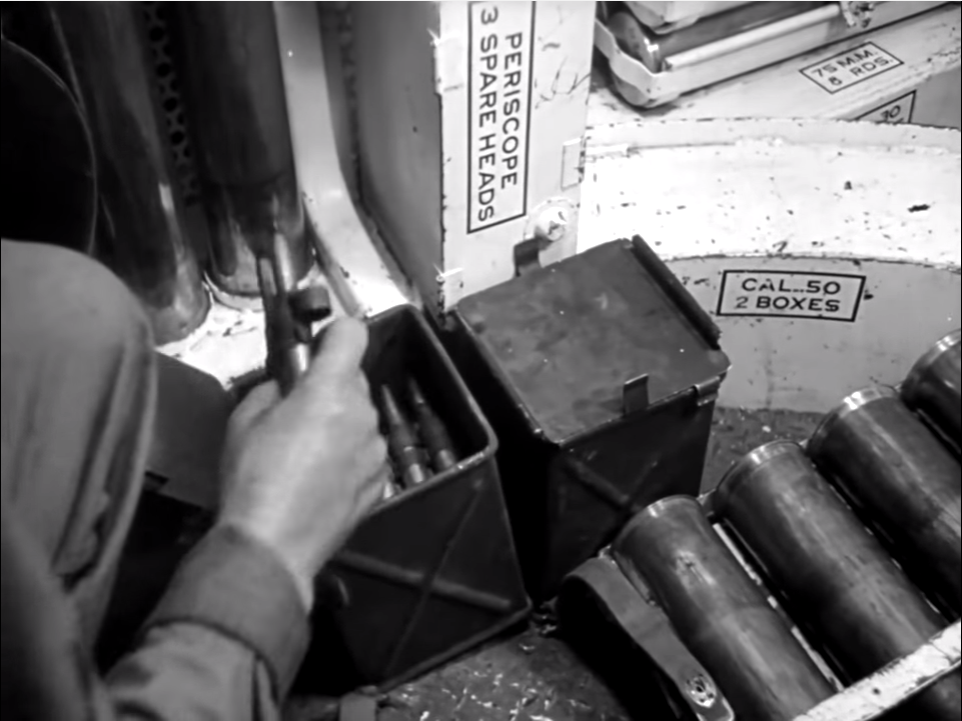
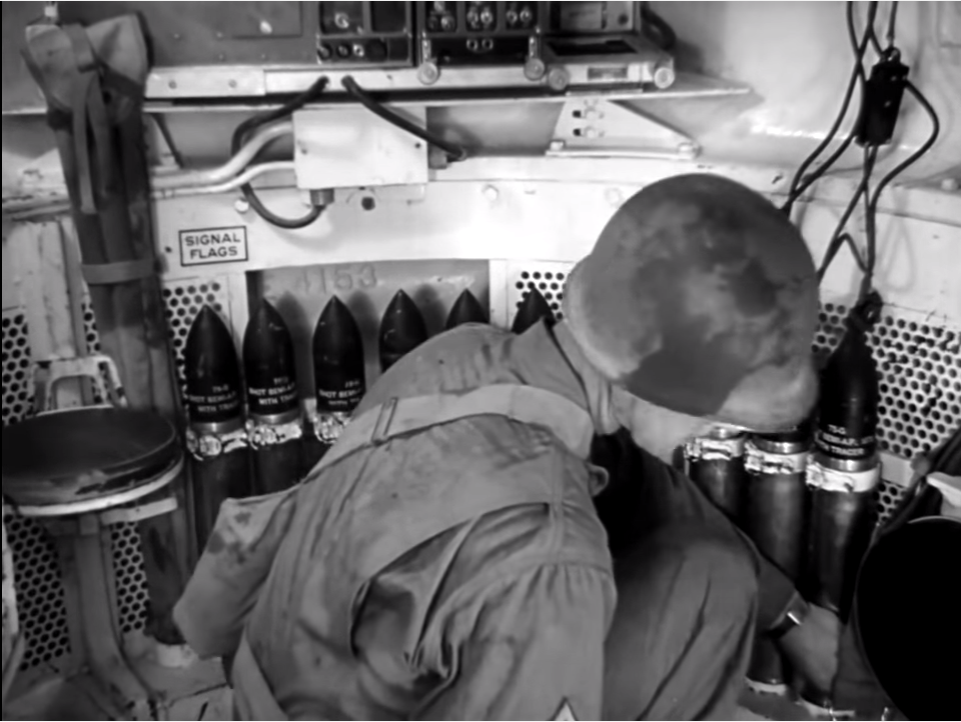
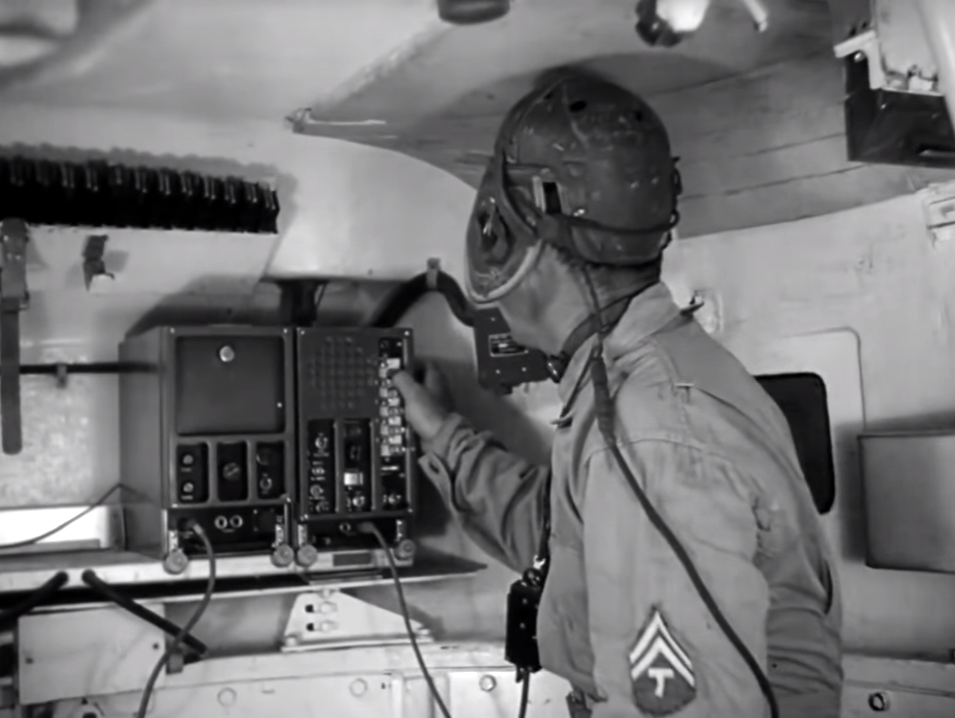
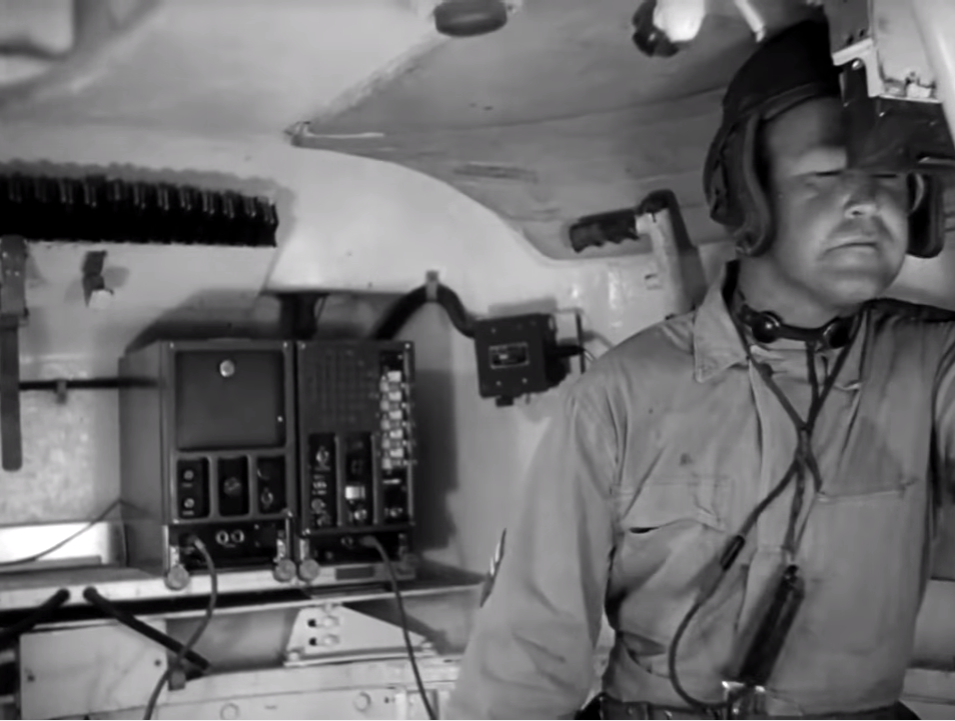
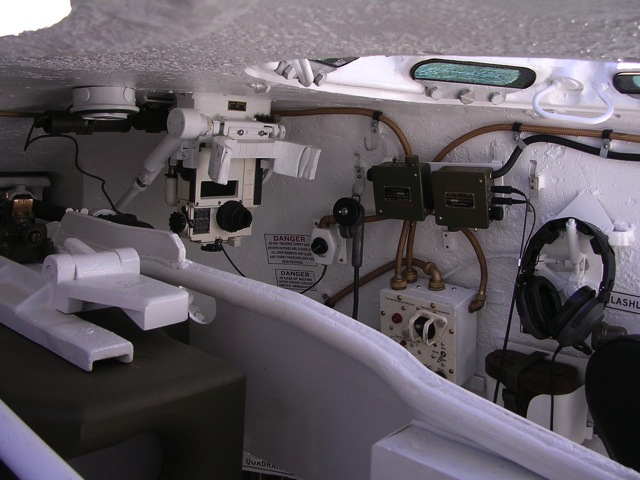
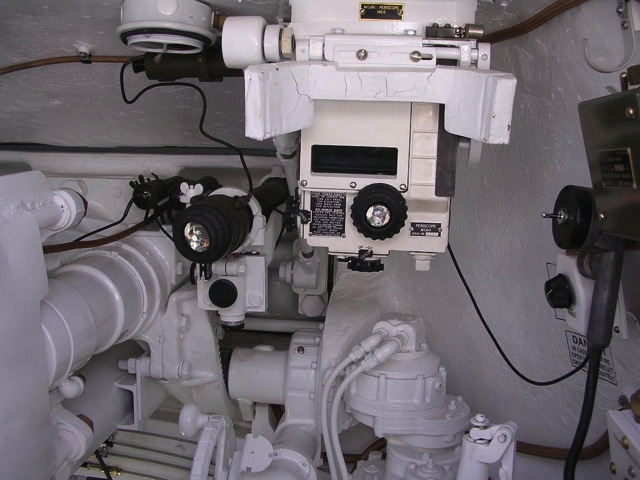
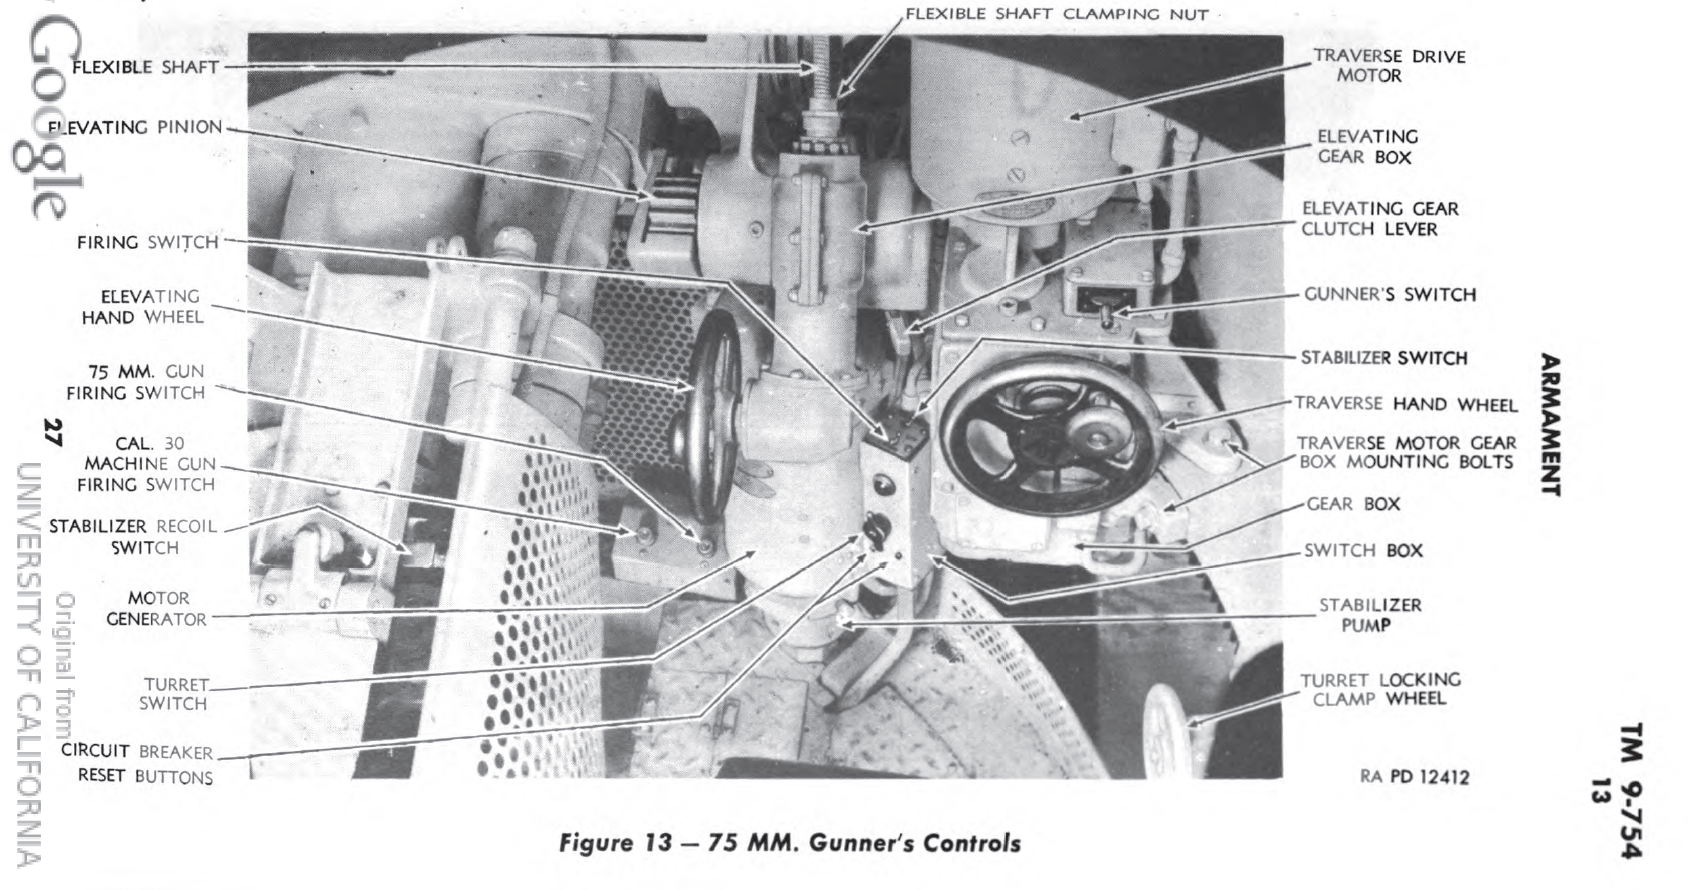
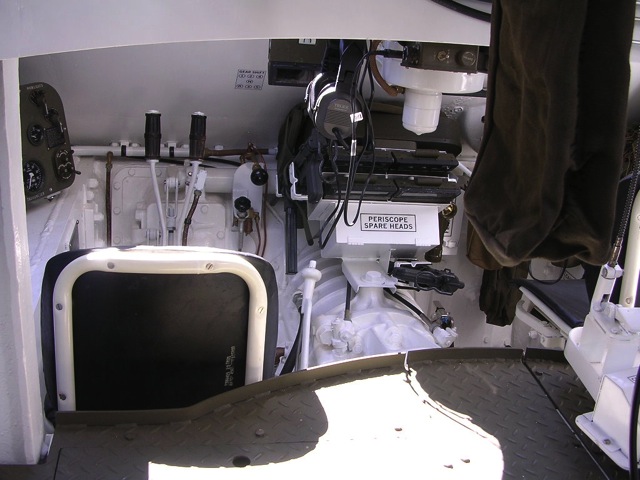
The Commanders vane site is an early version bolted to a late war vane site pad. The tank has the early style gunner’s periscope. The gunners periscope is missing the linkage going down to the gun. The radio looks like a 528. Note the Armored doors on all the ammo boxes and ready rack. The tank is missing a lot of interior storage, it may have been removed in preparation on shipping the tank out to it’s new owners.
I‘m no expert, but I think the Chieftain confused a .30 cal ammo bin for the 75mm ammo bin right next to his shoulder for the location of an SCR-506, I just can’t see a WWII radio fitting in the tiny box! You can see how sparsely filled the interior is, as issued the tank would be stuffed full of items to help fight it, live with it, or keep it running. The Chieftain shows just how easy even a small hatch Sherman was to get out of, the the Loader was still going to have some issues though. I wish he would have tried the belly hatch out, but maybe it’s welded shut or something.
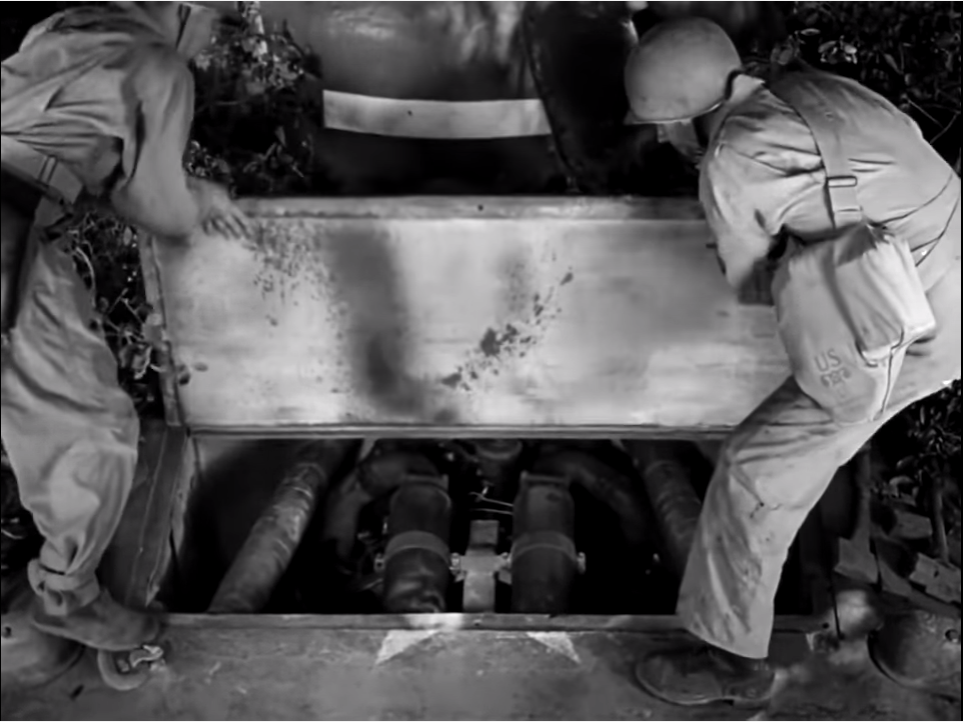
He covers the small floor hatch on the Grizzly tanks, and you get a nice shot of the early escape hatch. They also show the generator mounted on the rear of the transmission in one of the shots, briefly. You can also see the full turret basket’s mesh screening that separated the turret crew from the hull crew. Part of the quick fix was to cut this all out. I suspect most of the inconsistencies in the tanks details are due to the restoration crew using the Sherman parts they could get their hands on. Very few people would even notice or know it had the wrong commanders hatch, or even whole turret.
A note on the tank, it belonged to a the Military Vehicle Technology Foundation, a fancy name for the collection of a man named Jacques Littlefield. He had a passion for armored vehicles of all types but really liked tanks. He restored many to full functionality, including working main guns and machine guns on some tanks. Owning a working tank cannon is easier than you would think, and far easier than getting the paperwork approved to own machine guns in California, and Jacques Littlefield did both. He employed a restoration crew with world class skills and did some amazing restorations, including a Panther A that was impossibly damaged, but still brought back to life. That Panther was his crowning achievement, and he was a real mover and shaker in the international military vehicle restoration scene, seeing that tank run was one of the last things he achieved, because cancer claimed him shortly after.
The MVTF was supposed to make sure the collection of vehicles, that were a labor of love his whole life, lived on when he passed. Unfortunately the location of the MVTF, Portola California, on a large chunk of very private property, with very limited parking really presented some problem. The collection was used often while it was there, by TV productions like Myth Busters, and was a staple for the Wargaming Staff for their productions, and occasionally opened up to groups of vets, or other interested people. There were other difficulties with the location, and ultimately the collection was donated to the Collings Foundation. They reportedly decided to keep 40 of the most significant vehicles and auction the rest off. The money from the auction was going to be used to build a facility in Stowe Massachusetts, but due to zoning issues, the permits were not provided, leaving the vehicles they did keep in limbo.
I‘m sure the Collings Foundation, a really amazing Charity, they keep many rare WWII aircraft, and cars, including race cars running, has a plan for the rest of the tanks. Their website only lists the Panther in their collection, I hope that doesn’t mean they sold the rest when the museum fell through. That’s not a criticism of the CF, they I’m sure know their business far better than I do, and they really are a top notch group of people. Just browse that site to see the airplanes they’ve gotten flying. The only real B-24 liberatorand a working F-4 Phantom are just two of the notable planes!! If you know anything about aviation, you know just how complicated and expensive keeping an aircraft like a Phantom flying is, especially if you don’t have the resources of the U.S. Navy or Air Force backing you.
I have to say, this is one of the best Chieftain’s hatches they have done. Granted, I’m a tad biased, since it was on the Sherman, well a Grizzly made into a later model small hatch Sherman anyway, and the Chieftain really has gotten pretty good with the Sherman and its sub variants, and even has a book on US WWII TDs on the way.
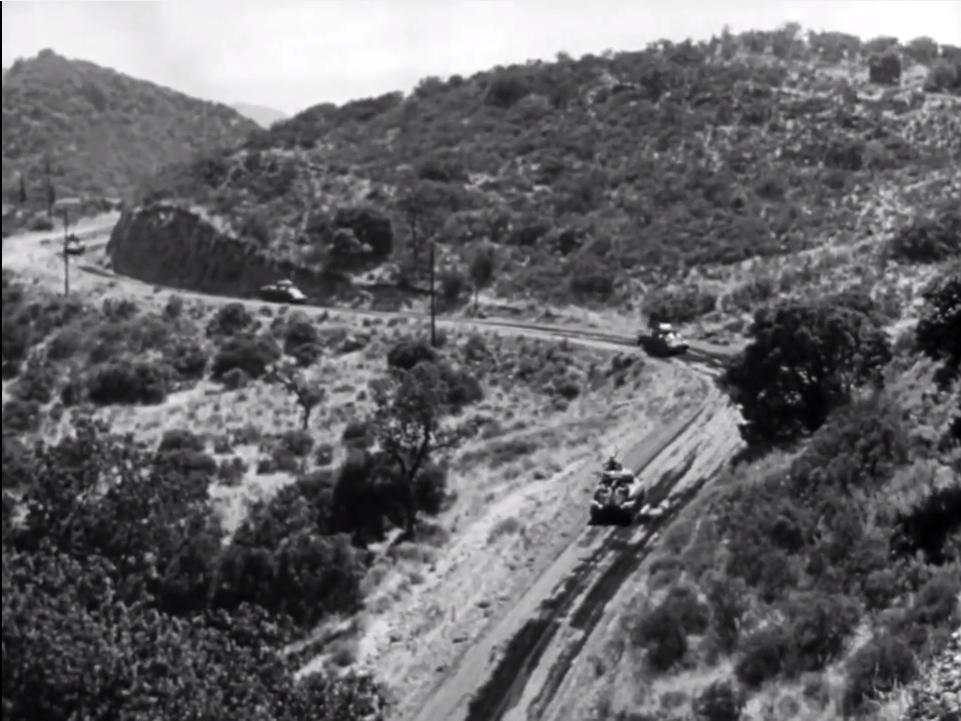
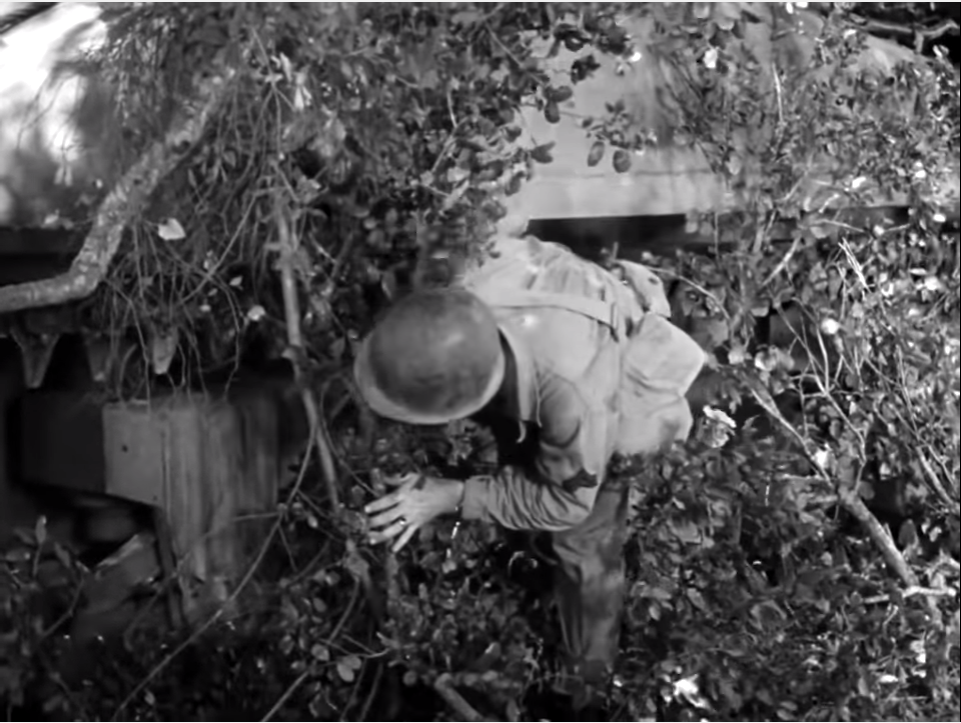
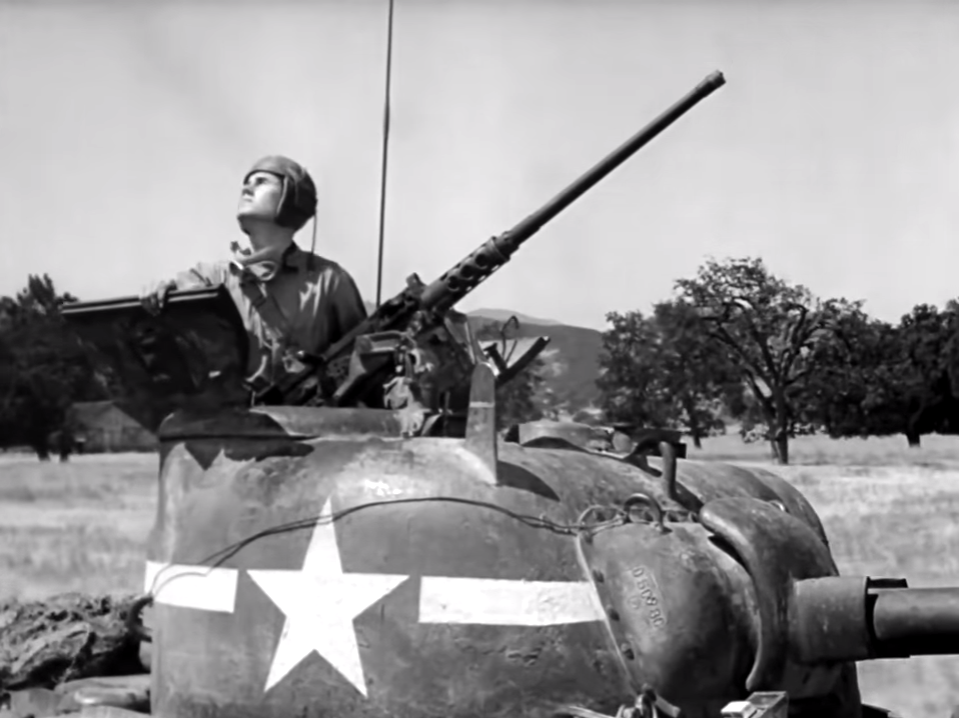
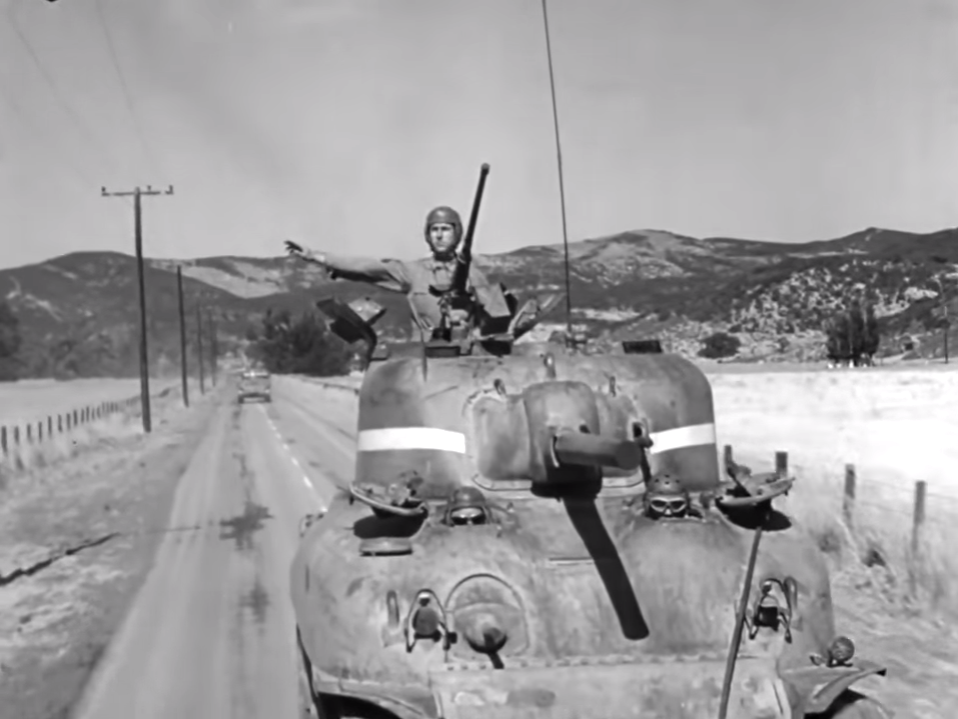
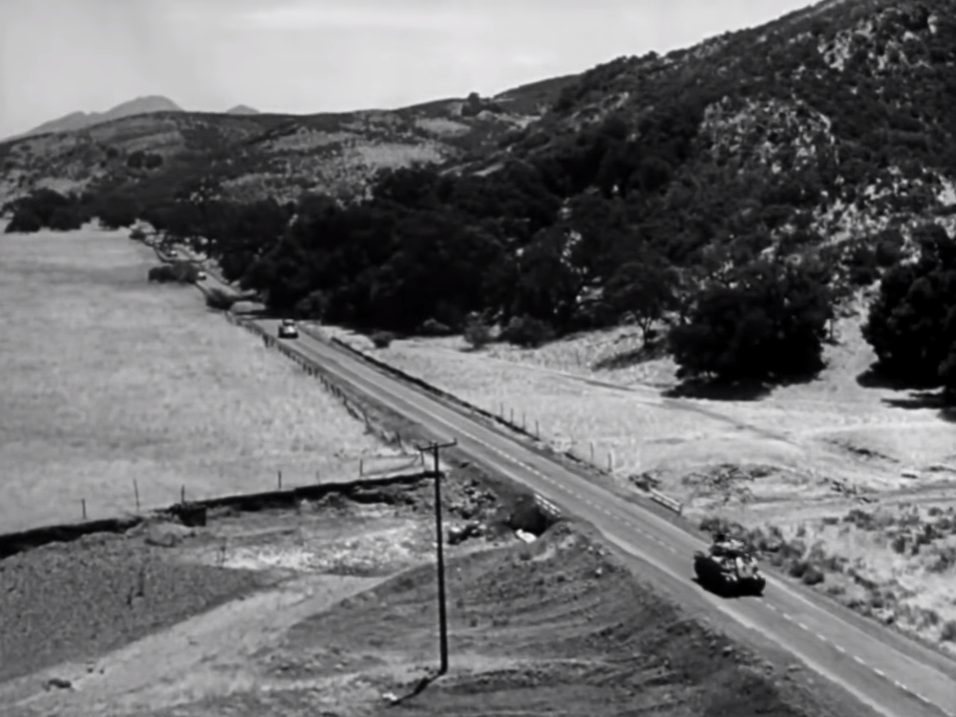
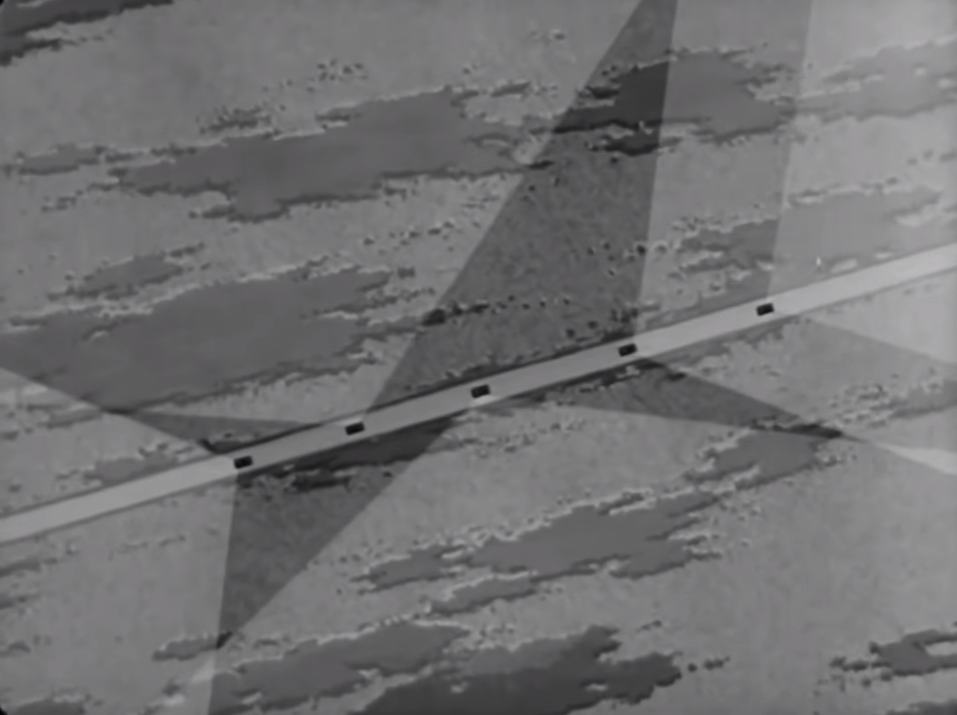
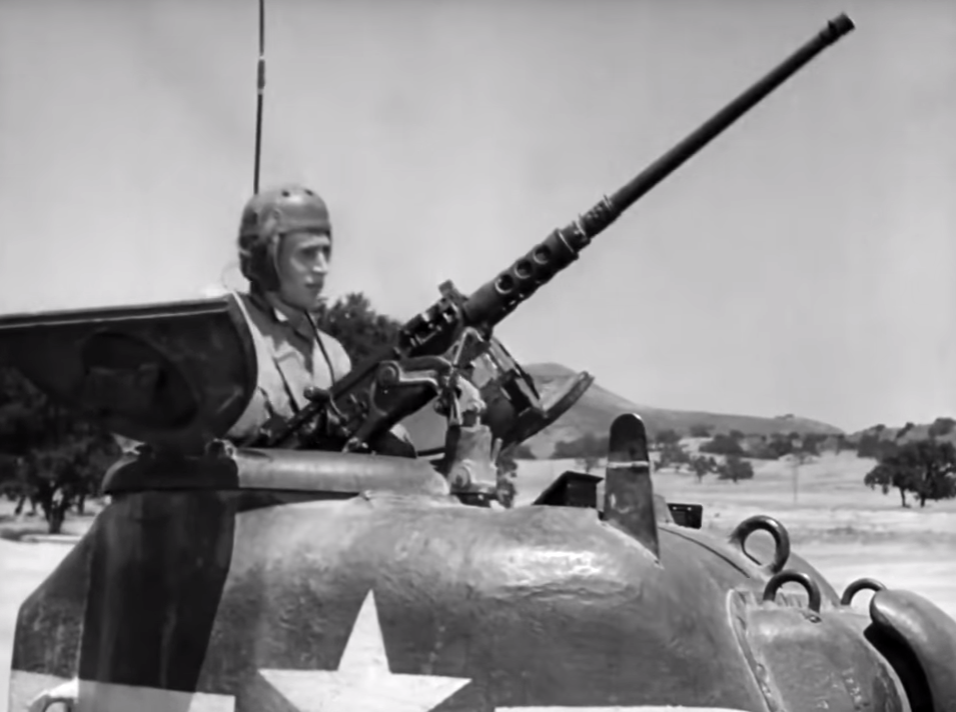
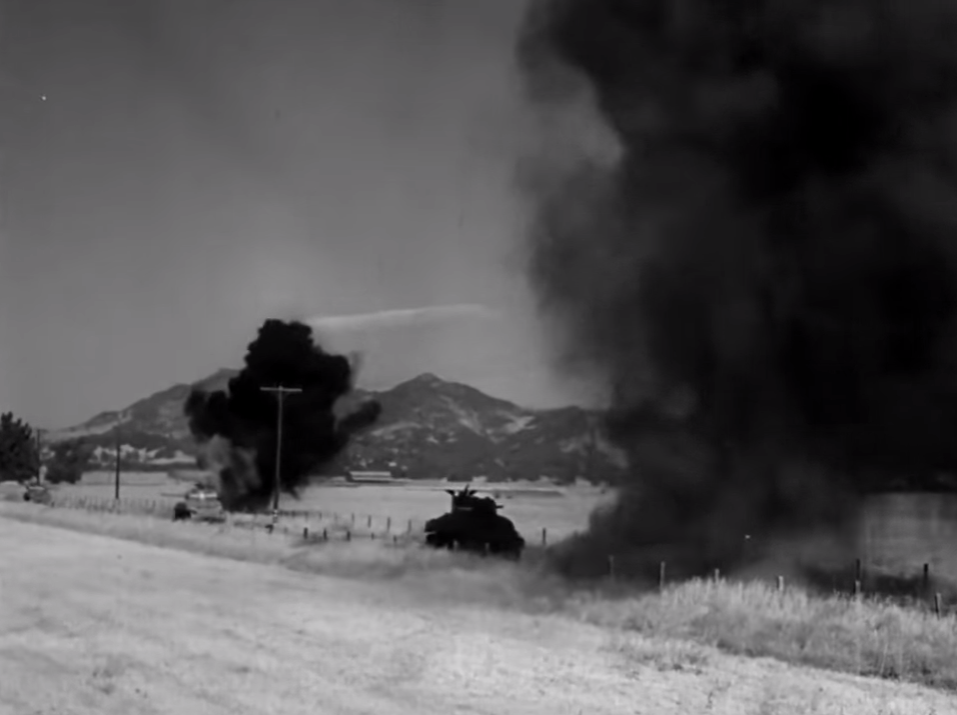
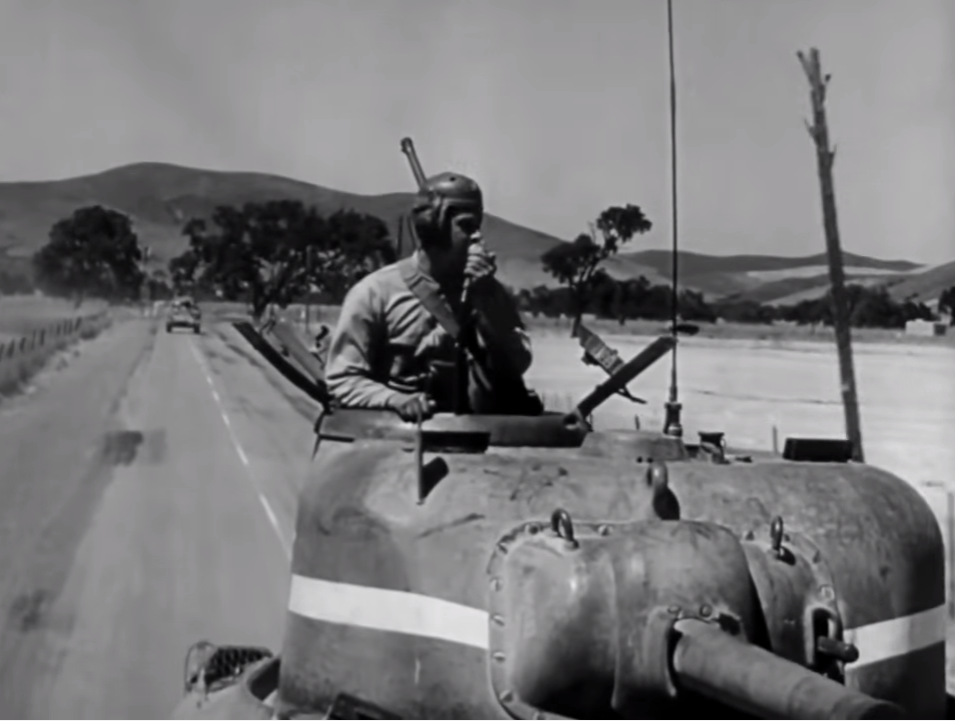
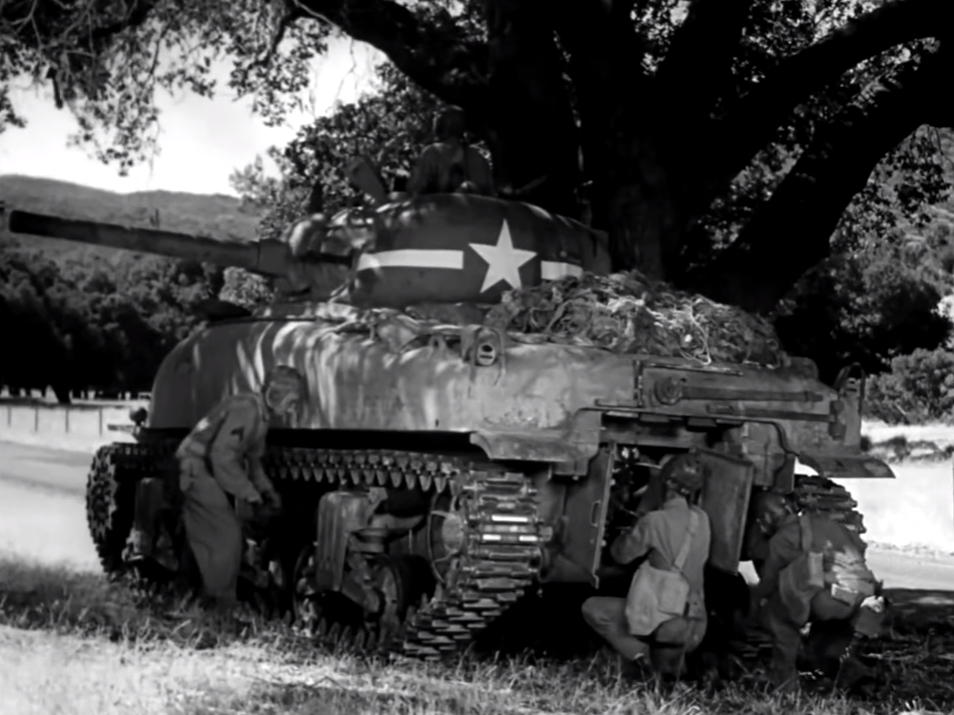
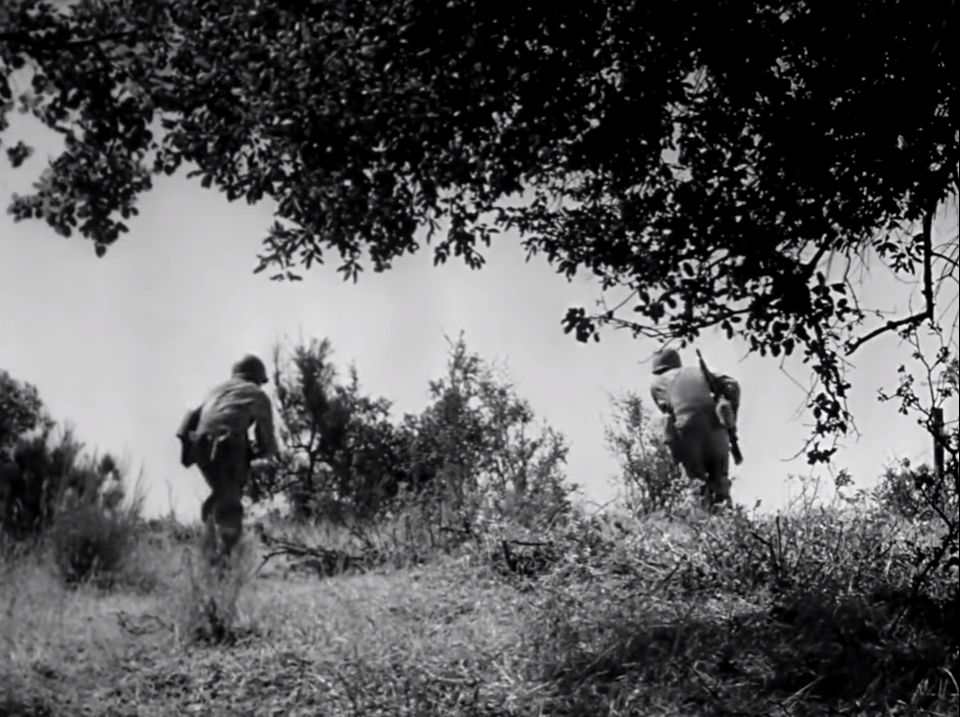
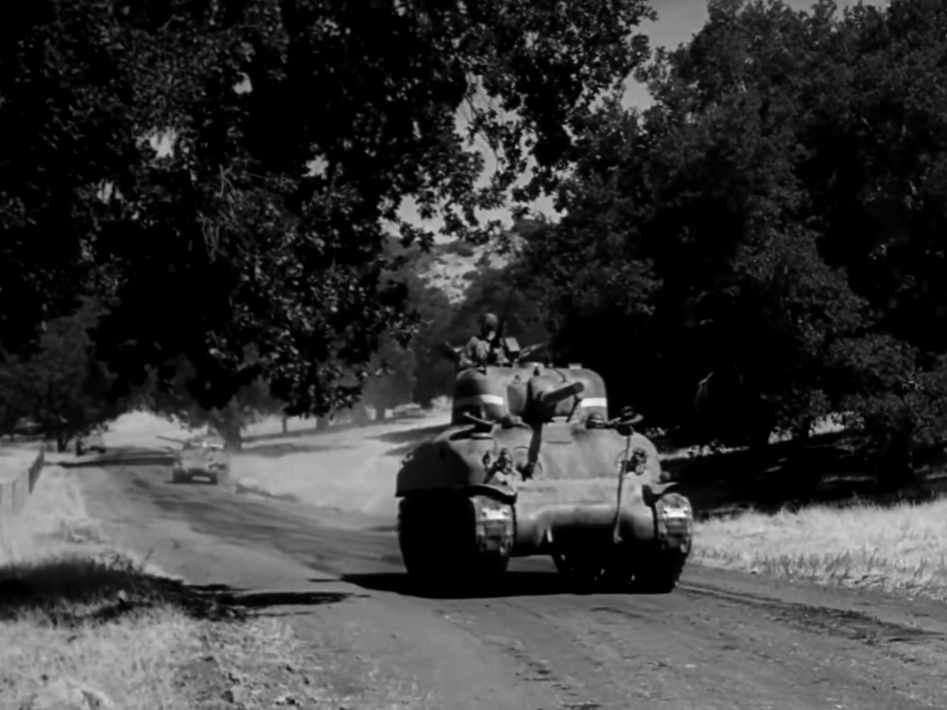
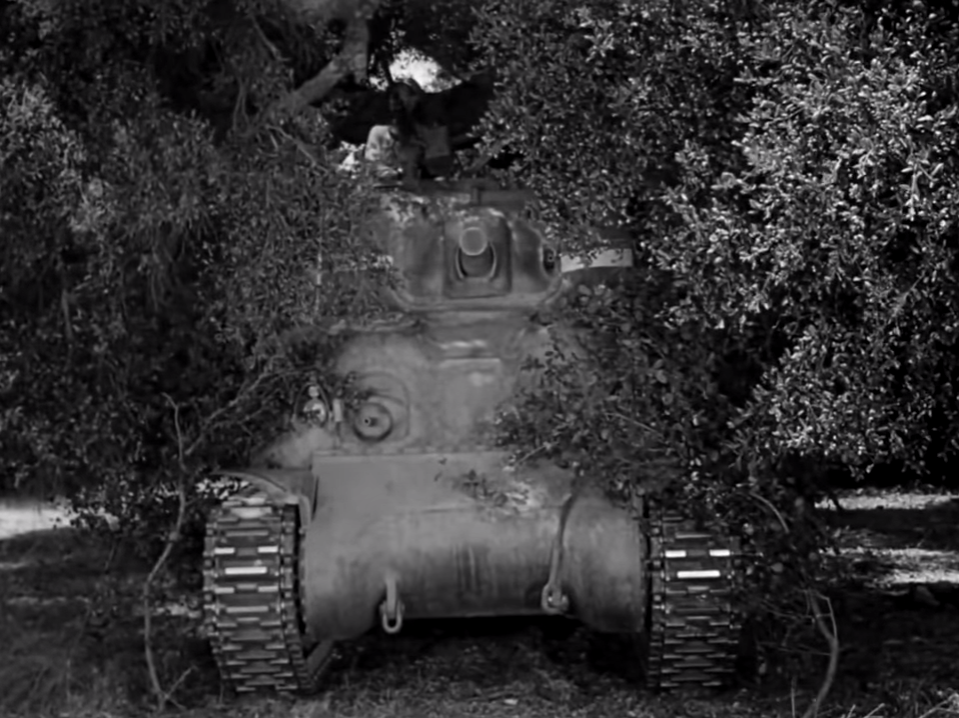
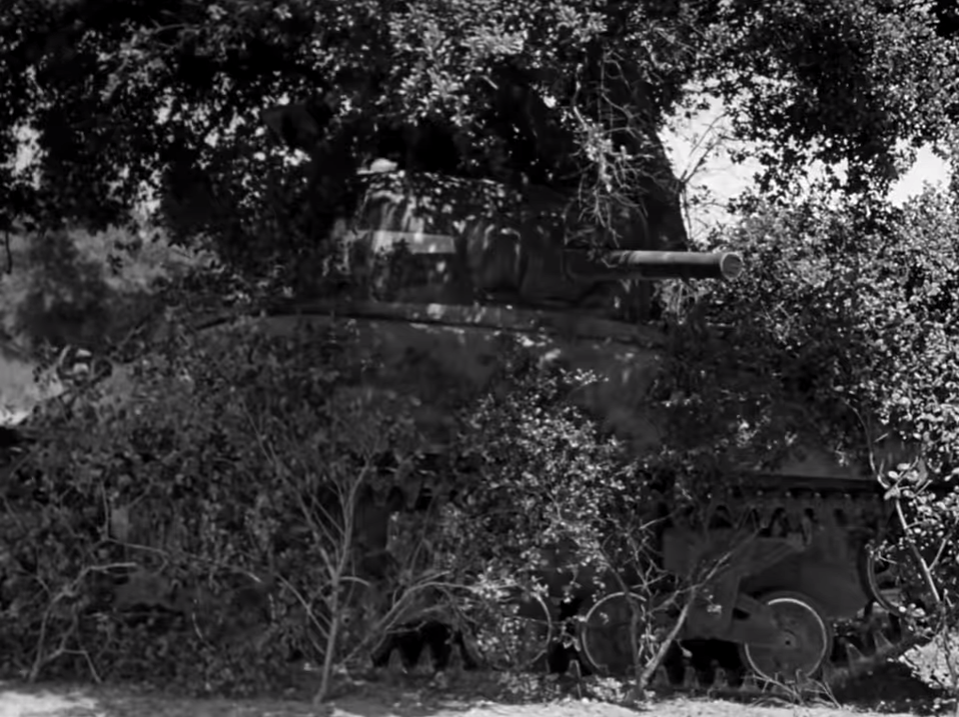
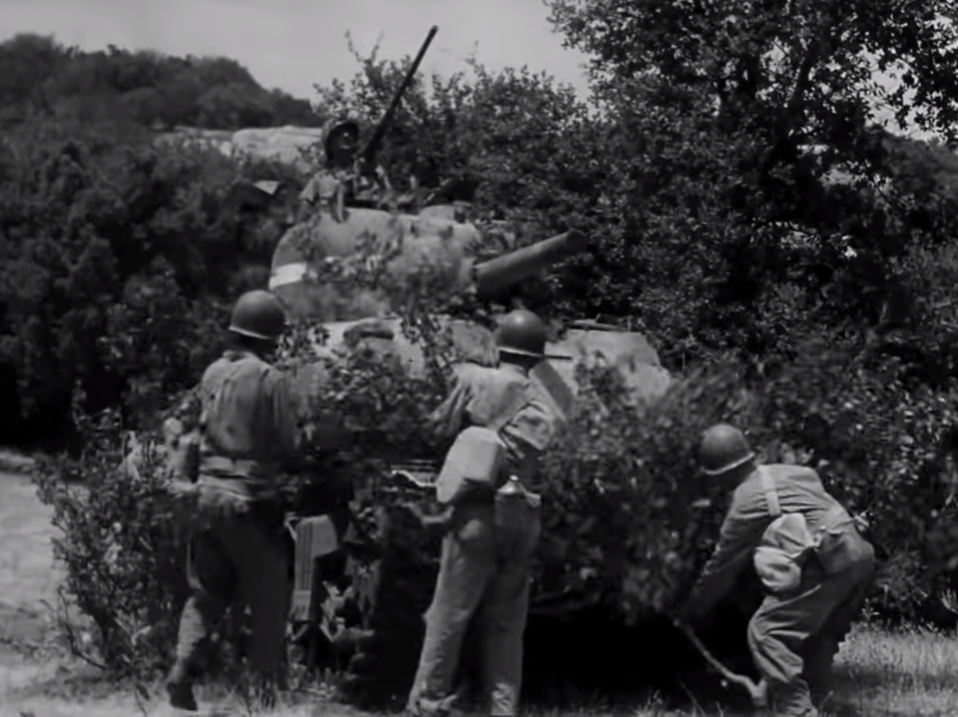
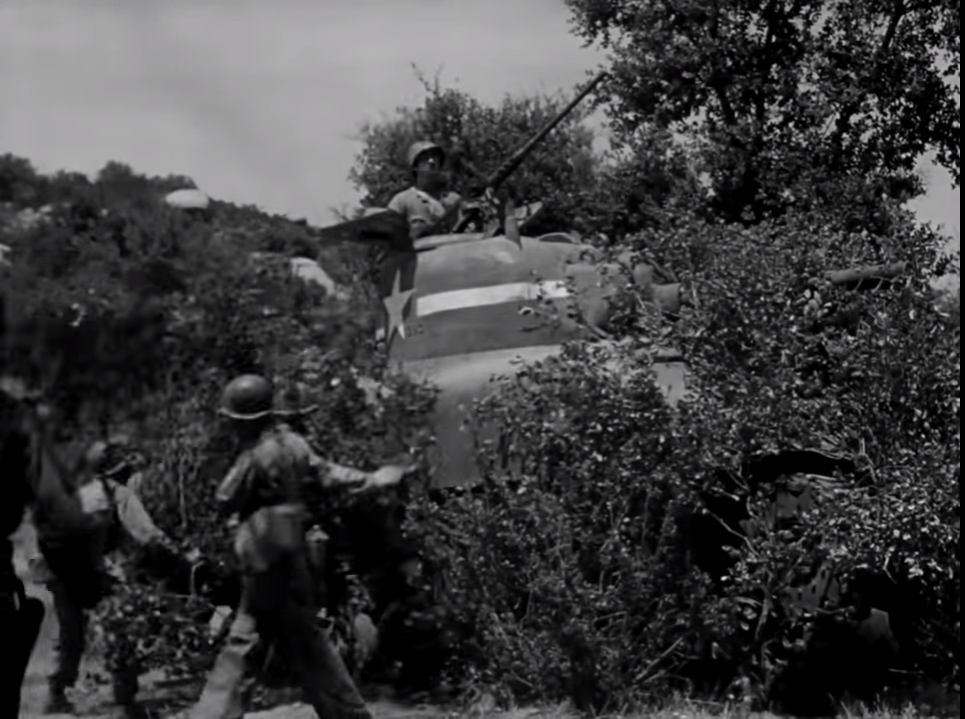
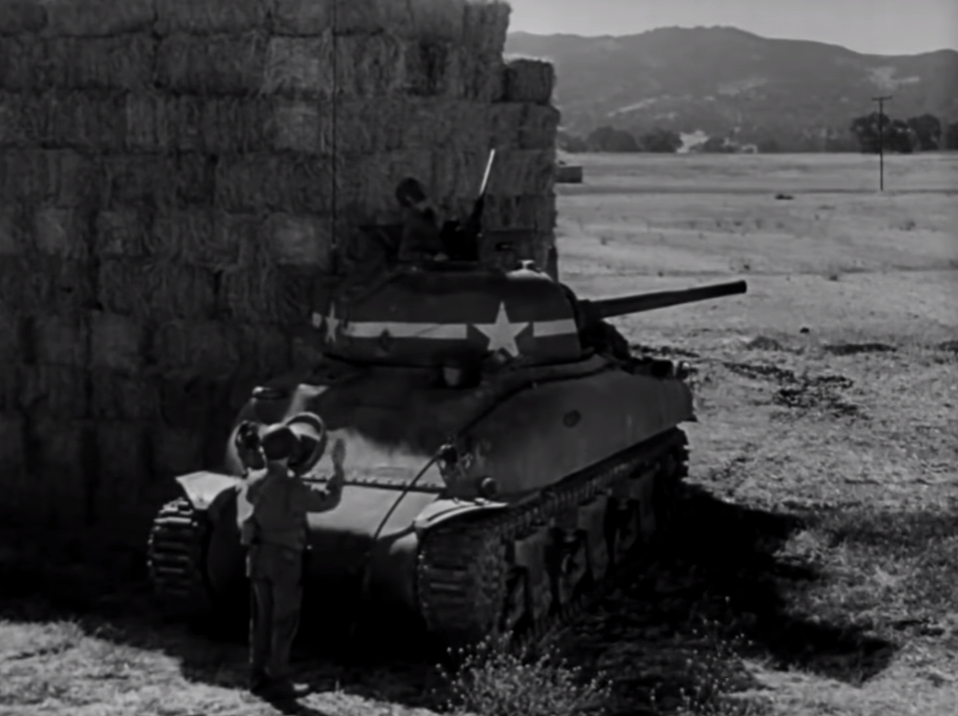
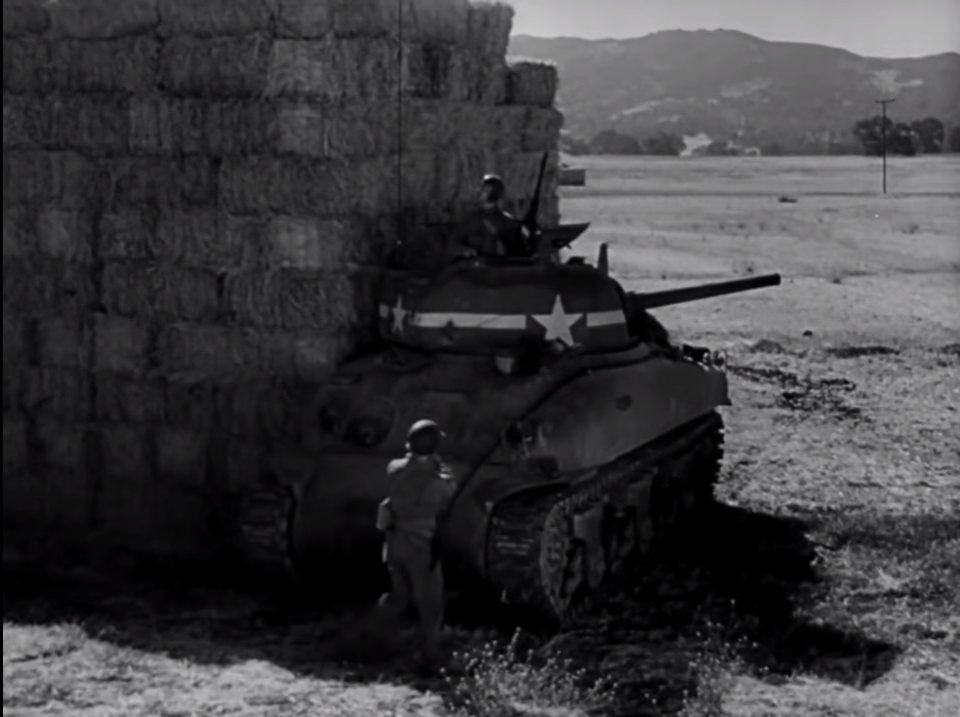
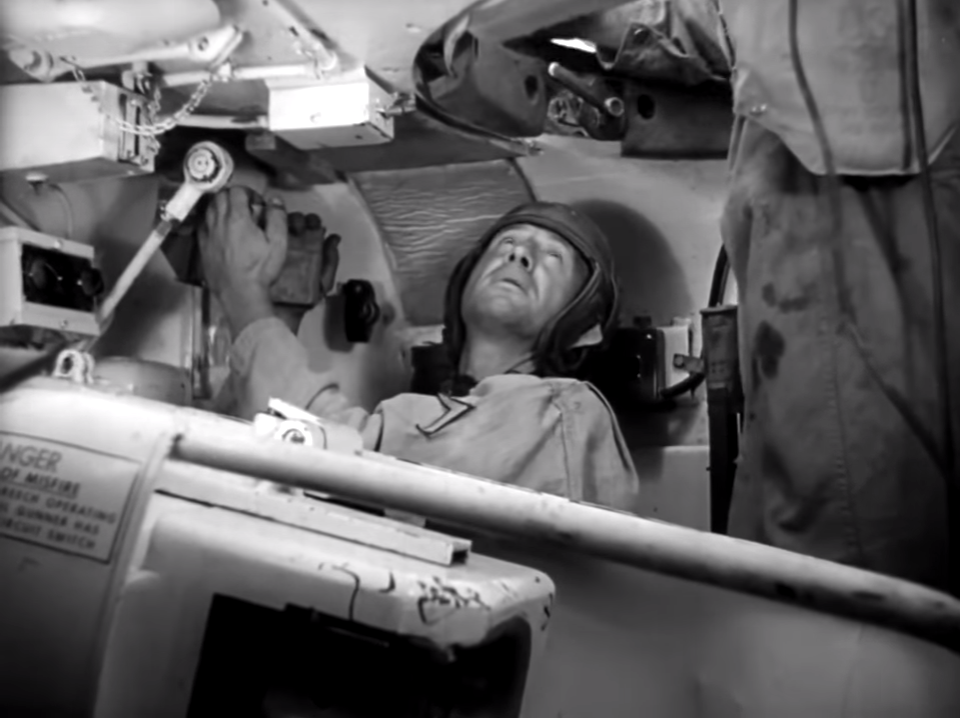
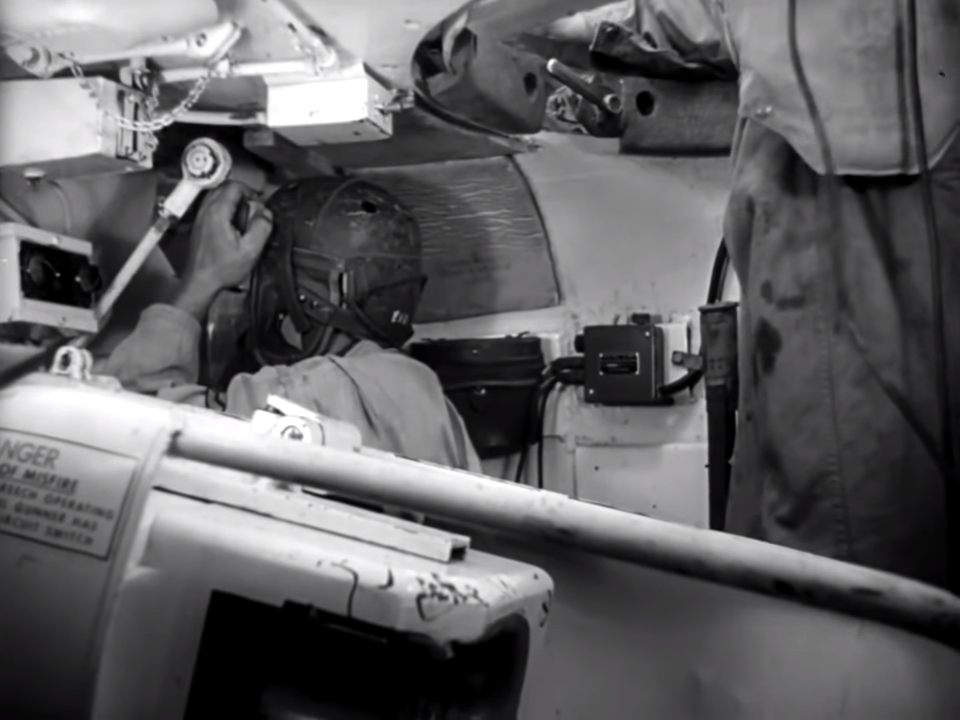
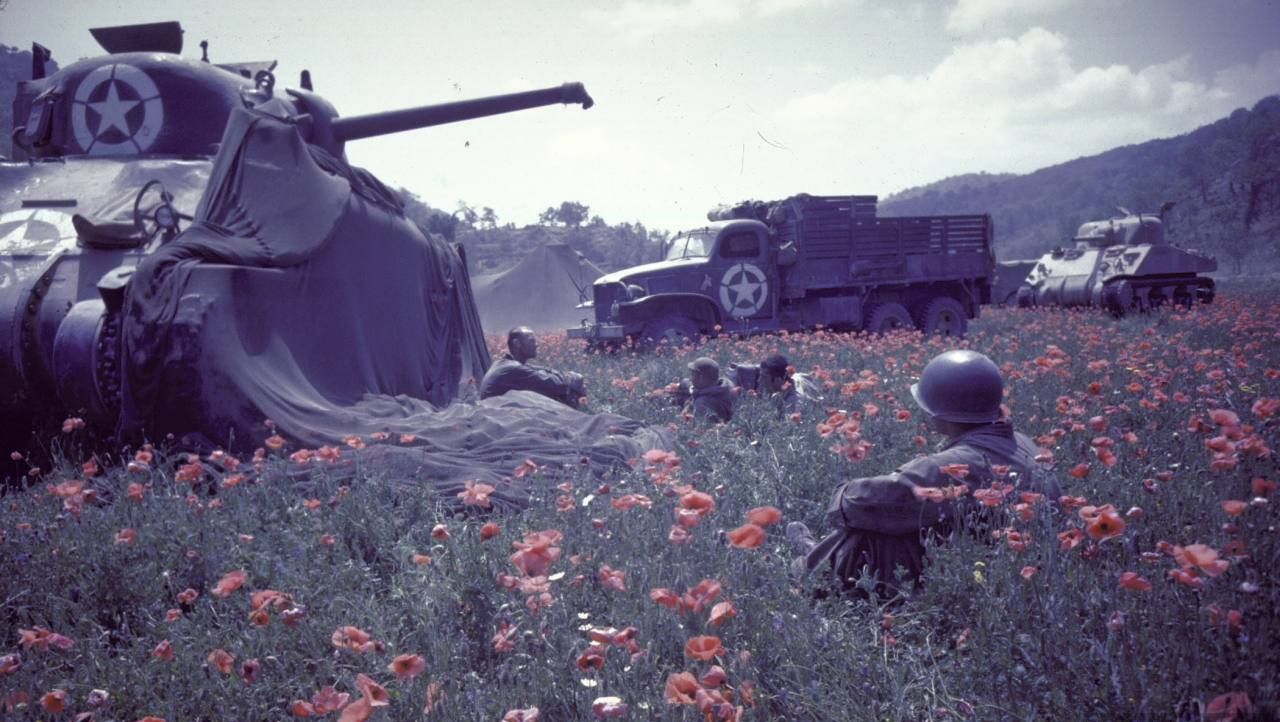
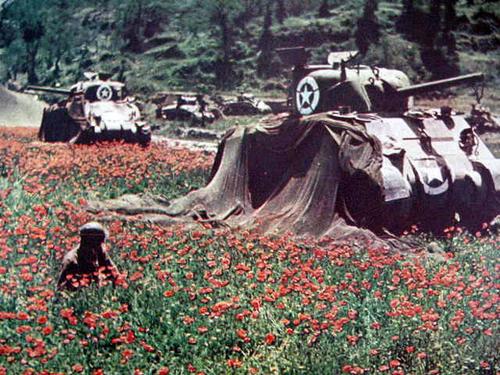
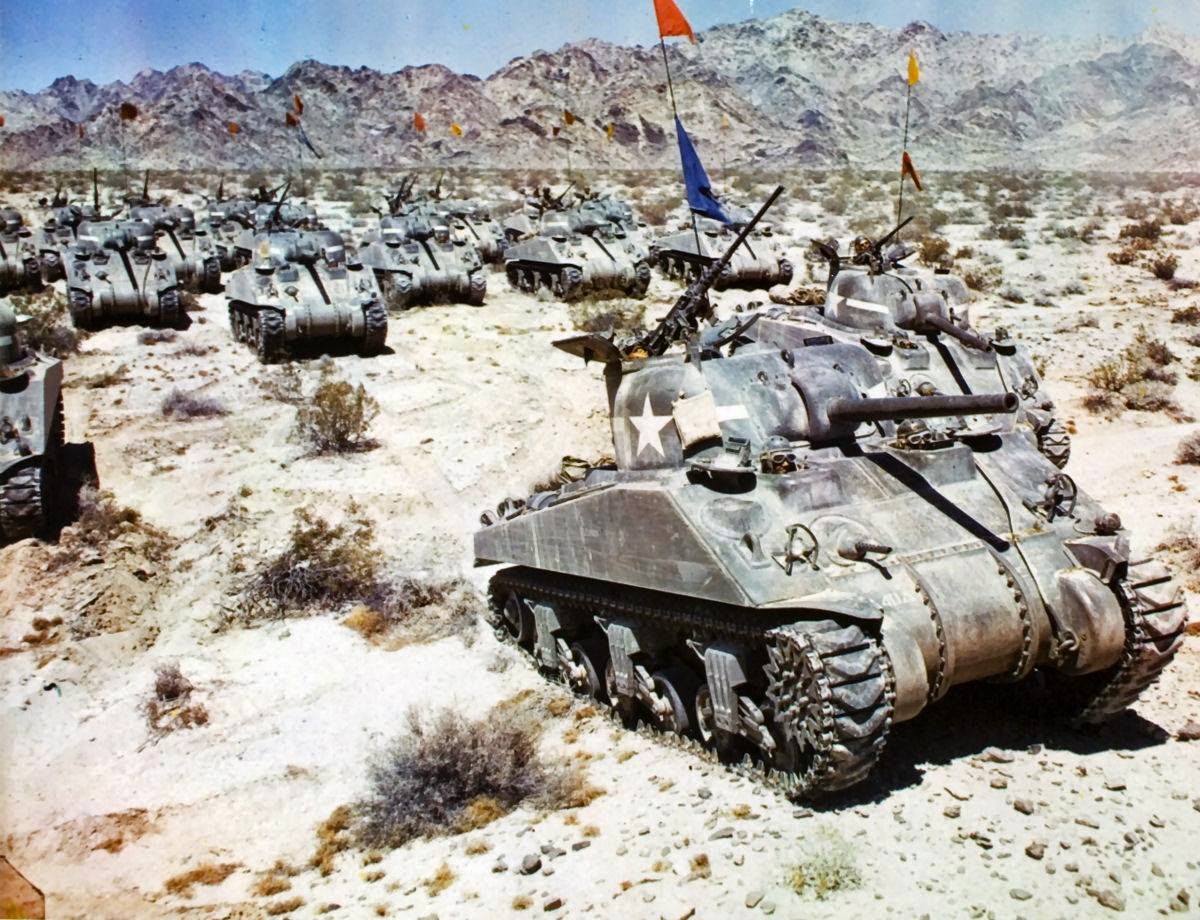
Tank and AFV News posted a link to a fascinating YouTube video covering march security of mechanized units, the film is from early 43. This Army training film is almost a half an hour long, and it’s really interesting, and has some rare shots of men working inside a Sherman. The film takes place somewhere in the US, probably on a Hollywood backlot, the Desert Training Center was pretty close so getting the tanks to Hollywood wouldn’t be hard. At times the film is clearly using special effects, and that lends more credence to it being done in Hollywood. The film covers security on the march, and does it by covering a tank platoon, and what it should be doing. It covers night movement, camouflage when stopped and gives tips on being stealthier in your tank; it also covers how to use the columns firepower if attacked from the air.
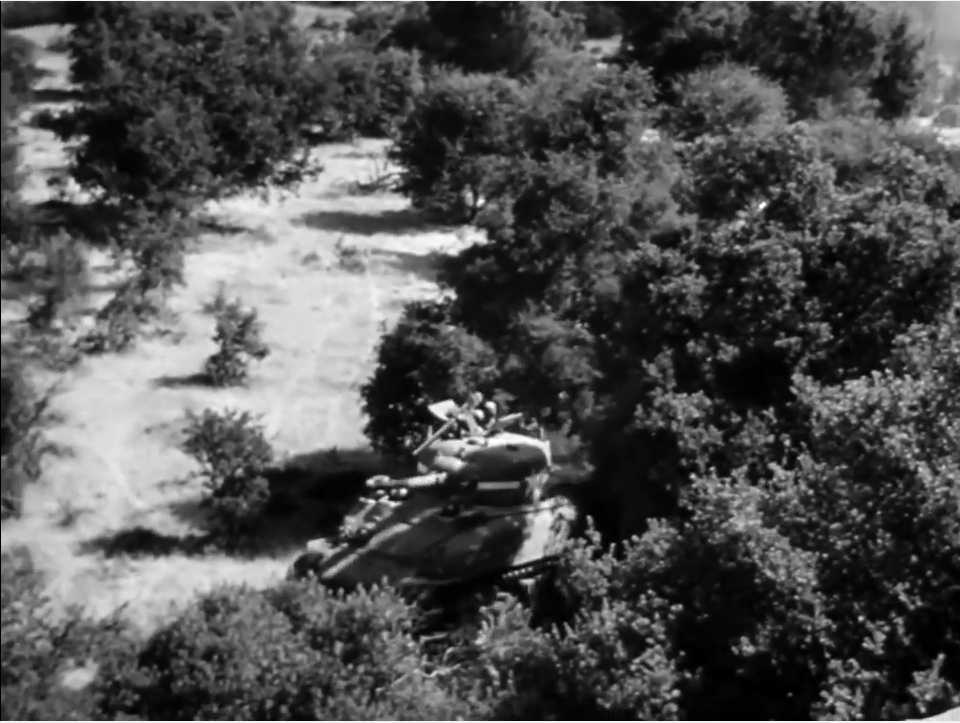
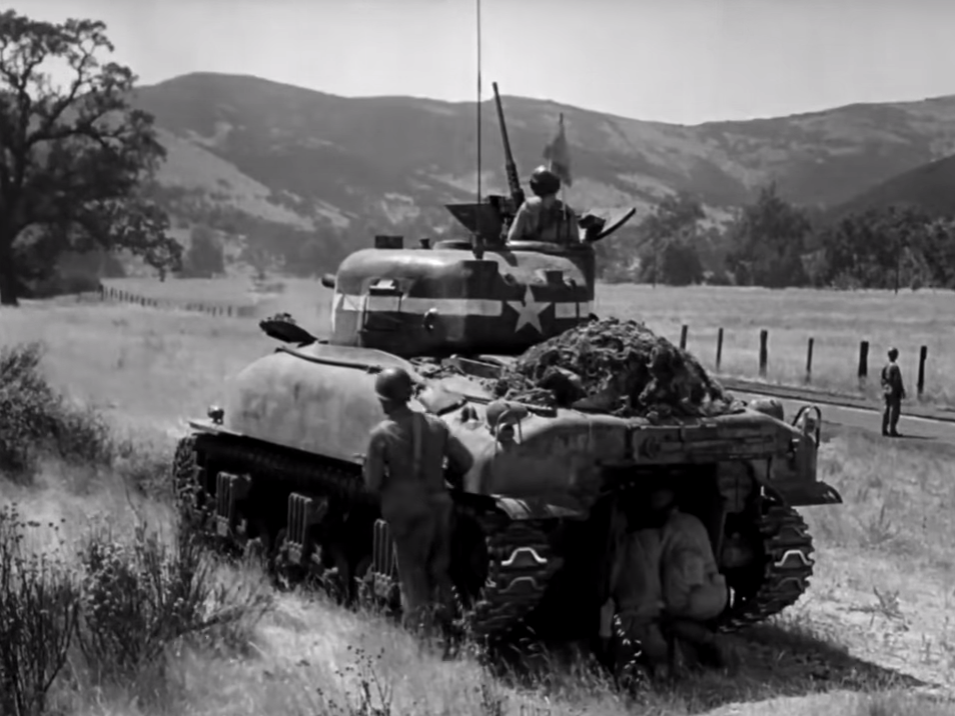
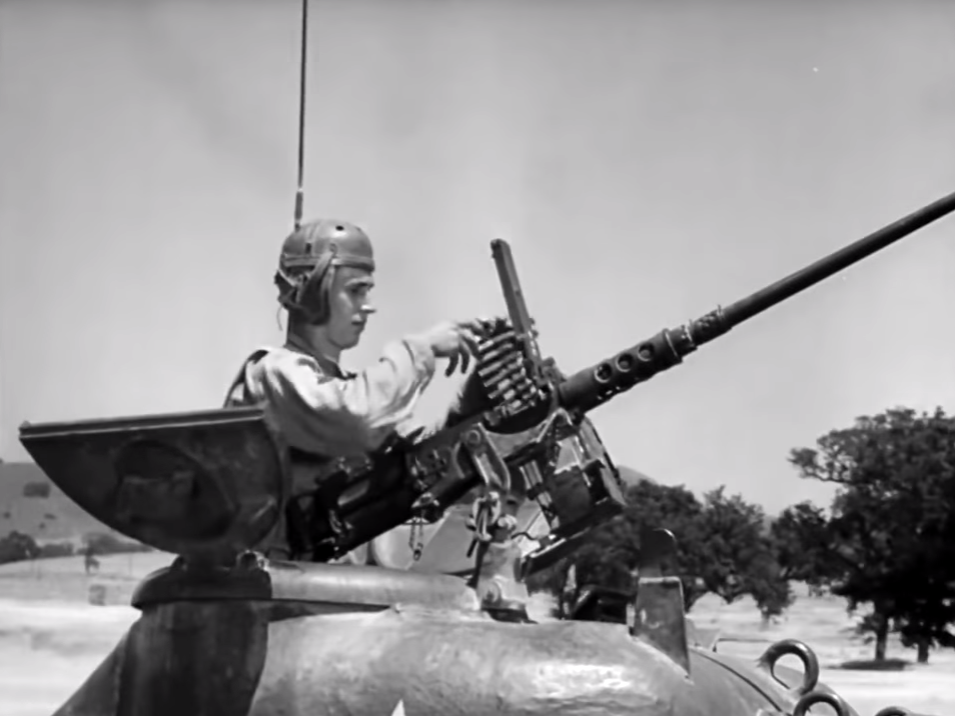
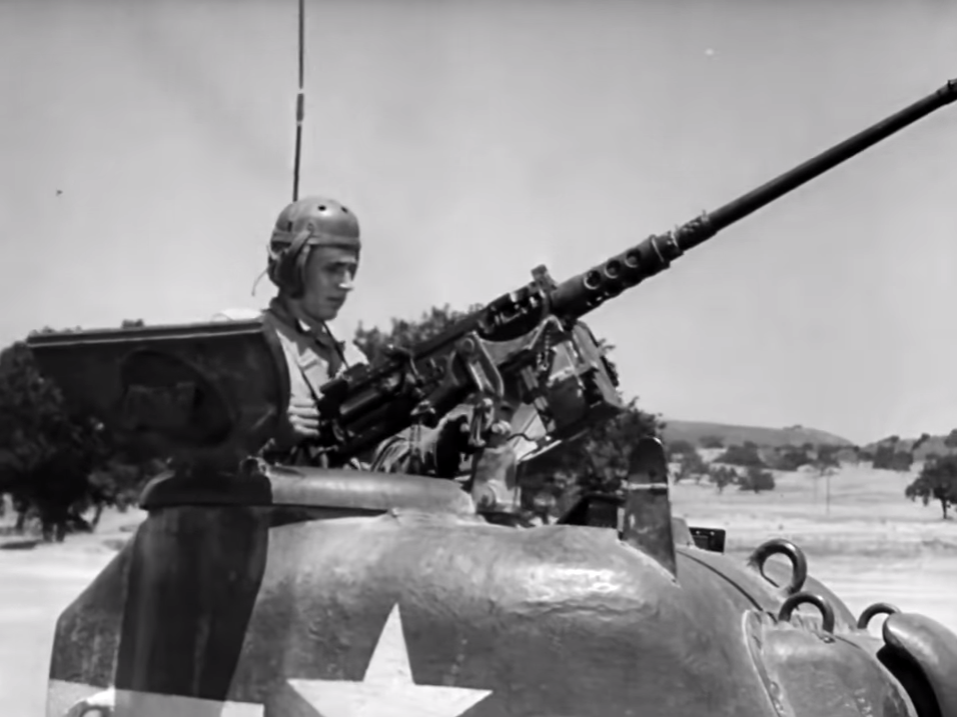
The tanks used were all early M4A1s, but not super early since they are not DV tanks, but still have shorty gun mantlet and no telescopic sites, they do have heavy duty suspension as well. The tanks also have full turret baskets, with the 12 unprotected ready rounds, and no armor over the sponson ammo racks or the turret cheek add-on armor. Its possible training tanks did not have these features removed like tanks slated to see combat, or the film was made very early in the war.
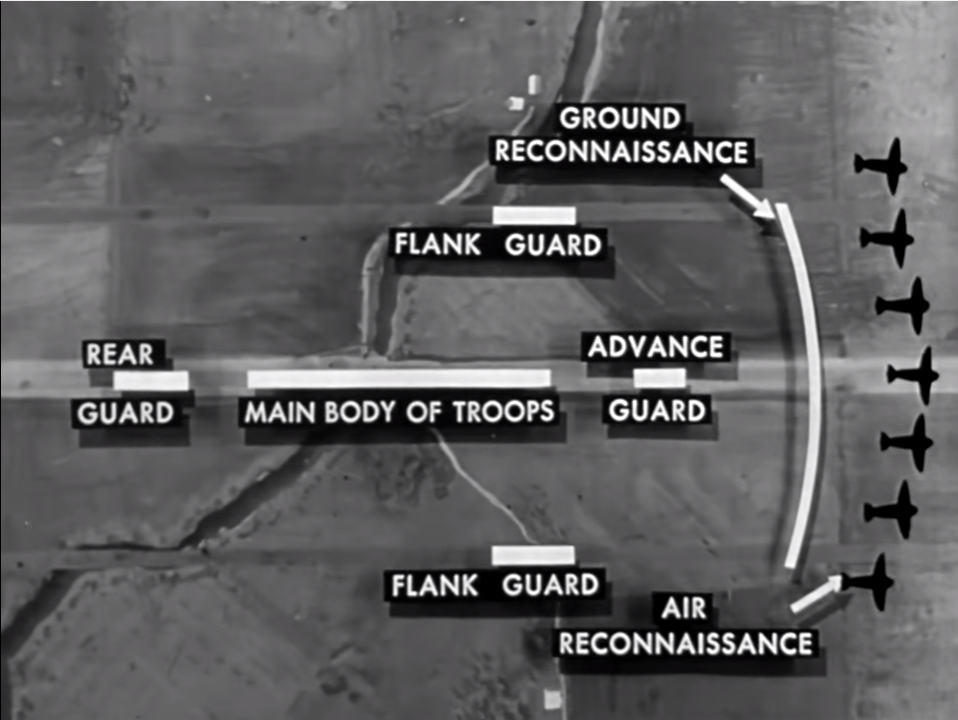
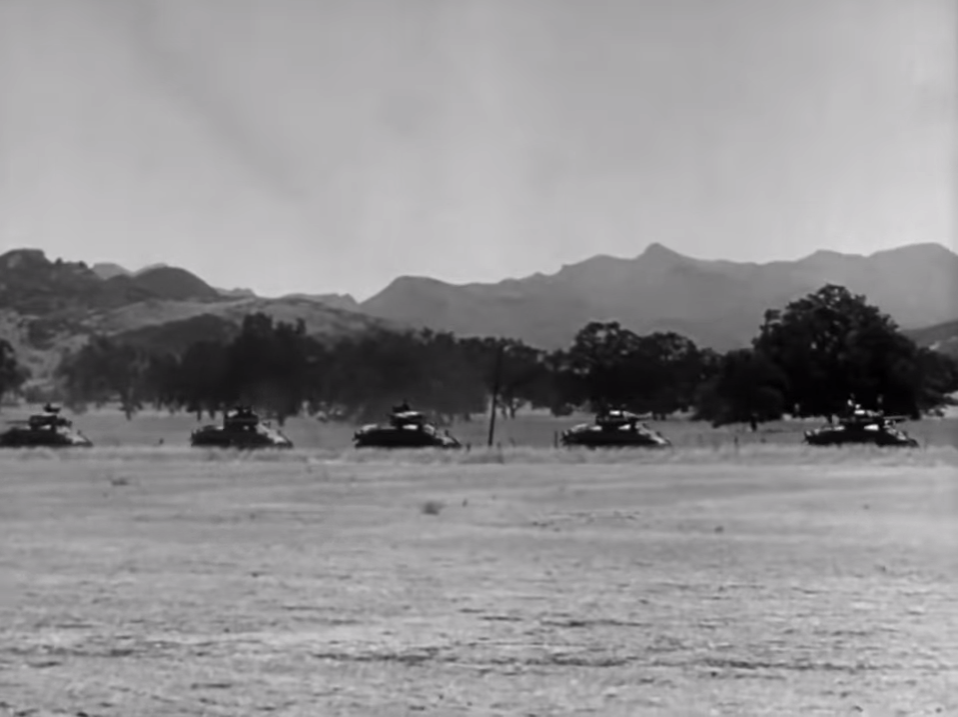
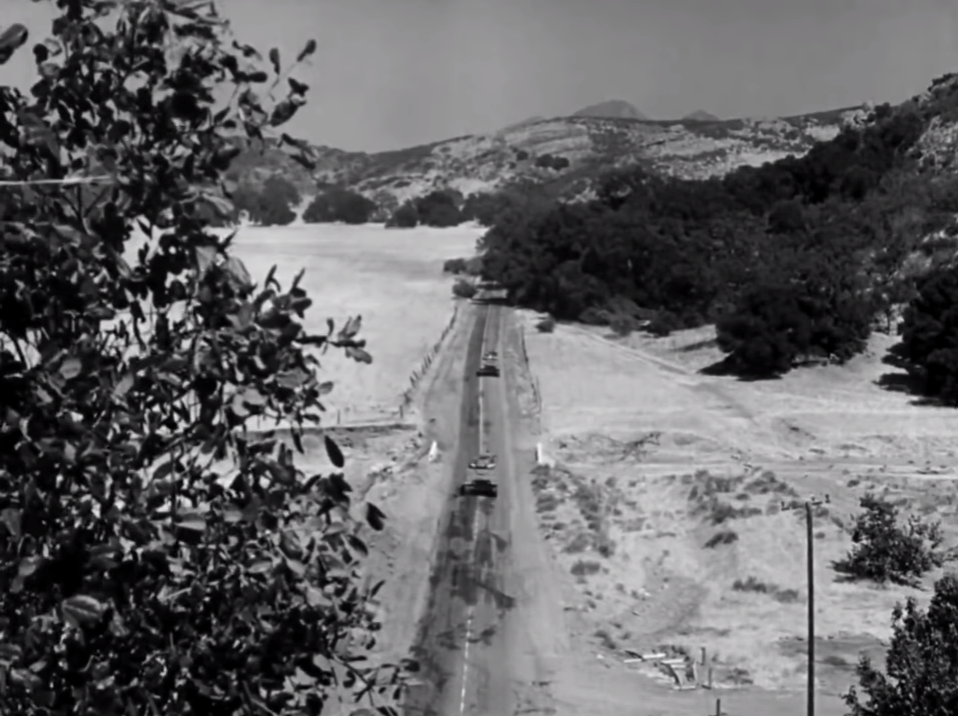
This image shows the big picture of a moving column a troops. This film only covered the role of the main body.
It is an Official War Department Training film, number T.F. 21 2035, and I want to make sure and thank Jeff Quitney for putting it up on YouTube! I had never seen it before so it was a real treat. He has a lot of other good content up on YouTube as well so check it out.
Now let’s talk about the contents of the Training Film.
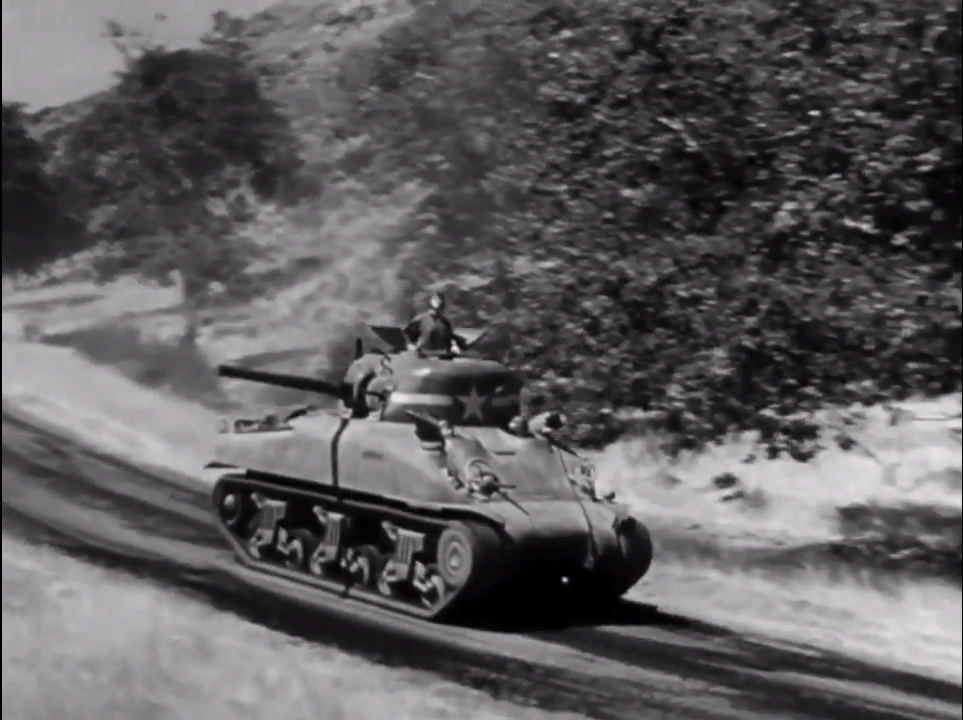
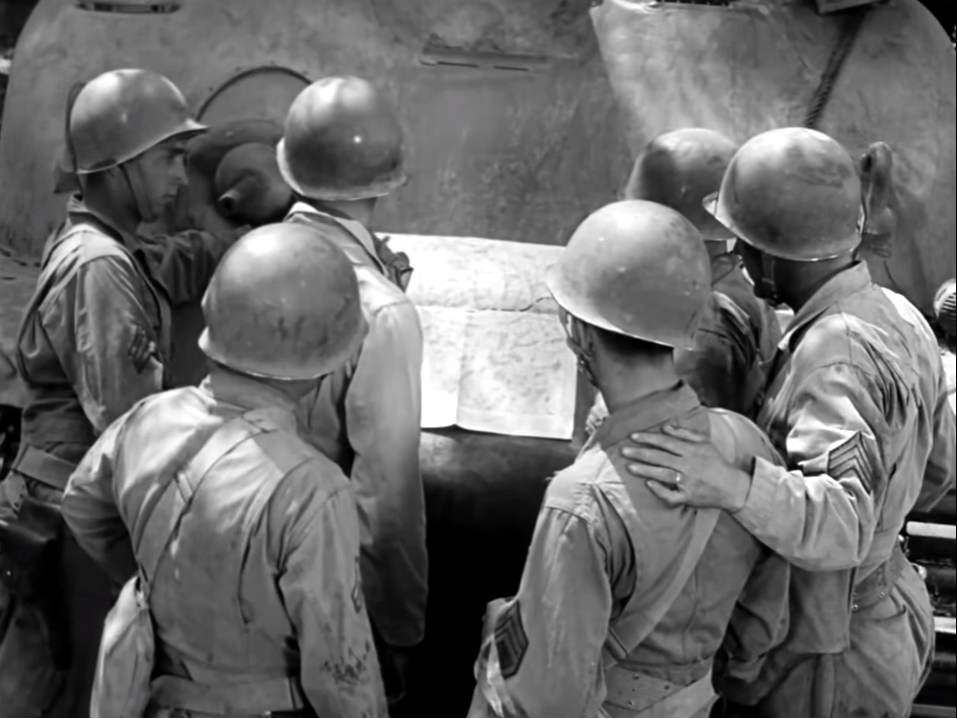
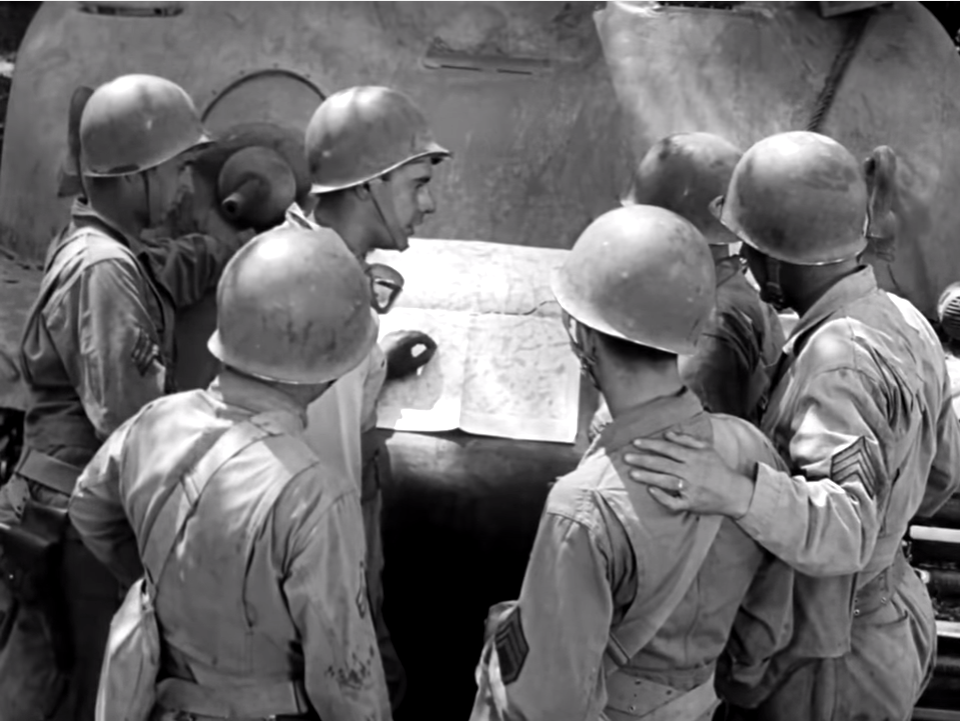
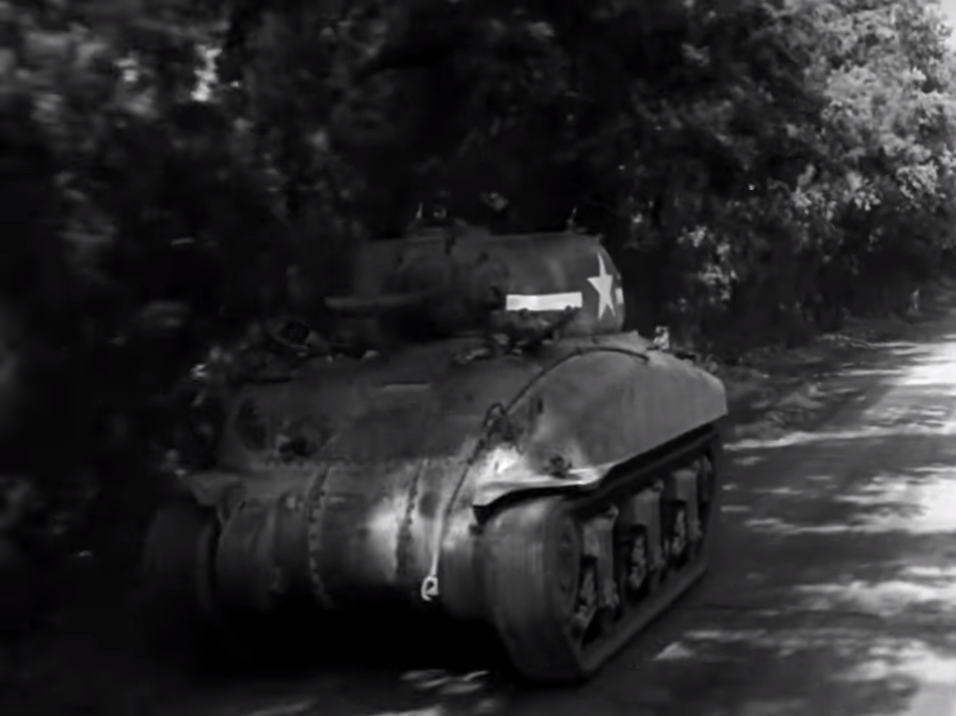
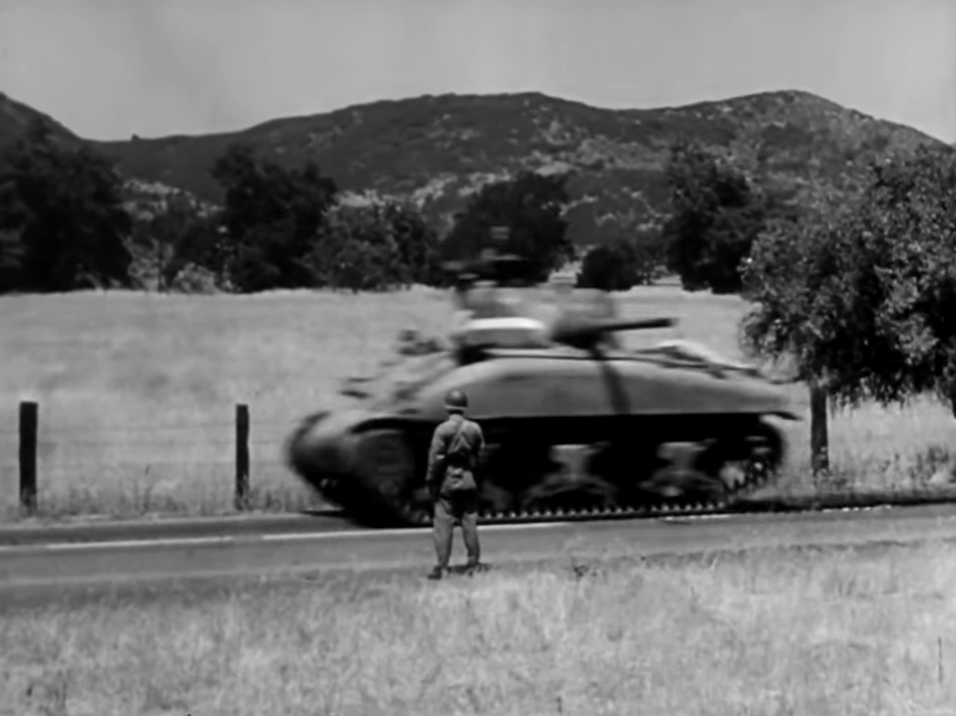
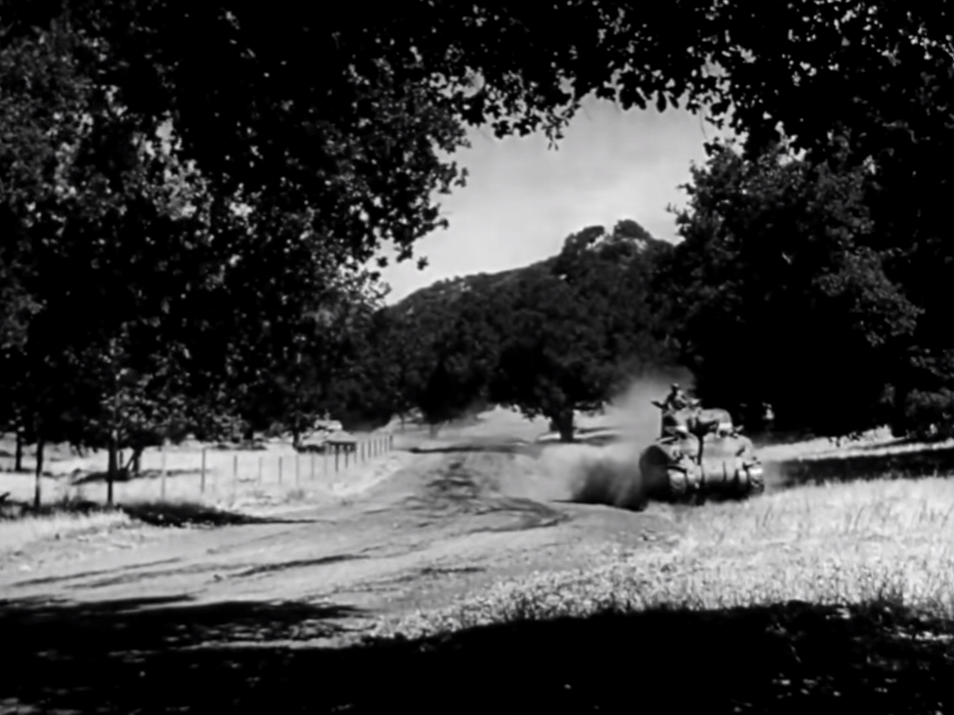
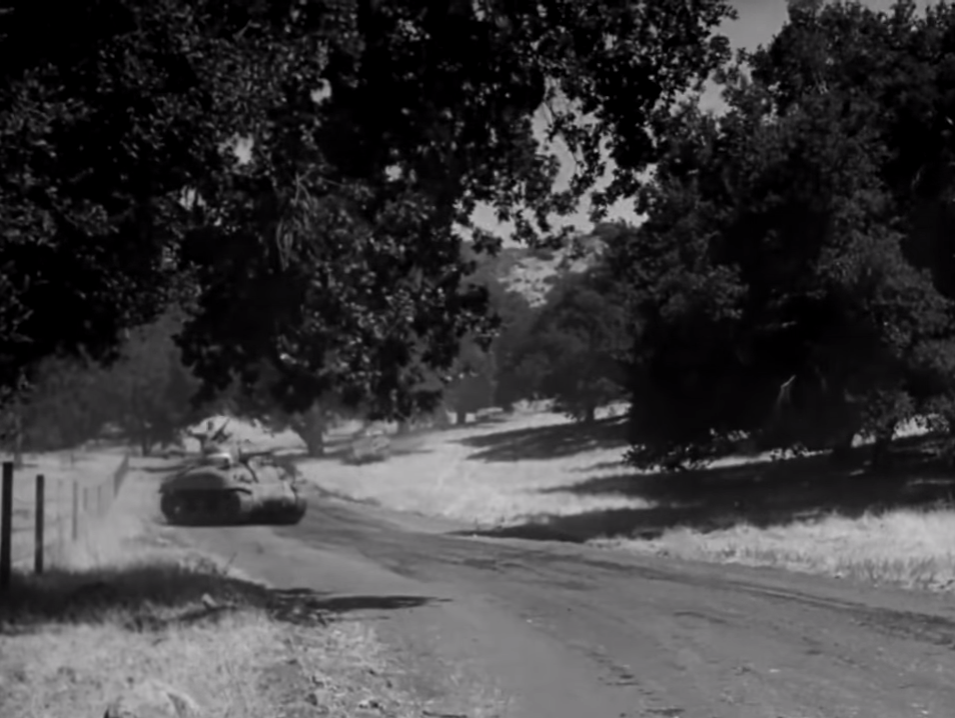
Right off the video starts off with a M4A1 driving by on a dirt road, it’s going at a good clip, and you can just make out another M4A1 trailing behind it at a few angles. The next shot shows a tank crew in front of their M4A1 going over a map with commander, and it just keeps getting better. I took well over 100 screen caps watching this film.
The training film makes it clear there are the five things that need to be kept in mind at all times to make a road march safe.
Advanced prep
Alertness
Concealment
Dispersion
Firepower
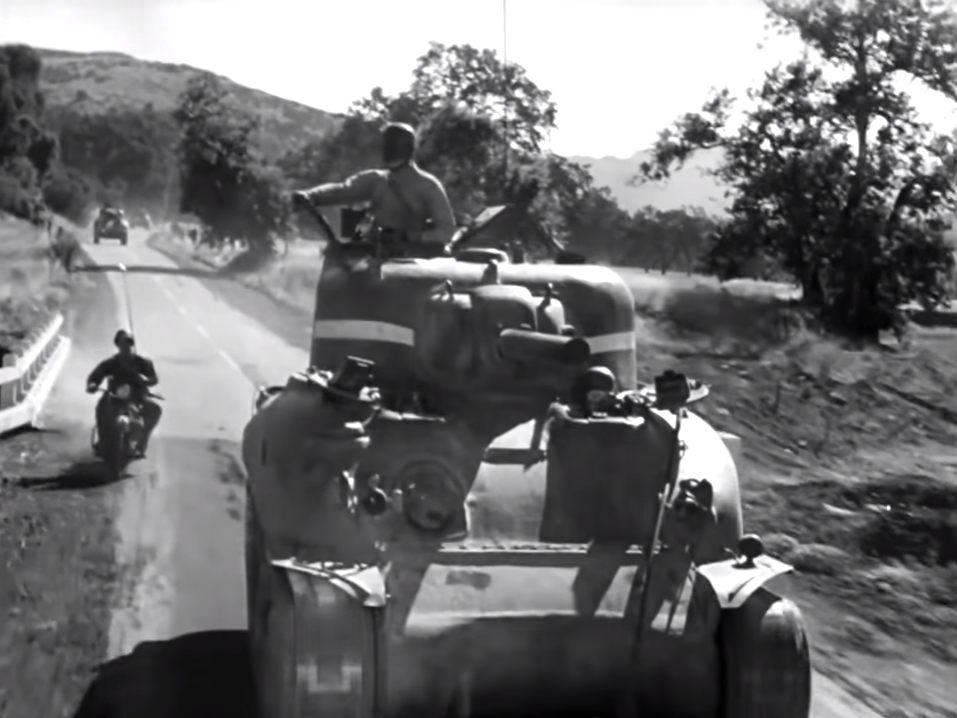
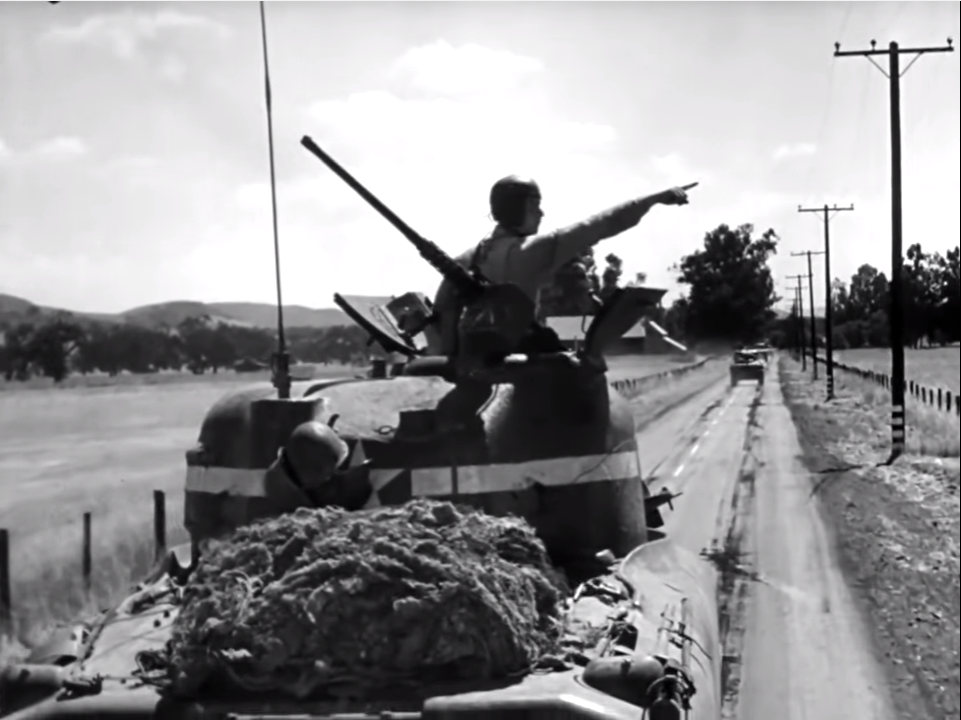
The enemy’s goal in an ambush would be to get to the main body of the column, and the film talks about how they should move, and covers things down to where each vehicle is to point its gun, to be prepared for an attack that might come either from the air, or ground. The film focuses on the actions of a single, five tank, platoon in the main body of the column, and then covers each of the five steps previously mentioned, and how that platoon would do them.
Advanced Preparation: Because good prep makes for smooth operations.
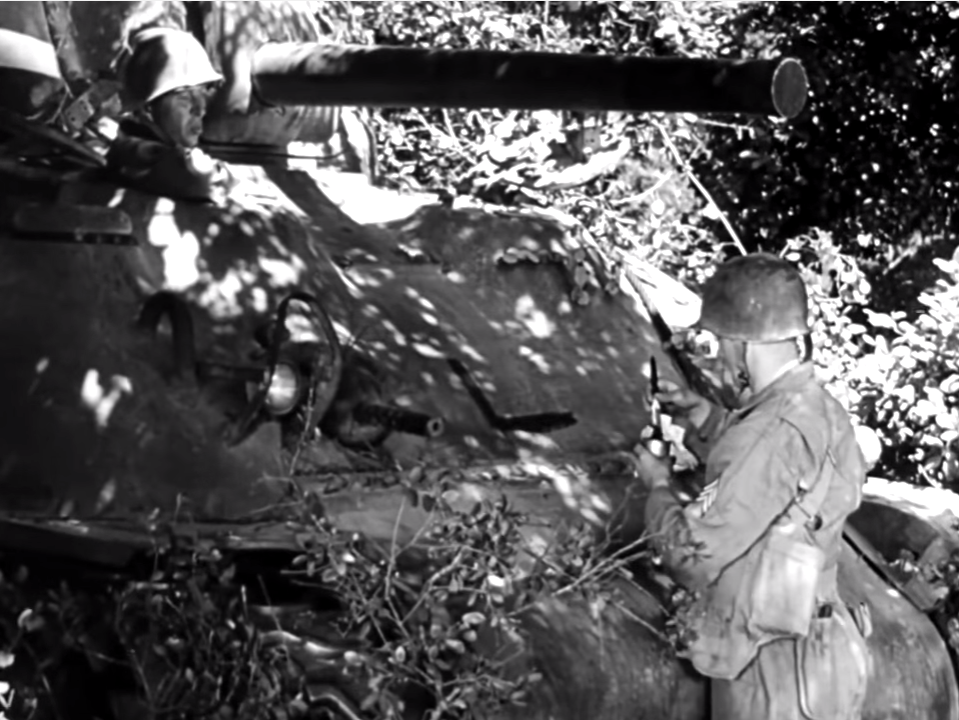
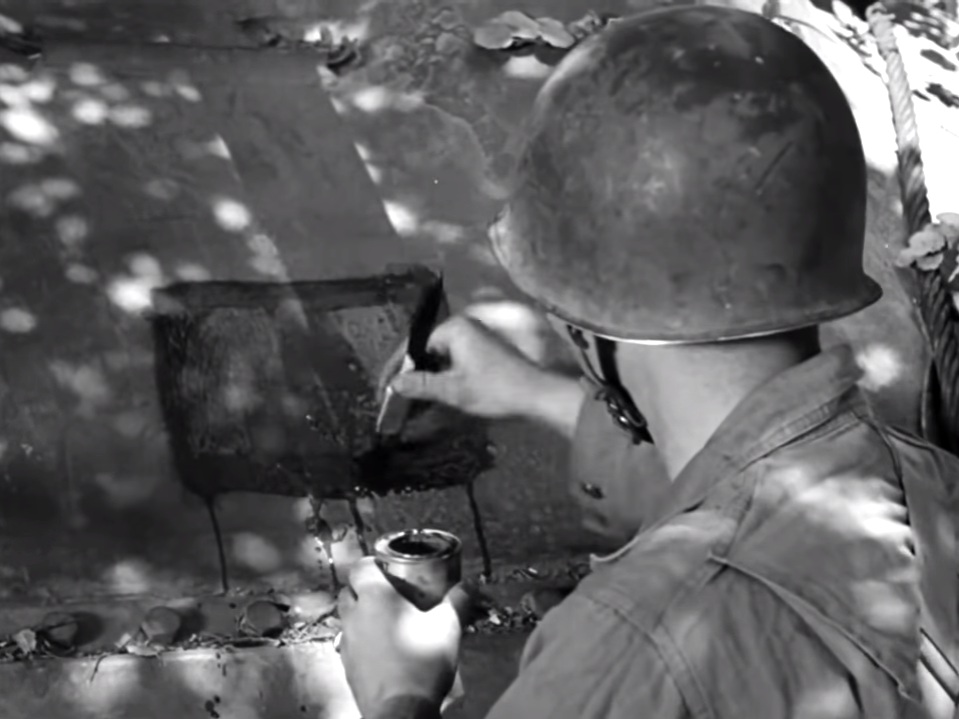
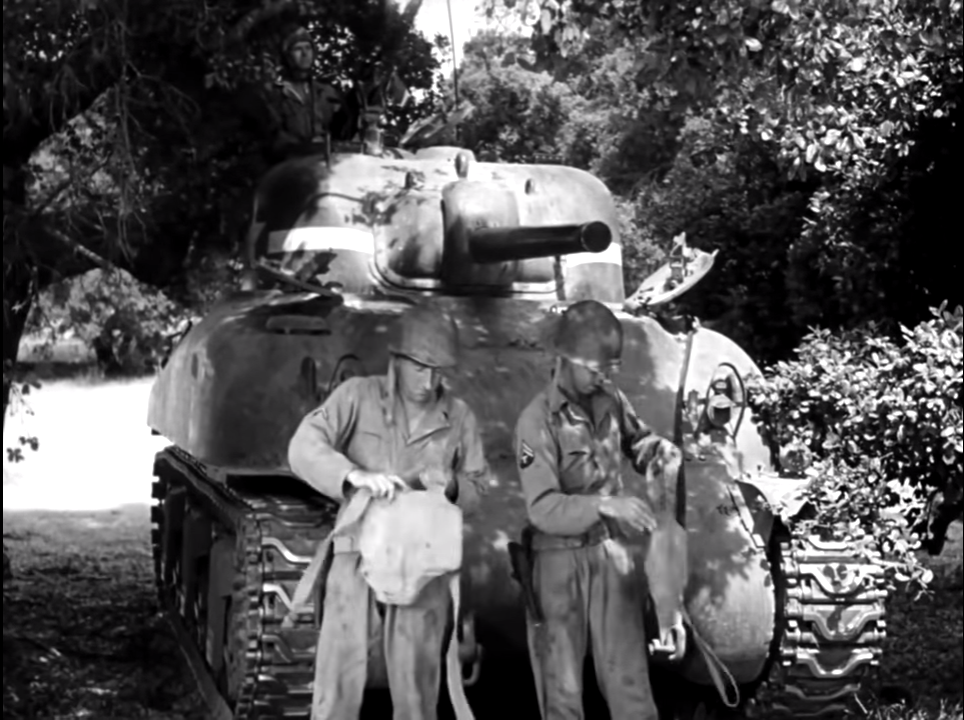
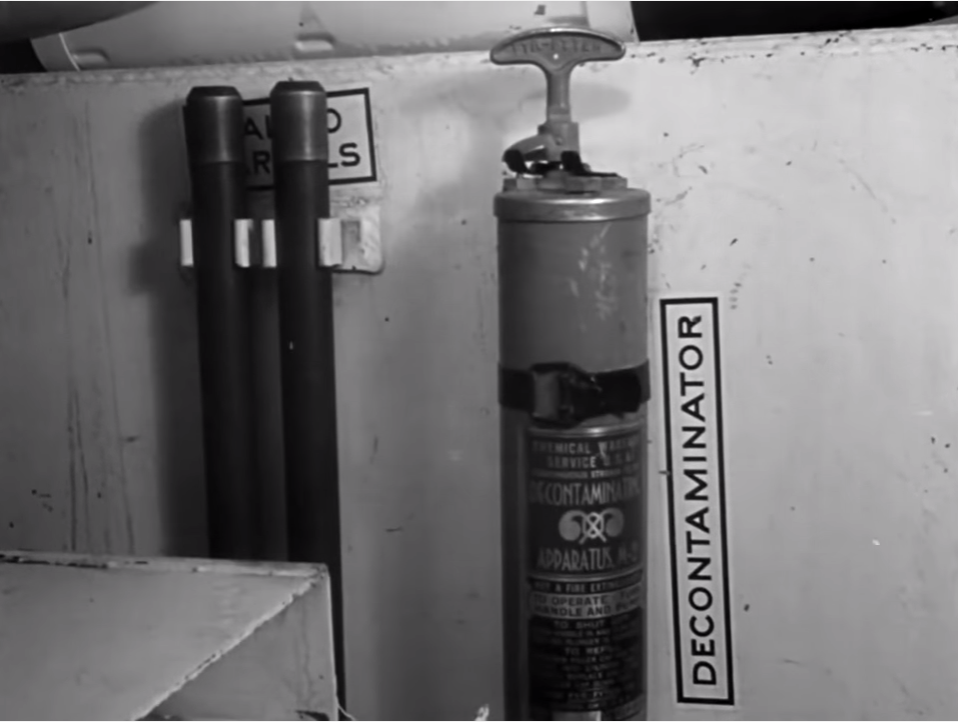
Be ready for gas, liquid vesicant detector paint, this pain, turns green to red when vesicant gas droplets touch it. A large square of this stuff was painted on the front of the tank. Then the decontaminator stored in the tank could be used to spray down the tank. The crew was also issued gas masks, and this was the time to make sure they were in working order.
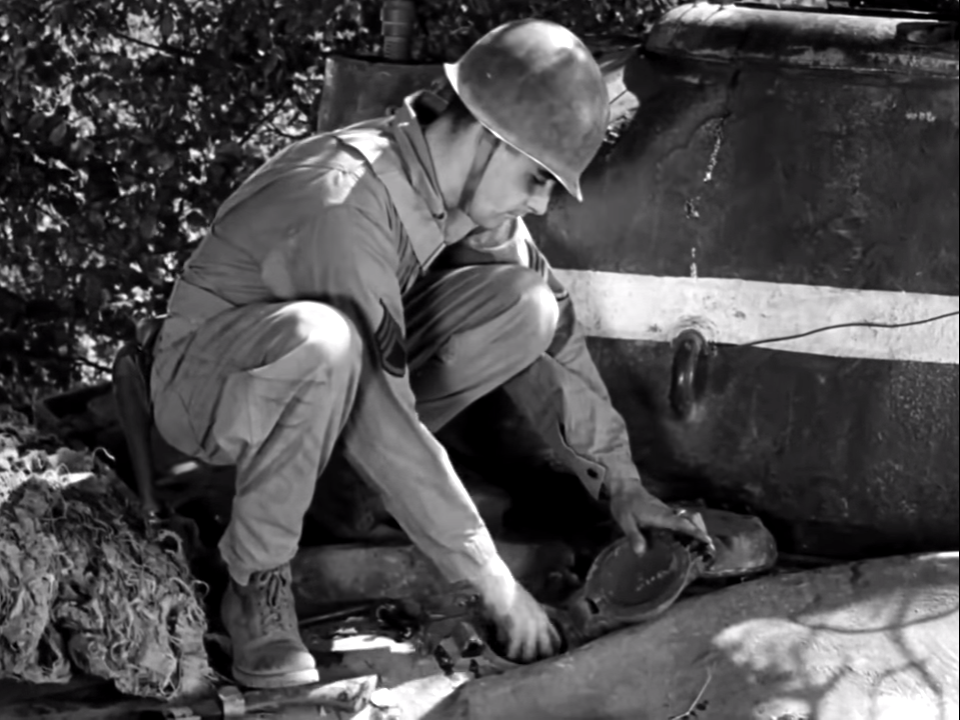
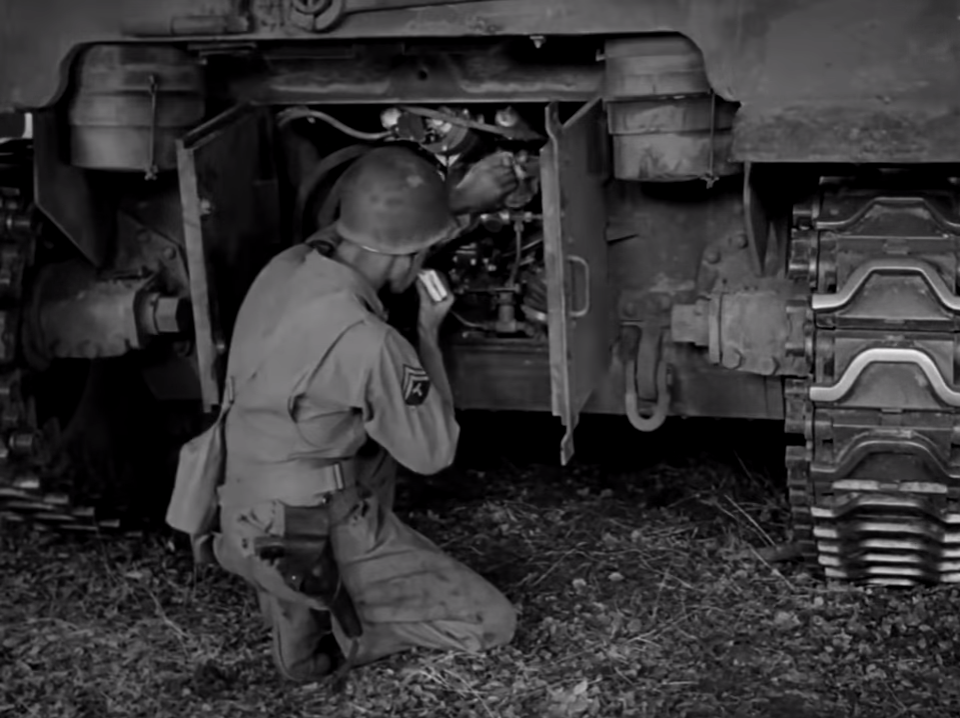
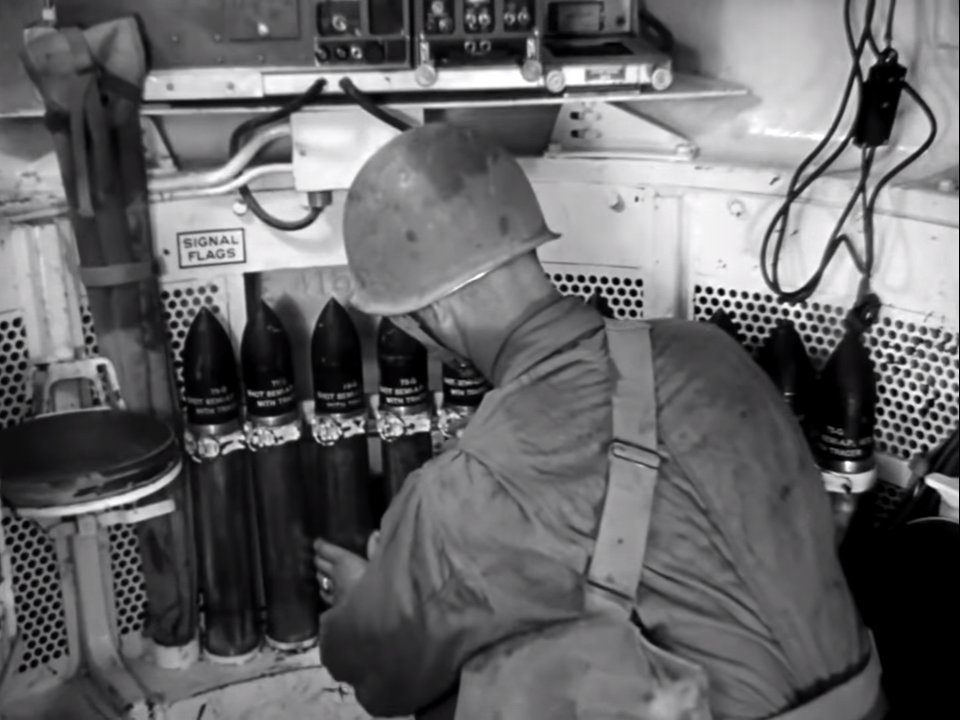
Check the tanks readiness out. The Commander needs to check the tanks fuel level personally. The Crew, checks the engine out, checks the tracks, and checks out the ammo load. Do not leave with an empty ammo rack if ammo is available. Main gun rounds should be clean and undented.
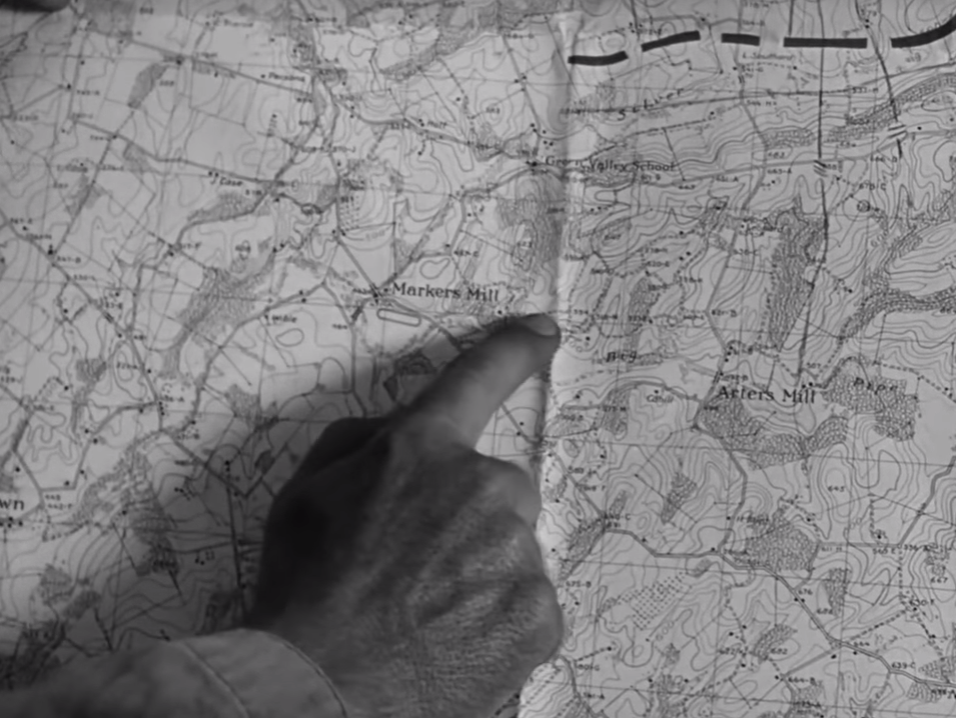
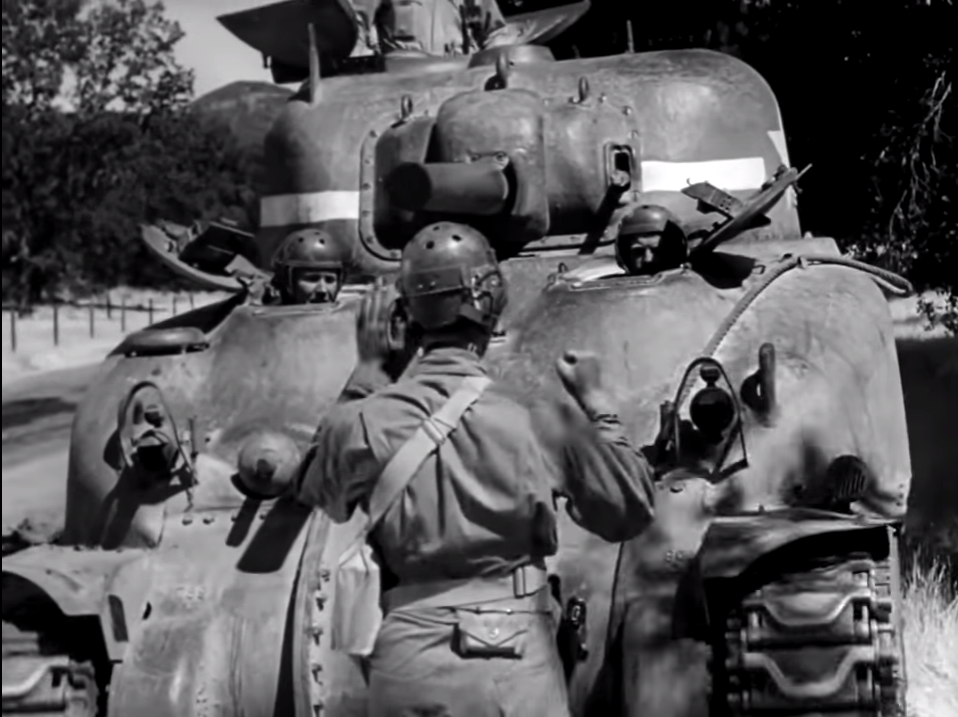
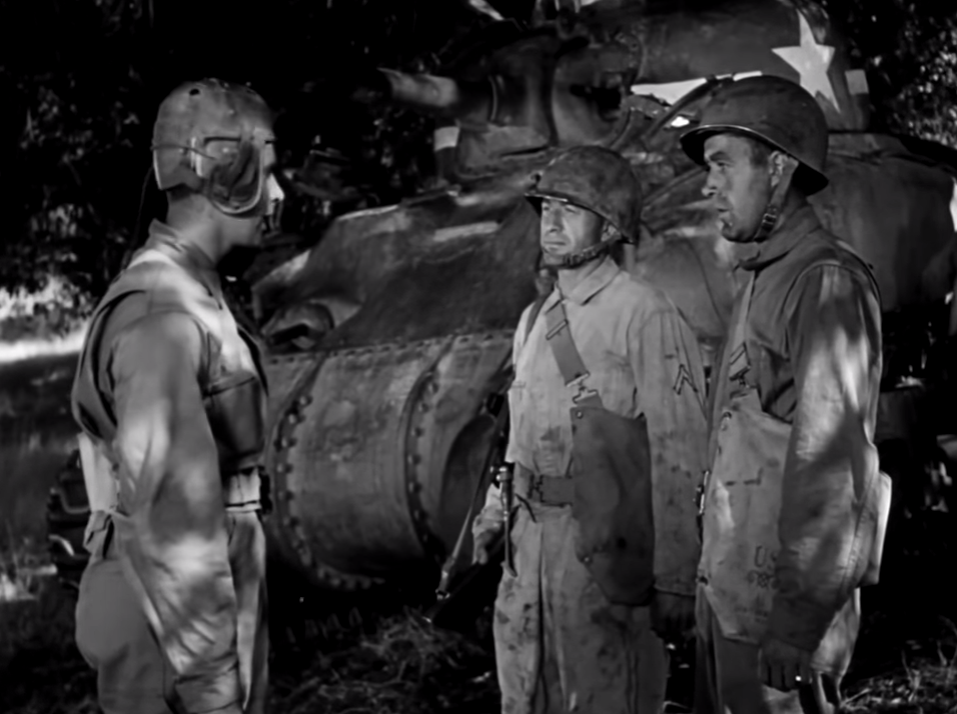
Platoon leader review whole route on the map with all tank commanders. Cover all points of interest along the route, likely ambush spots, landmarks, areas of good cover for rest points etc.Each tank commanderwill then pass all this info along to all his crew members, ensuring they can all fill in for each other. If one tank has to fall out for any reason, its crew knows the whole route and plan.
Alertness: Because surprise is the enemy’s best weapon, always be on guard for attack, air or ground.
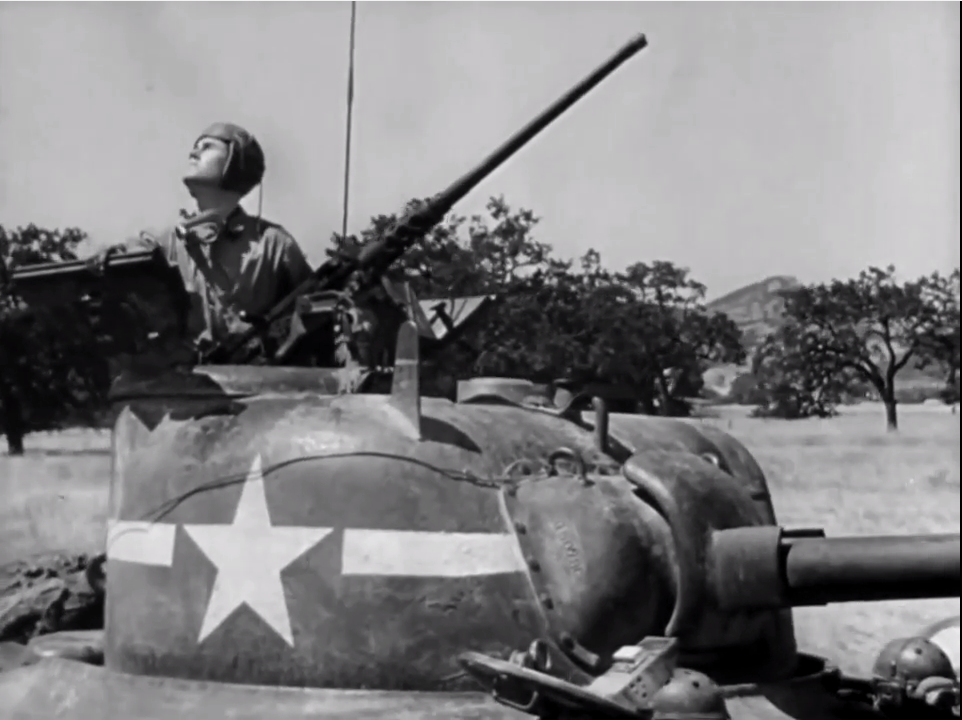
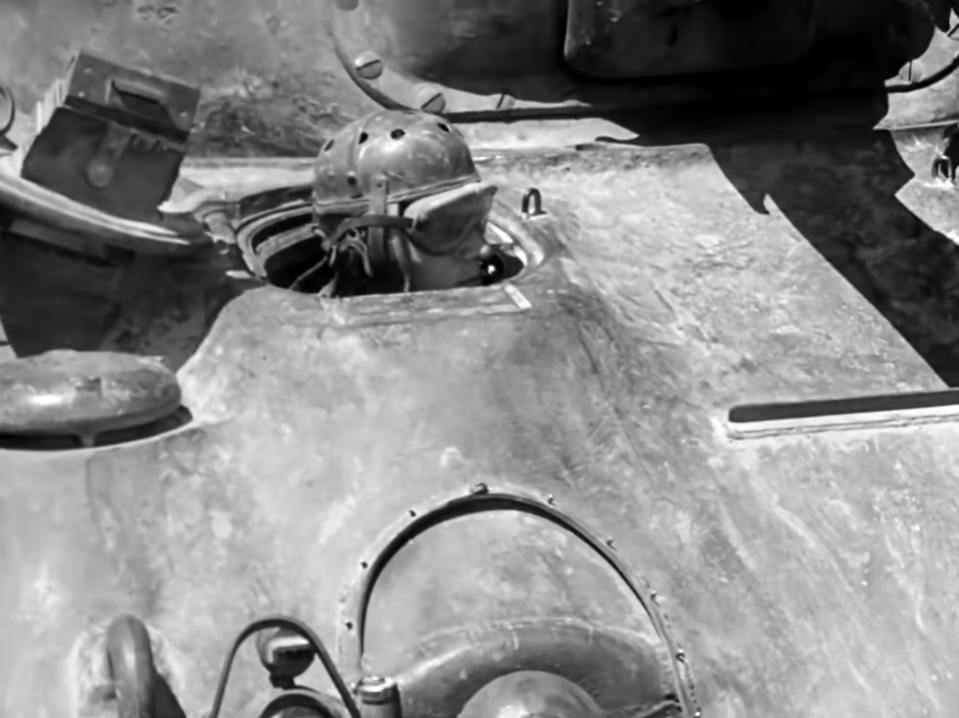
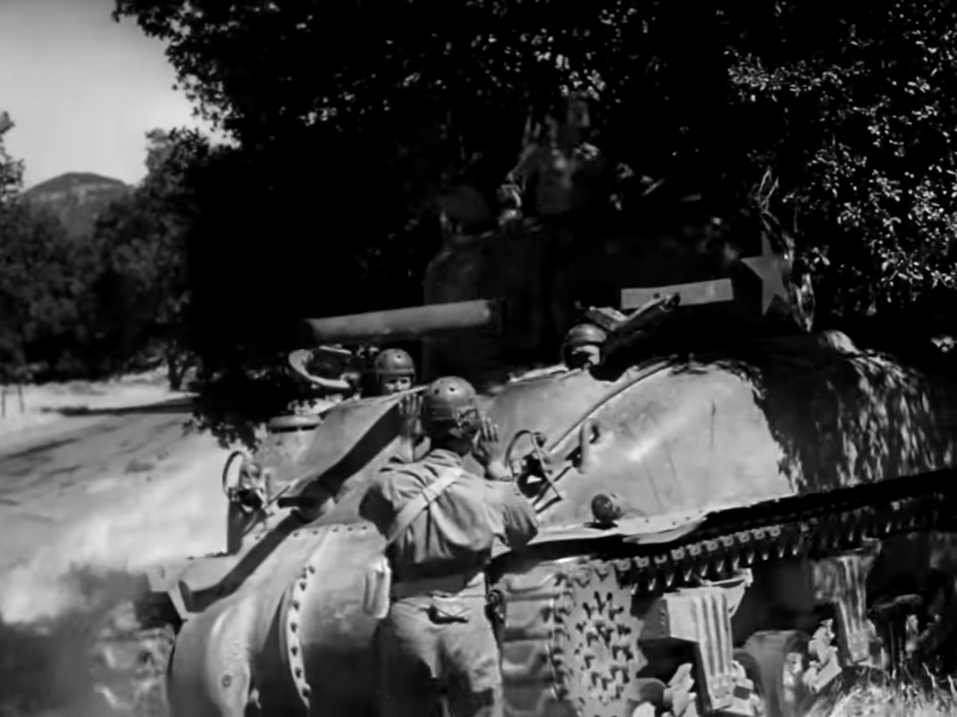
Every man in each tank turret is an air observer, the Tank Commander should always be looking around the tank, scanning the ground and air, and looking back. The Co-Driver should be watching the flanks, because the Driver is watching the road. The gunner and loader should be using their periscopes, all scanning for an attack.
The crewmember in the turret hatch needs to be alert, so when the commander is tired and needs to take a break, the gunner or loader will swap places with him. The Commanders position, no matter who is manning it has to be ready to receive signals from the platoon or company commander and pass them on, be they flag, or hand or radio. He also has to be able to see a messenger that needs his attention. The Loader should help the commander tend the radio, and the crew should listen to the radio to keep informed.
Concealment: Keeping a 32 ton tank as hidden as possible!
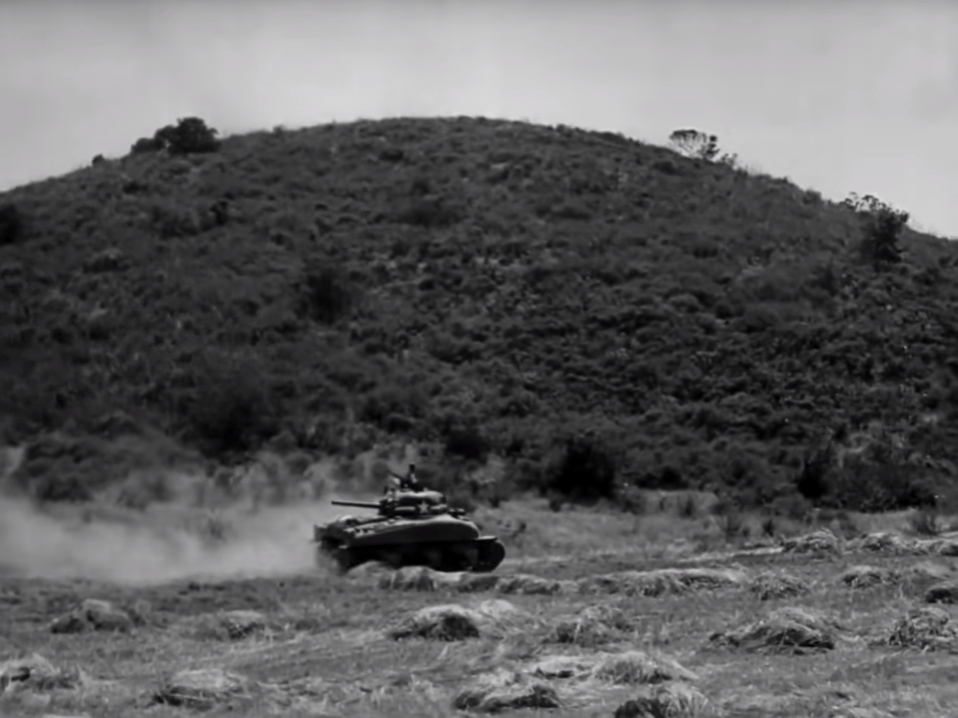
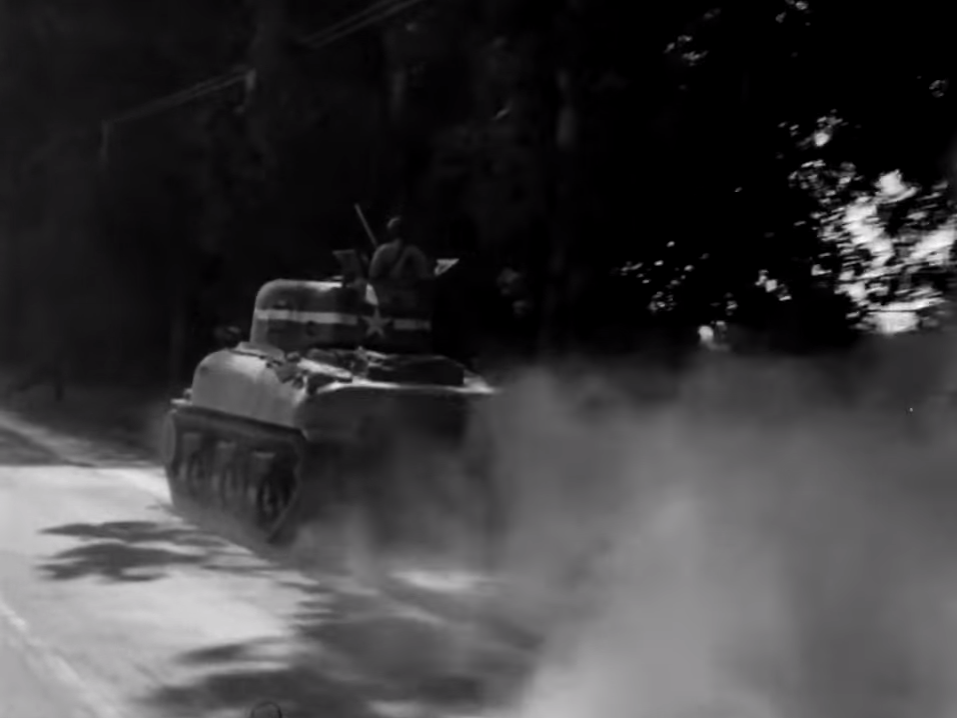
Dust is bad. You can’t hide tanks in a dust cloud, so don’t drive on soft dusty shoulders if you’re on a road. Even if that shoulder is shady, and will make the tank more pleasant inside, the dust can be seen for miles. Sometimes it can’t be avoided, but try to do so as much as possible. Line formation is best for use in places dust cannot be avoided. Driving at a slower speed can help minimize dust as well.
Shielding Terrain is to be taken advantage of anytime it won’t produce large amounts of dust.
Shade is ok is it does not make extra dust, and can help hide you from air observation.
Your goggles can reflect light for miles; if you’re not wearing your goggles store them in the tank. If they are needed to protect your eyes, they should be covering them. This applies to any shiny object.
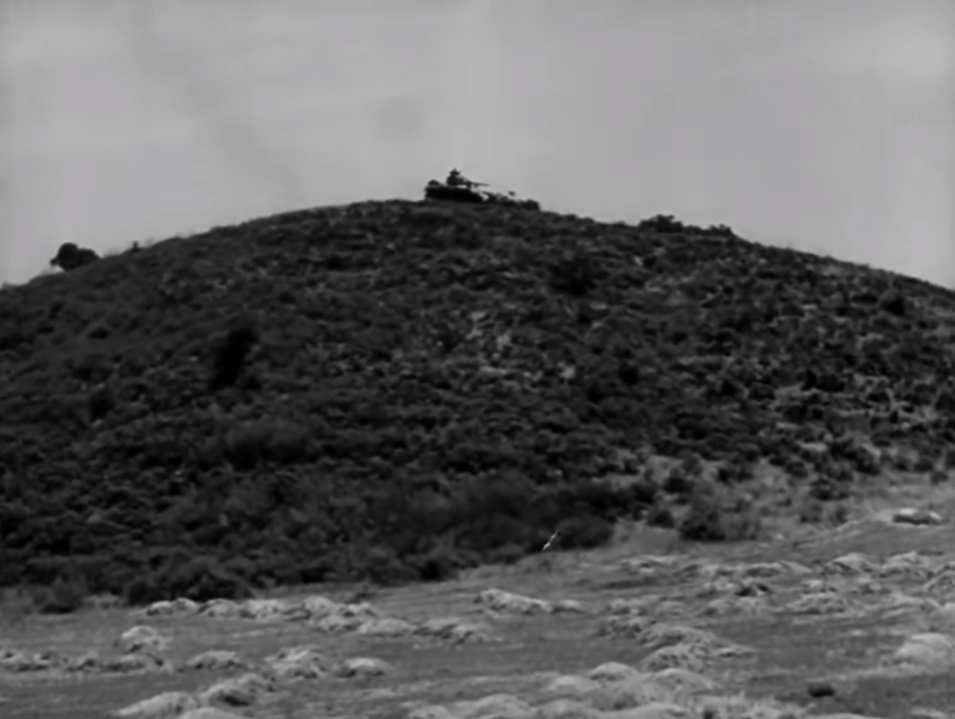
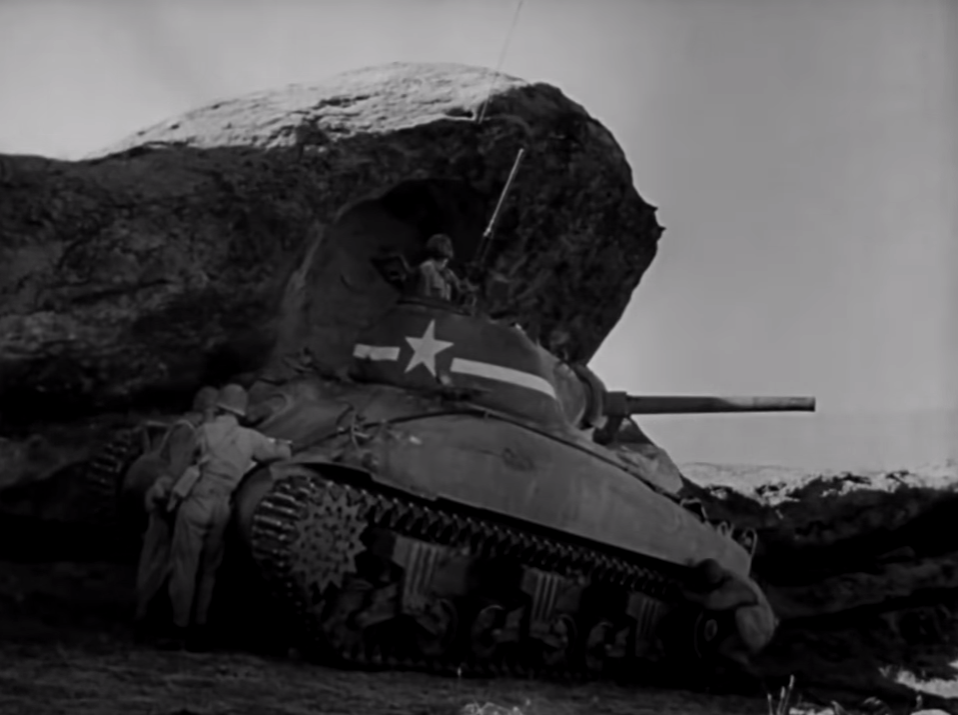
Do no silhouette your tank on a hill or high ground. Drive around the base of the hill. If you have to drive on a hill stay below the crest.
Dispersion: Bunching up is bad, if you are to close one artillery round, or bomb can damage multiple vehicles.
Bunching up like a bunch of cows with their tails in the breeze is bad. This makes you a big target.
Proper daylight spacing is at least 75 yards between tanks. If visibility and terrain allow, you can have more than 75 yards, but never less. In hilly terrain it is easy to bunch up, keep your eyes on the tank in front of you if it starts slowing down; you will have to as well.
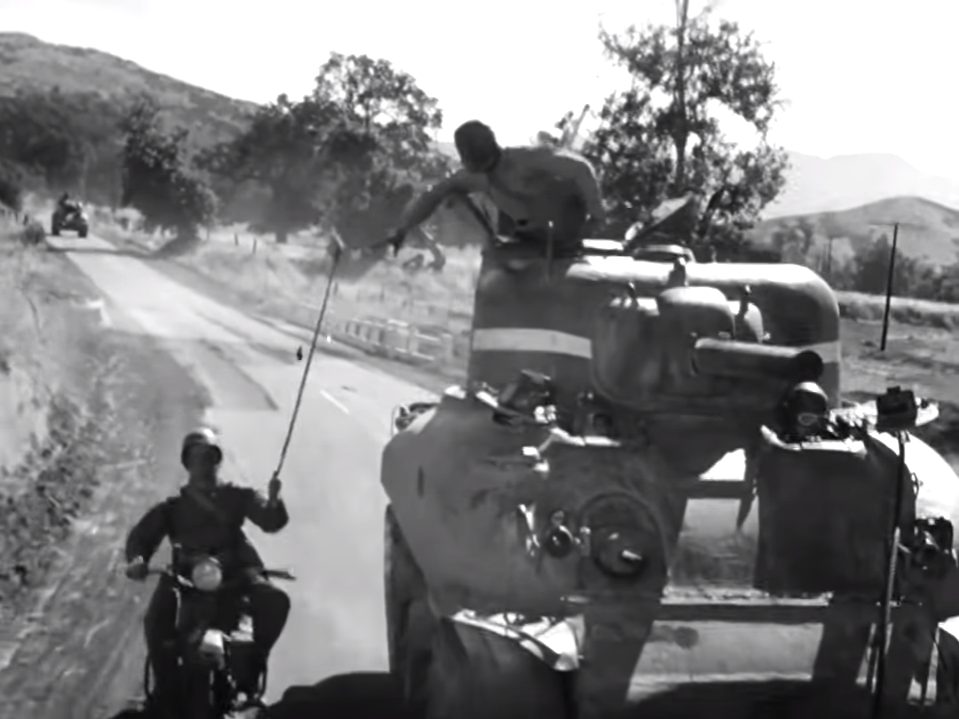
Falling Out. If your vehicle has to fall out for some reason, engine troubles, or some other issue, make sure you pull far enough off the path to not cause a bottleneck on the path, and slow the rest of the column. Make sure and signal the column and platoon so they know what is going on. Don’t try and catch up, wait for a halt, then retake your position. Fall in with the rear guard until the halt.
Firepower: A Sherman tank packs a lot of punch, keep it ready, it’s your ace in the hole
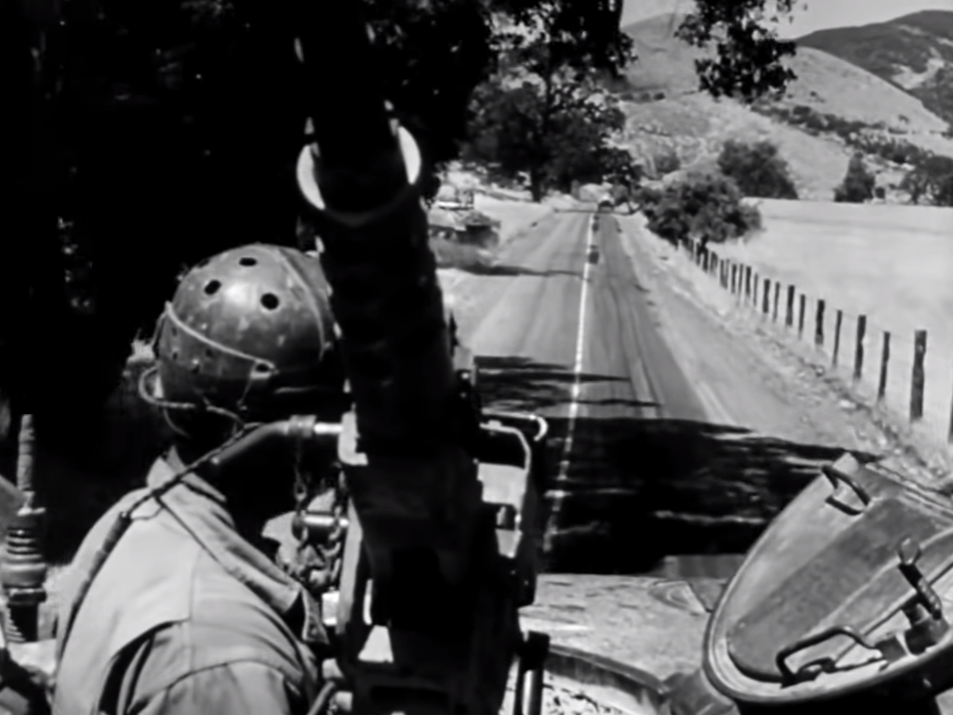
The main gun should be trained out and ready, but not loaded. The lead tank and the next in line keep their main guns aimed straight ahead. The third tank in line keeps its gun trained out to the right. The fourth tank keeps its gun trained out to the left. The fifth tank will have its main gun traversed to the rear.
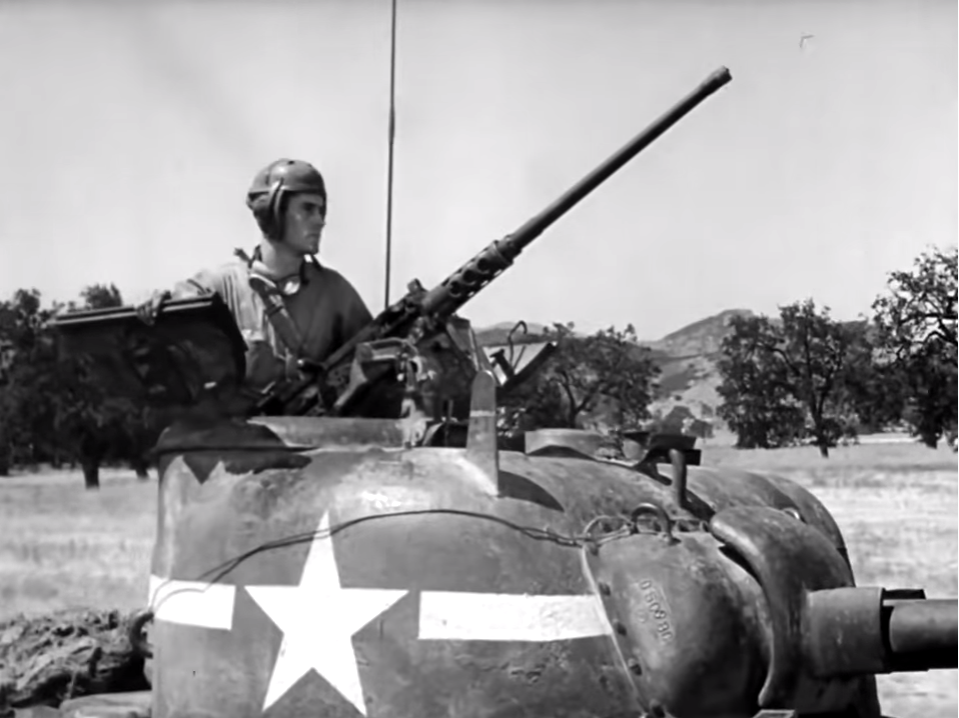
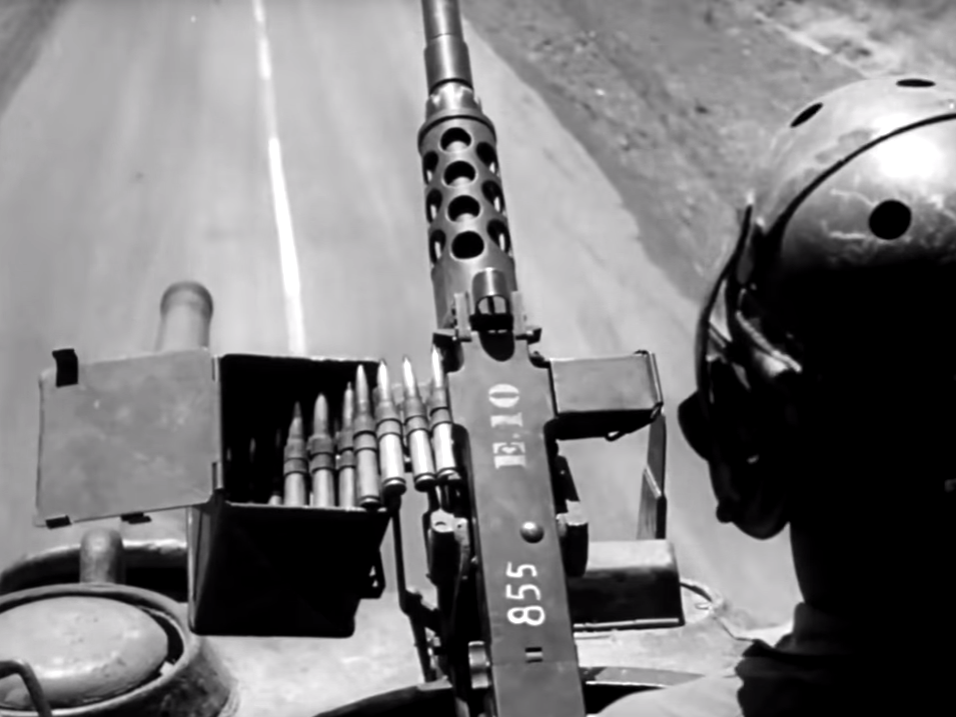
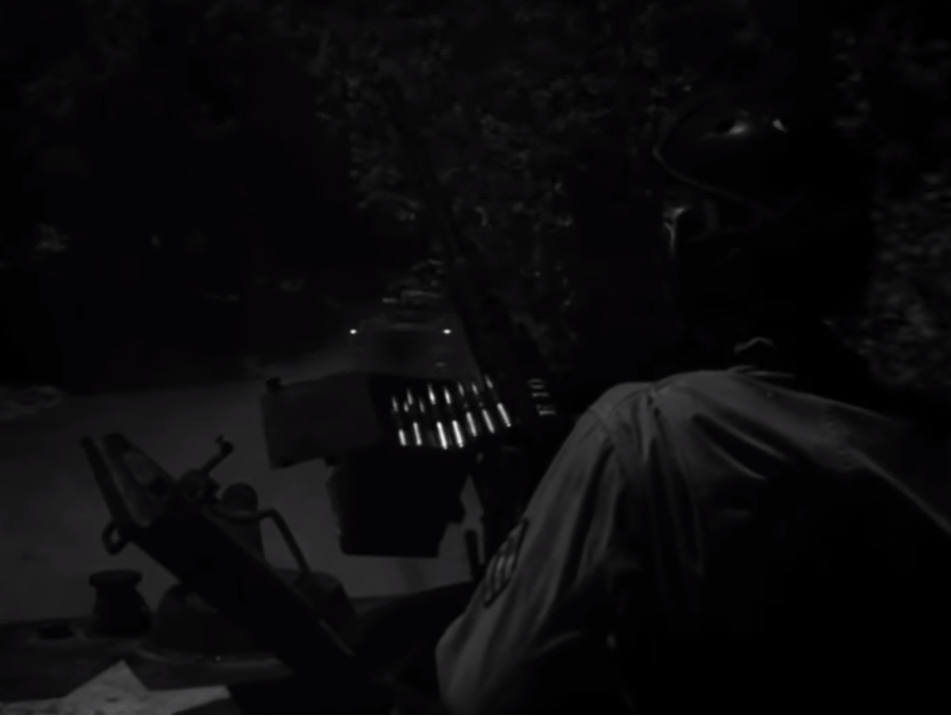
M2 .50 anti-aircraft guns should be kept half loaded, so they can be quickly brought to bear on any attacking aircraft. To keep the column covered, alternating tank commanders look forward and to the rear during air attack.
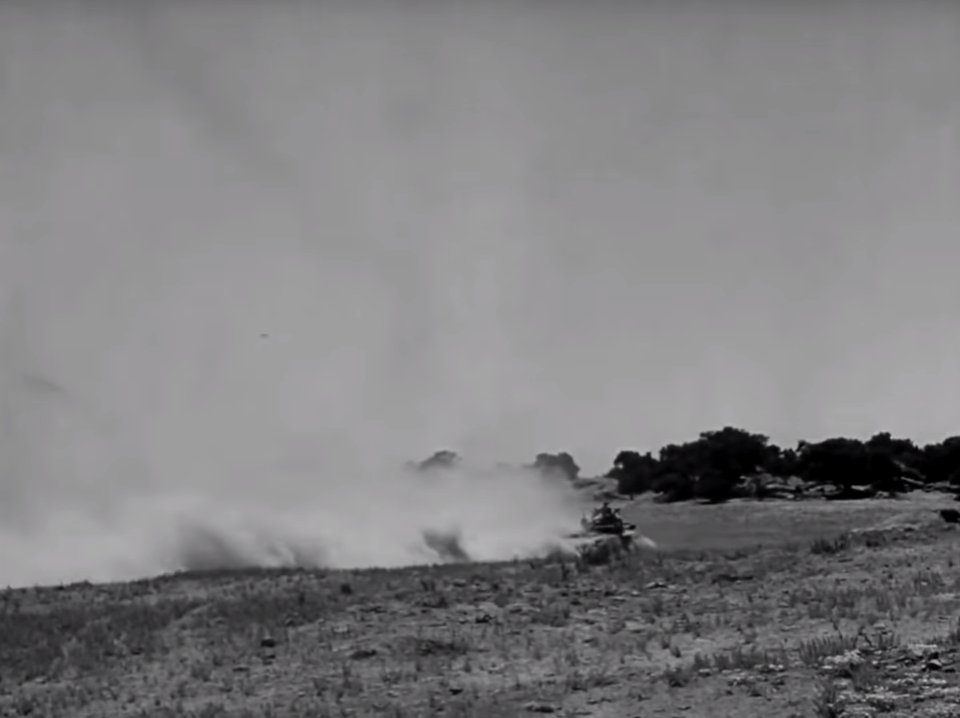
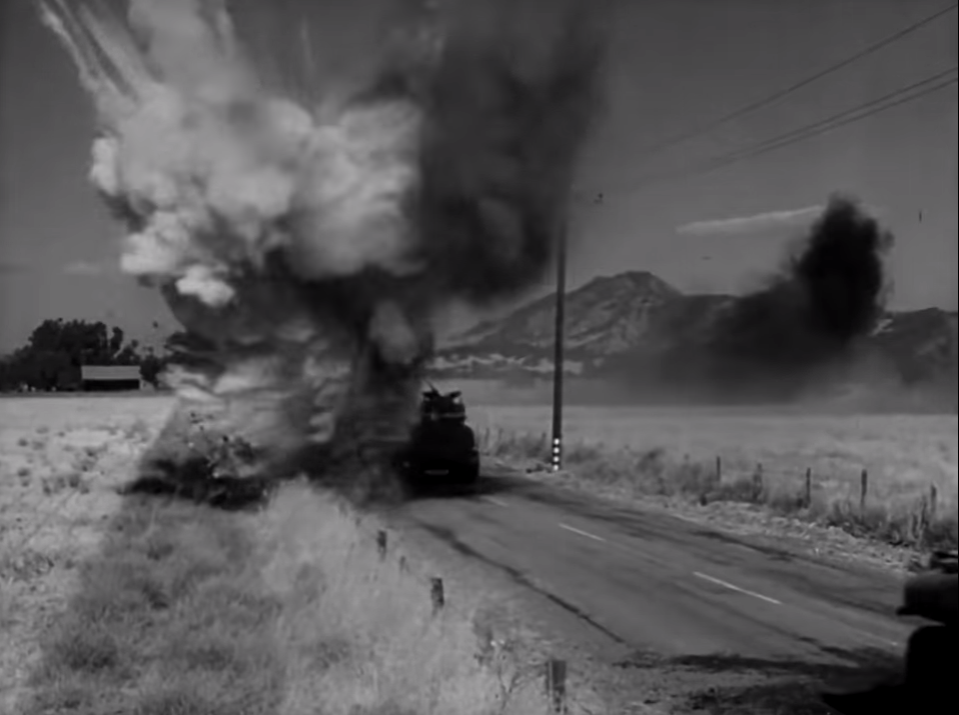
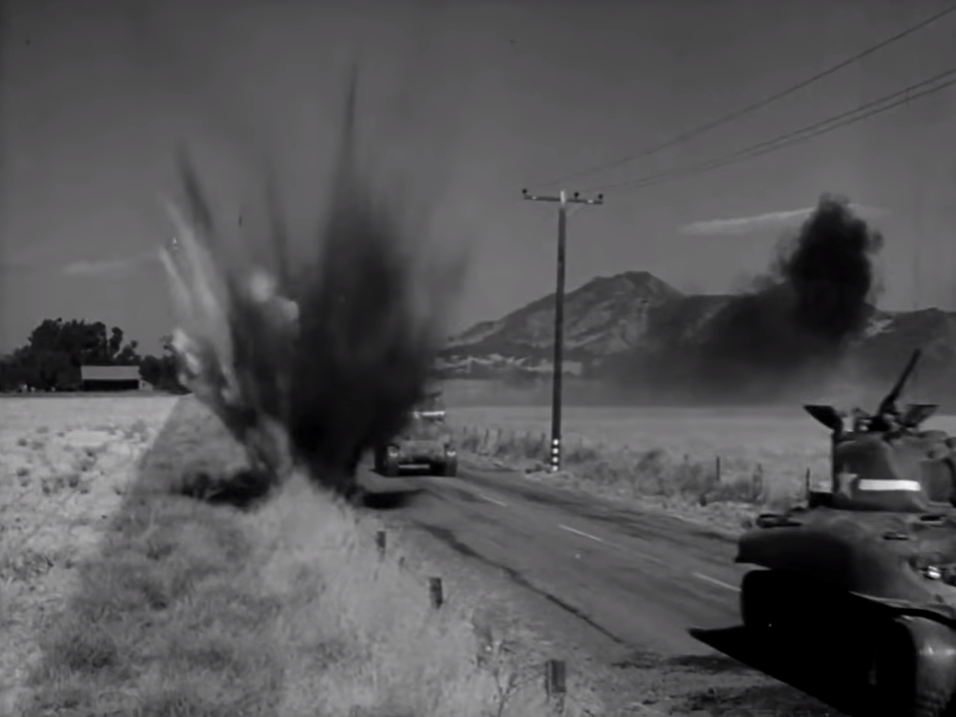
Do not halt, during an air attack. Your tank is much harder to hit when moving. Even if you have good concealment, do not stop. When a plane is sighted signal the rest of the column, close all hatches but the commanders, alternate the .50 AA guns and engage the aircraft.
Report the results of any air attack up the chain of command. TCs report to Platoon Leaders, Platoon Leaders to Company Commanders, etc.
Halt security: Units on the move have to stop, for human reasons or mechanical ones, and you can’t just do it willy-nilly, there’s a plan for that too.
There are two kinds of stops a unit on the march will make. The short ten minute halt, to check the tanks out, for the crews to stretch their legs, no major maintenance will be taken on these short halts. The second kind is the Long halt. On the long halt, the tanks can be repaired if anything major popped up and refueled, and the crews could get some chow.
Security rules and things to note on the short halt:
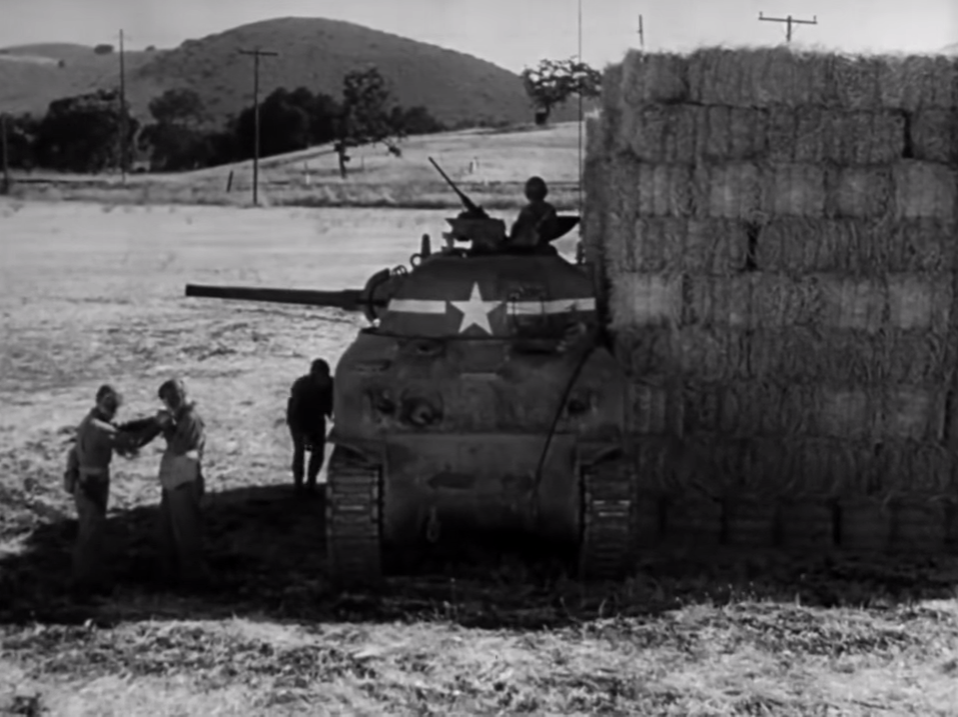
Check the ground where the tank will be parked, make sure the tank won’t get stuck, or sink in. Back into the spot so you will not have to back out if the tank needs to move out in a hurry.
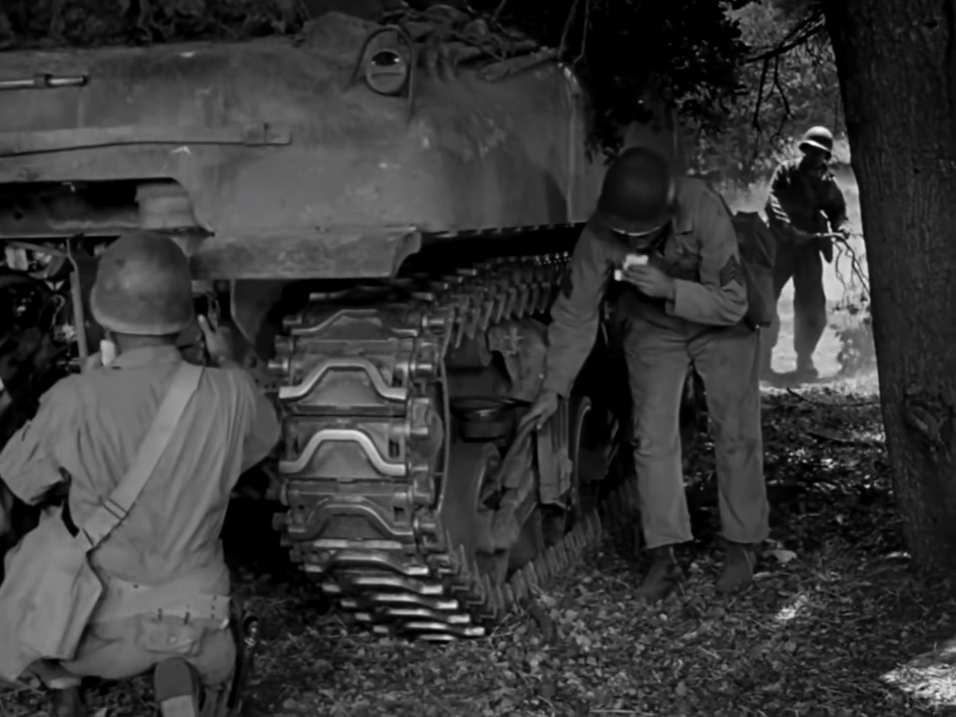
First Echelon Tank Maintenance should be done on the short halt, check the tracks, tighten the end connectors, check the motor out, lube as needed.
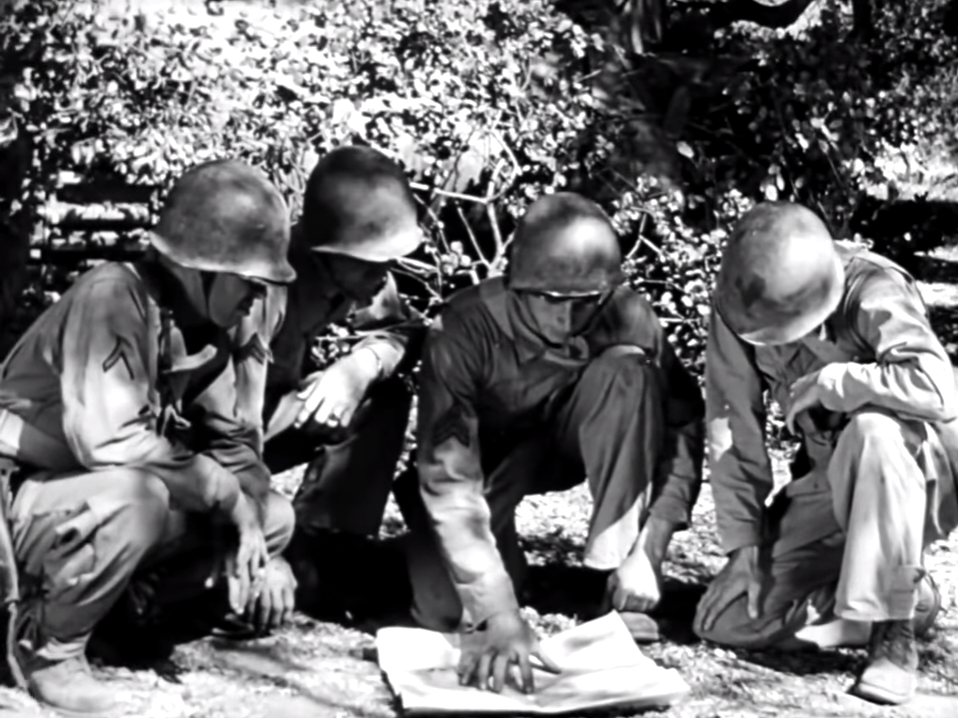
Review the course, check out the route the column is taking on the map, and review it with your crew and the rest of the platoon.
Be Alert, post guards, at least two from each crew. One man must always be on the platoon leader’s radio. Do not let the enemy sneak up on your position.
Disperse on the halt, in the same pattern as on the move; each tank is still responsible for covering the area they were covering with their main gun. Use any cover available on the halt to conceal the tanks as best possible from air or ground observation. Spacing cannot be less than 75 yards.
Each tank will have the commanders .50 manned.
When pulling out, each tank will keeps its spacing, and will not stop on the road to form up.
Security Rules and things to note on the long halt:
All the rules for a short halt apply
You can pull further from the road on a longer halt. A guard has to be posted near the road to receive any signals though.
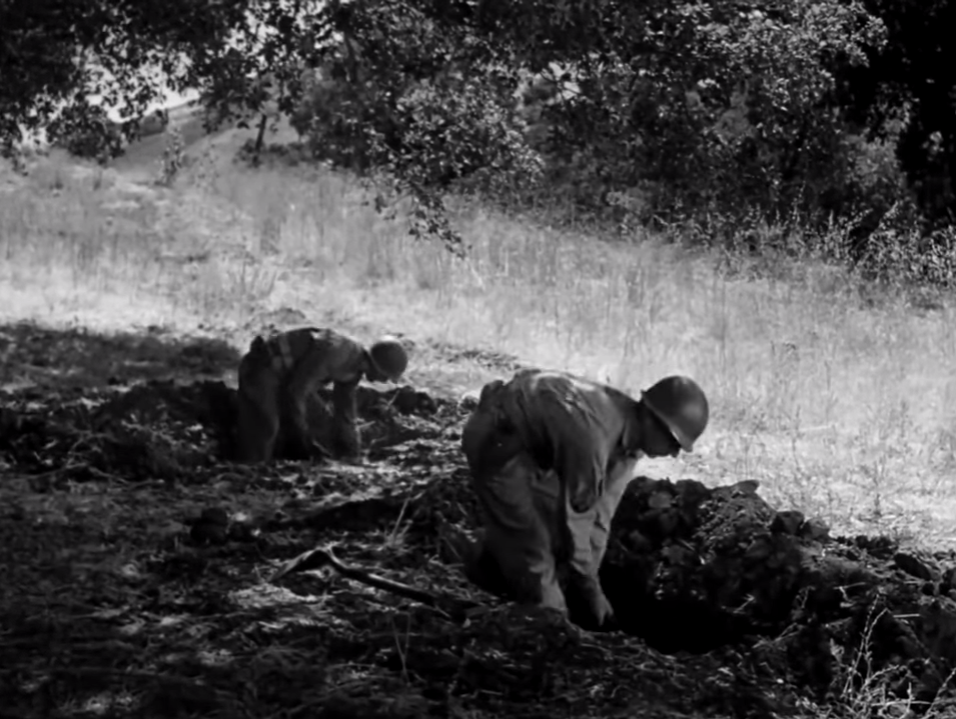
Dig Prone Shelters, you might not be able to get back into the tank in a surprise air raid or artillery attack.
Eat while you work, you never know how long the halt will be.
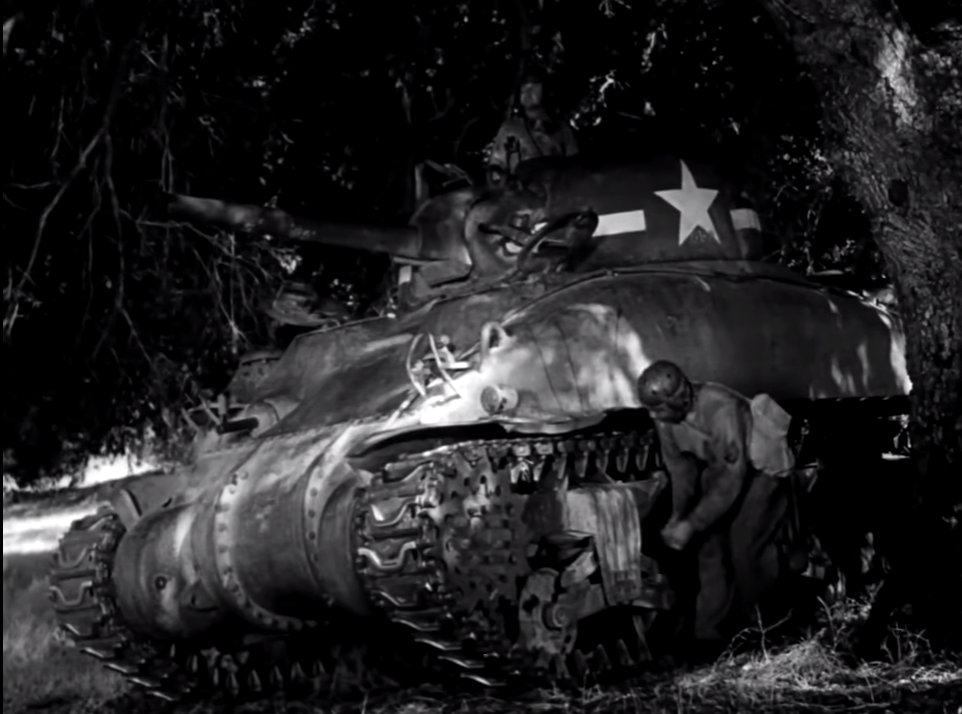
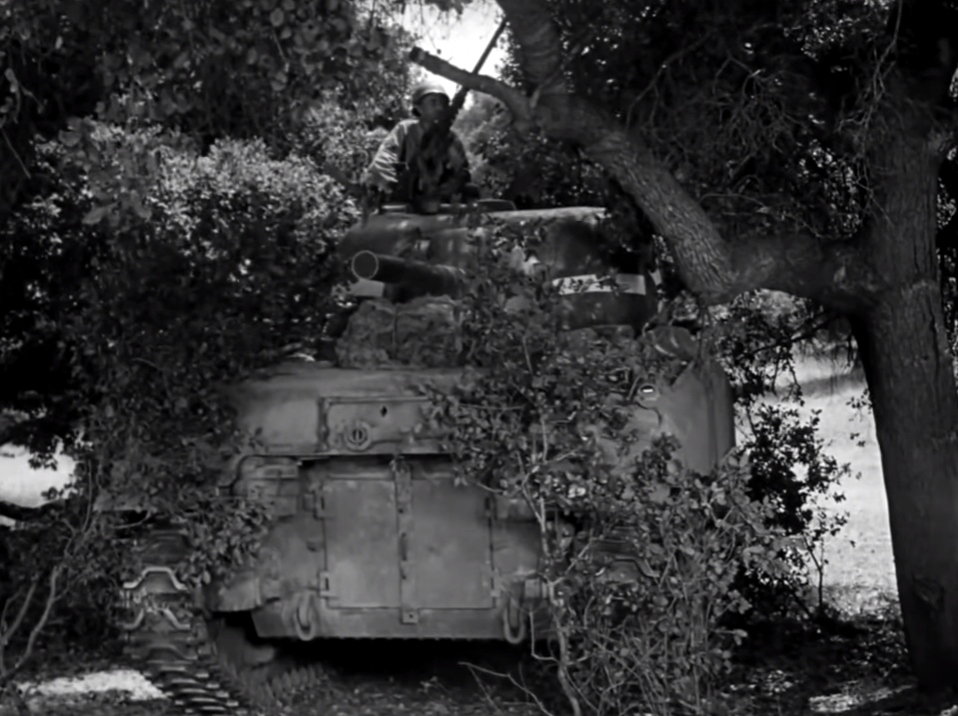
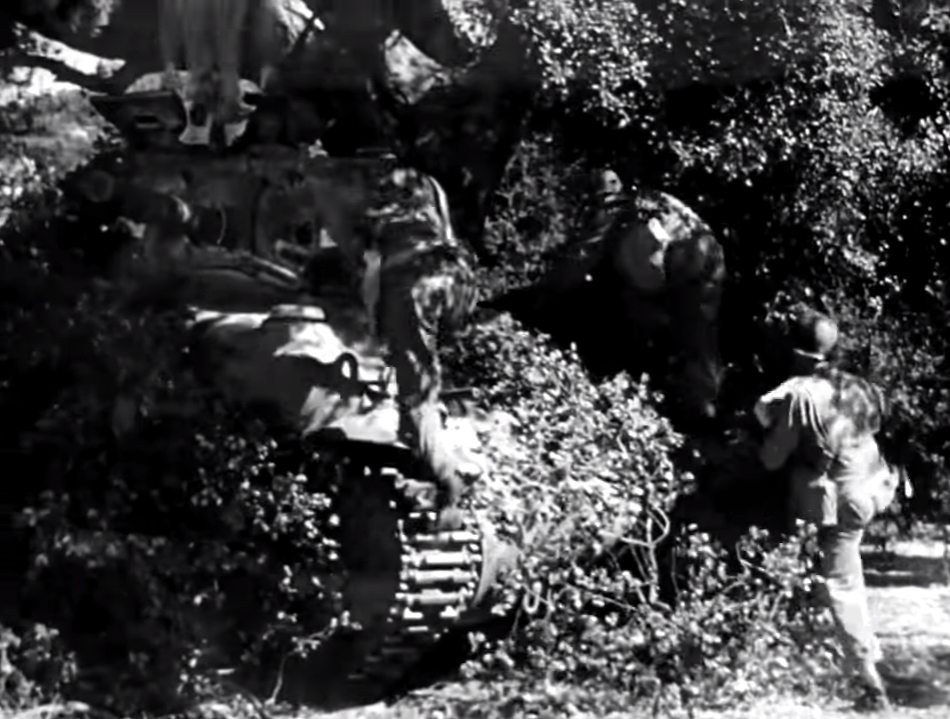
Take more time to conceal the tanks, cut or break off tree branches and use them to break up the tanks lines. Rake the tanks tracks leaving the road away.
Use shade and any local cover to hide the tank, move the tank as the shadows used to hide them move with the sun.
If no cover can be found, use the camo net.
Some camo is better than nothing.
Special Rules for night marches:
If under air attack, Stop, for both concealment, and to prevent bunching up.
If under air Attack, Do not fire, unless you are sure you are spotted.
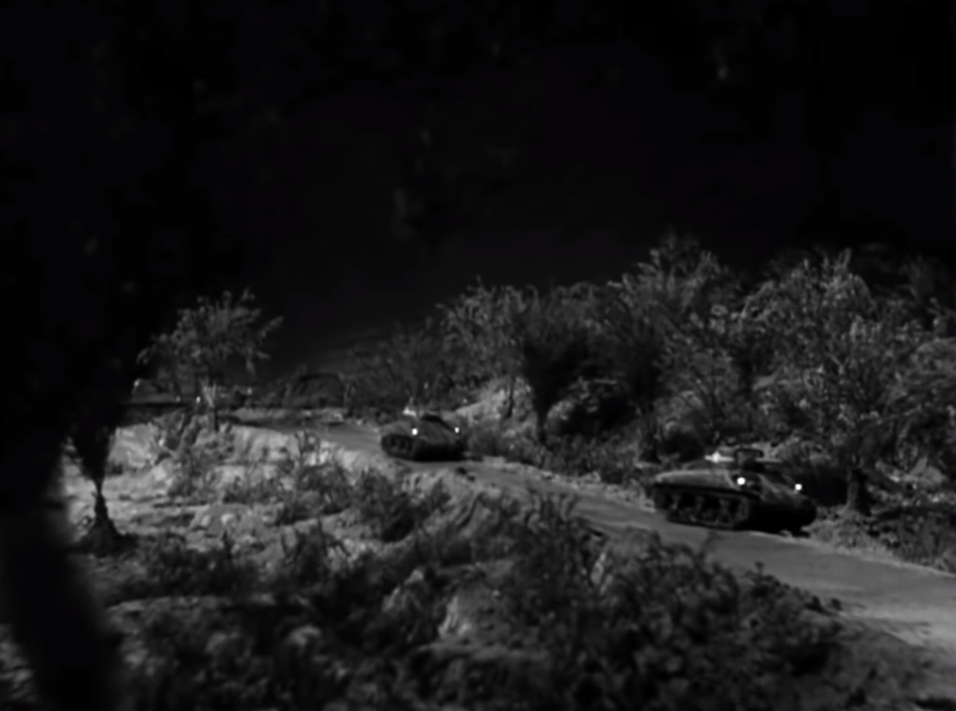
If under air Attack, Turn off your marker lights, the video doesn’t say this, and they used models in the film, but I think it’s a safe assumption.
No light, not even a smoke, and smoking is bad anyway, mmmkay.
…
Now for some thoughts on the film, it is really very interesting for several reasons, and the quality is very good. The main reason it’s interesting is the look at prewar combat, or pre air superiority march doctrine. The attention paid to defense from air attack would not be pushed nearly as much even by the Italian campaign and would be almost an afterthought by Normandy. Later films probably pushed very carefully searching for well concealed AT guns and infantry that the lead and flank scouts may have missed.
It is also interesting how gas attacks and preparation for them is first thing they cover. I’m sure shortly after most unit got in combat they ended up losing or discarding most gas related gear, and I can’t ever recall seeing a man carrying a gas mask case or a square of the gas detecting paint on any vehicles in combat photos.
The night shot of tanks moving is clearly done with models. The machine guns used during the mock air raid also appear to be prop guns. If you watch carefully, most of the film, the .50 M2s have the normal short cooling sleeve with round holes, during the shooting scene, these have slotted sleeves, and the barrels do not seem to recoil at all. The explosions look like typical Hollywood fare as well. It should come as no surprise Hollywood was willing to help the war effort; this is just one example of many. All the big studies did propaganda movies and even Bugs bunny and Disney got into the act.
I have been looking the tanks over, they are all M4A1 75 tanks, they are all small hatch hulls, but none are DV, they all have heavy duty suspension bogies. Two have three piece cast differential housings, the rest have the first version of the cast one piece diff housing. The turrets all look the same for the most part, with the short mantlet, so M34 gun mounts with no telescopic sights. Some of the gun mounts have slanted lift rings, others don’t seem too. At least one turret has the port for the spotlight on the roof. One tank has the siren mounted in the front plate with the odd single brush guard, the rest seem to have them mounted on the fenders. Two or three of the tanks appear to have T54 steel chevron tracks, while two or three seem to have T47 steel bar cleat tracks. I’m bad at spotting the little clues that give away who made what, but I think two of the tanks were made at PCF in Washington; I think the two tanks with three piece diffs are from PSC in Illinois.
The Escape Hatch, Interior Lighting, Exterior lighting and Auxiliary Generator: Why? Because People Want to Know About Sherman Interior Lighting
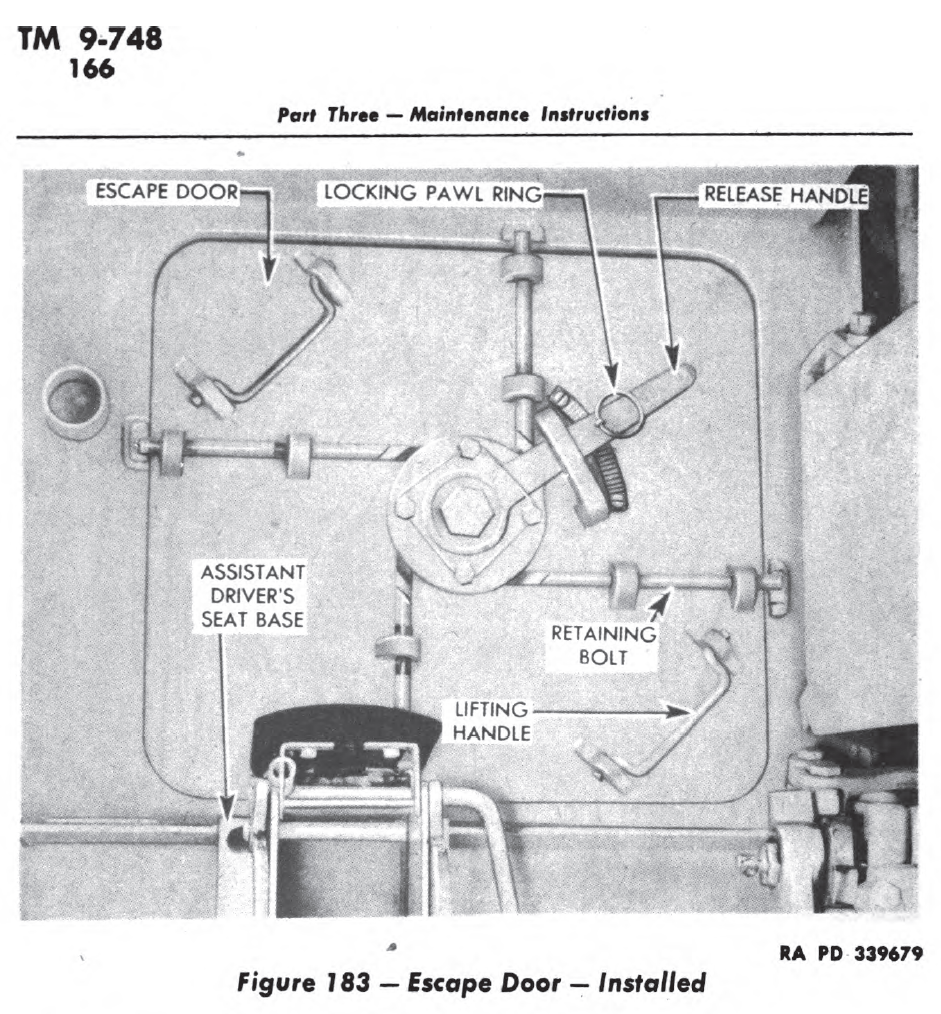
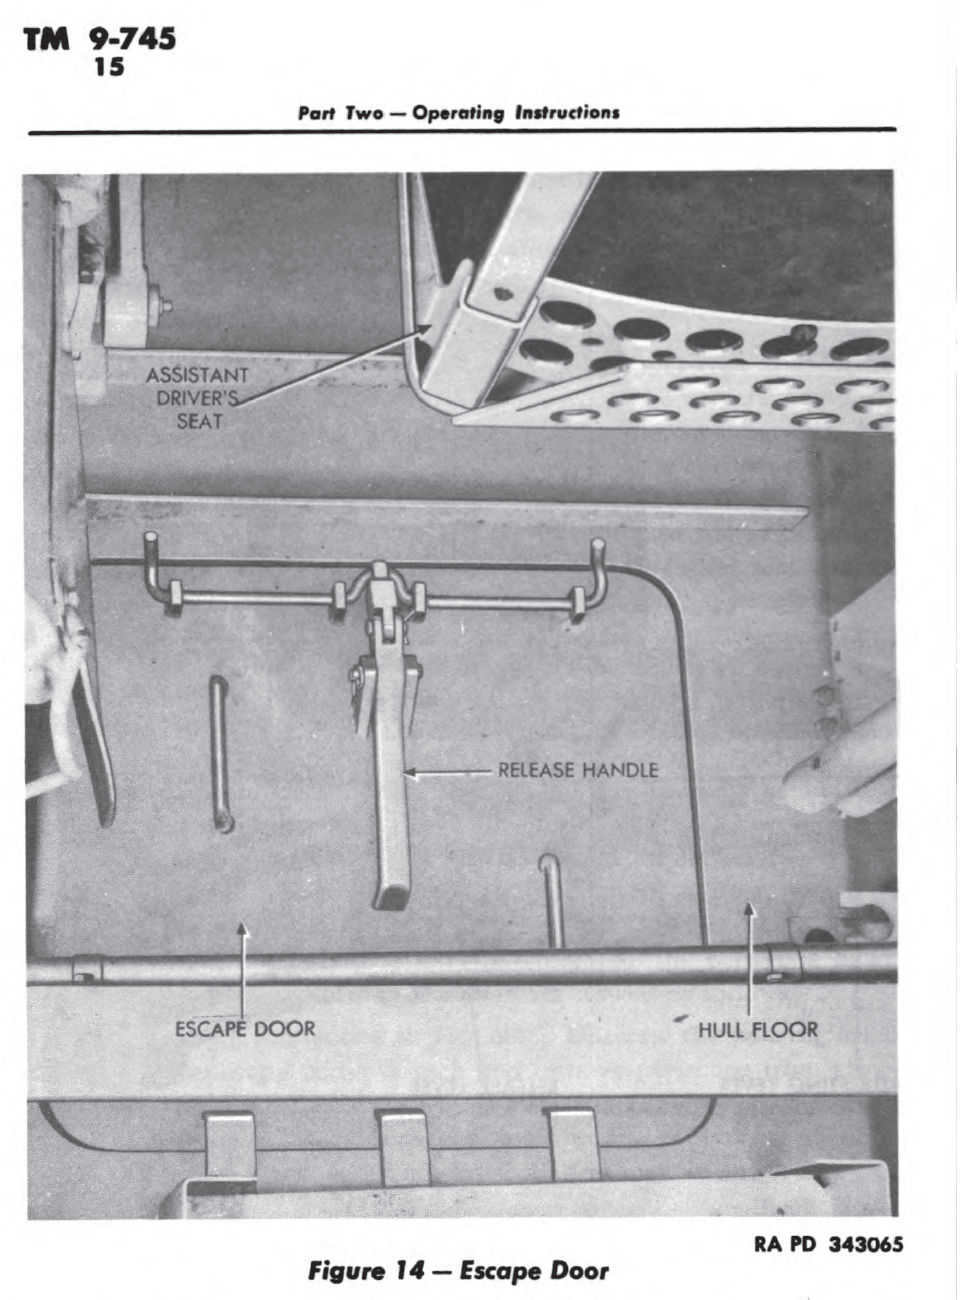
The Escape Hatch: If You Can’t Get Out the Top Get Out the Bottom
Sherman hatch this does not seem to have changed much from the start of Sherman production to the end
All Sherman tank production models and most of the TDs and ARVs based on the Sherman had an escape hatch right behind the co driver’s position. The location and size of the hatch stayed the same, but the ones installed on TDs seem to be different than the ones installed on tanks. None seem to have been hinged though, a common field modification was adding steel tabs to one side of the hatch so it doesn’t fall all the way out this was a common modification on both tanks and TD. This field mod was made a factory installation on at least the M36 B2.
M36/M10 escape hatch
The escape hatch on early Shermans with a full turret basket was only really usable by the driver and co-driver. The driver would have to climb over the transmission to get to it, but the area was pretty large to get through. The reason the turret crew couldn’t use it, or it would be hard for them to use it, was the turret basket on early Sherman models it was fully screened in. There were openings, so the loader could reach the hull sponson ammo, but to use these, the turret had to be in the right place and not facing forward. These openings, when turned towards the co-driver or driver would allow them access to the turret, or the turret crew to the hull.
When they decided the initial ammo storage layout was too dangerous, they removed the screening, and the ready rounds, making access to the hull for the turret crew much easier, but there was still the turret basket floor, and the braces attaching the floor to the turret to get in the way. As the Sherman matured, the basket on the second generation Shermans was cut back to a half basket, and then eventually removed. Once this was done, using the floor escape hatch was much more convenient for the turret crew.
The Shermans escape hatch was located just behind the 1-inch thick armor under the driver and BOG, where it was only half an inch thick. Far enough back there was not much of a chance of the crew being seen as they exit. The hatch was not used for just escape, I’ve read many accounts of the hatch being used to rescue wounded and or just pinned down men under heavy machine gun fire. The men would be told to lay still, and the tank would be directed onto them by the infantry in the area, in some cases one of them riding in the tank and when close the man on the ground would make sure the tank was going to straddle him and then waited to be run over. Once the tank was over the man, the escape hatch was dropped, the man pulled in and the tank would back out. This could be repeated as needed in the Pacific since in many cases the Japanese had nothing that could take on the Sherman locally.
One final thought on the escape hatch, the reason it was fairly large and far back under the hull was that there were no torsion bars to worry about getting in the way. Later US tanks did have hull escape hatches, but they were usually further forward due to torsion bar use, and different driver’s location. You can see this on the M26 Pershing, where the escape hatches, there was one each for the driver and co-driver, were right under driver and co-drivers station. In some cases large mines could blow this escape hatches up into the crew compartment, injuring the driver or co-driver. This could take place on a Sherman, but no crew member was right over the hatch.
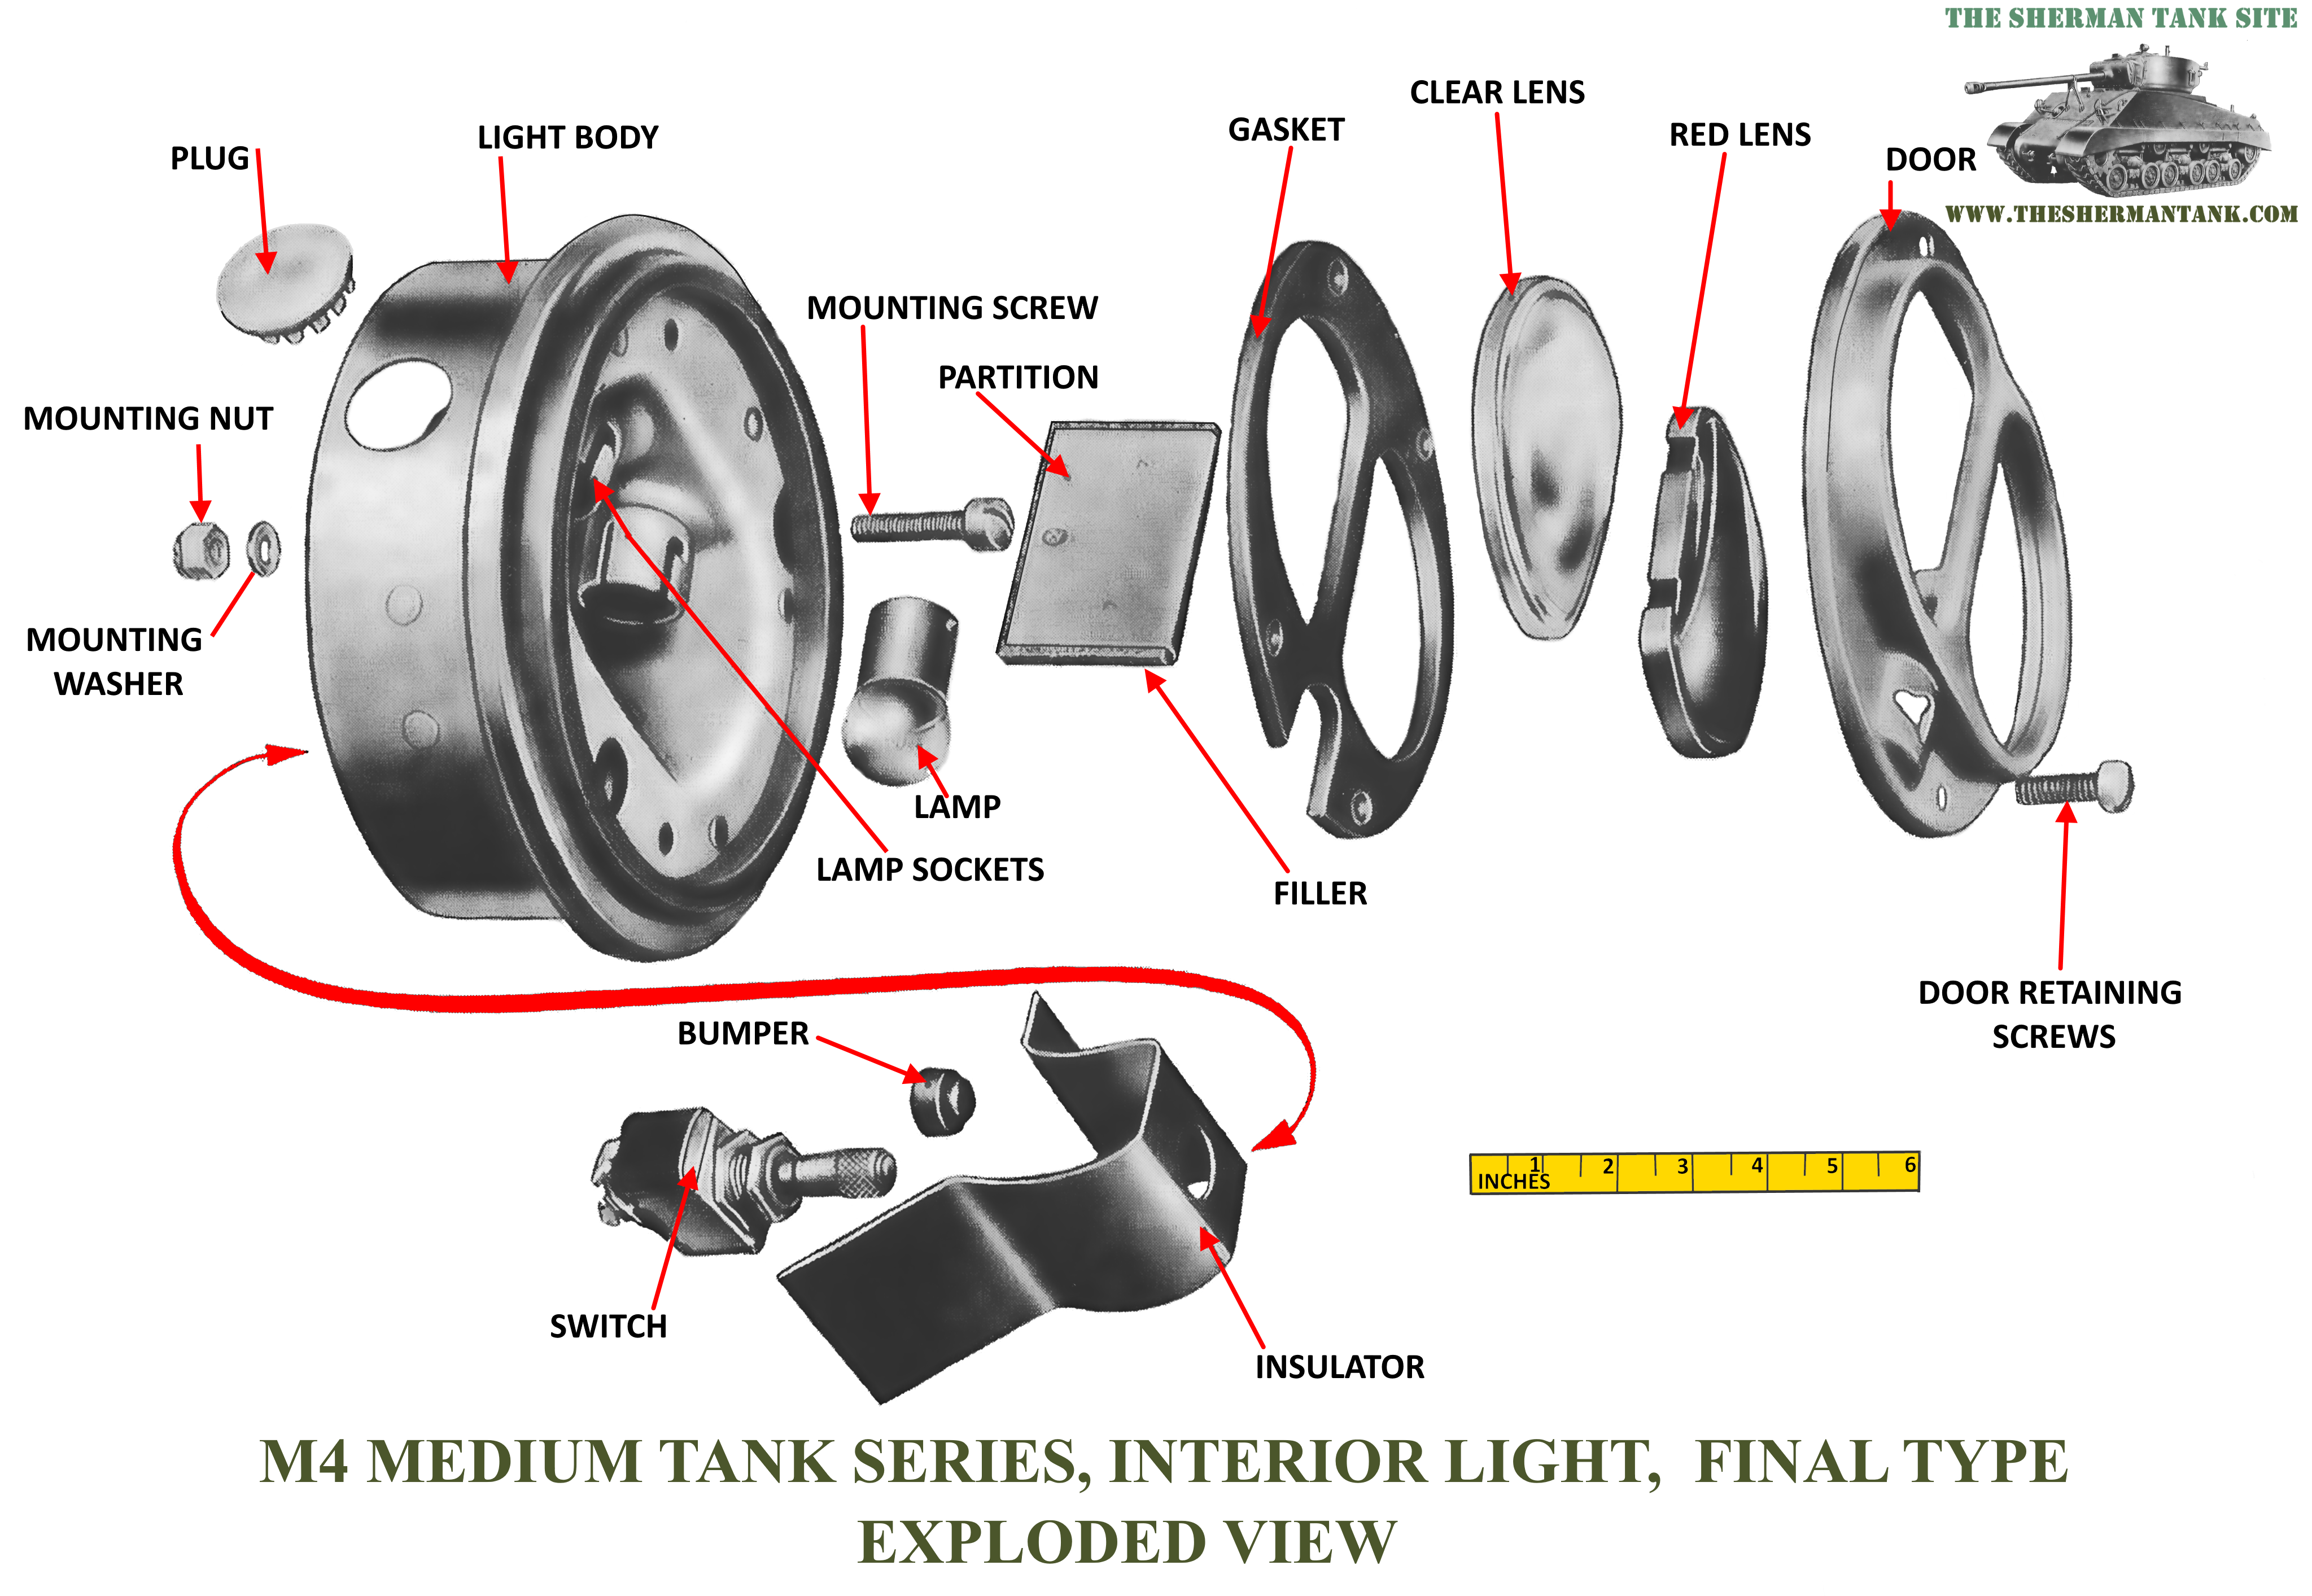
Interior Lighting: Because the Interior of a Tank is Dark, and People want to know About the Lights.
The early and late style Sherman interior lights. Thanks to Marc S over on the G104 mailing list!
The interior of a Sherman tank is a pretty dark place, even during the middle of the day, particularly on the early models, when buttoned up. The only light would be what could come in through the various periscopes if they were open, or the DV ports on DV Shermans. On late model Shermans with the all-around vision cupola would be a little better but still not great. Opening the hatches and the pistol port, of course, helps a lot, but you can’t run that way when they are shooting at your Sherman.
M4A3 hull wiring diagram showing crew lights
Now those clever engineers who designed the tank thought about this one, and they provided the early Sherman crew with three interior dome lights in the hull and four or five on later Shermans, and the instrument panel and compass were illuminated. The turret had an additional one to two interior lights on early tanks, and three on later Shermans. These lights were all three candlepower.
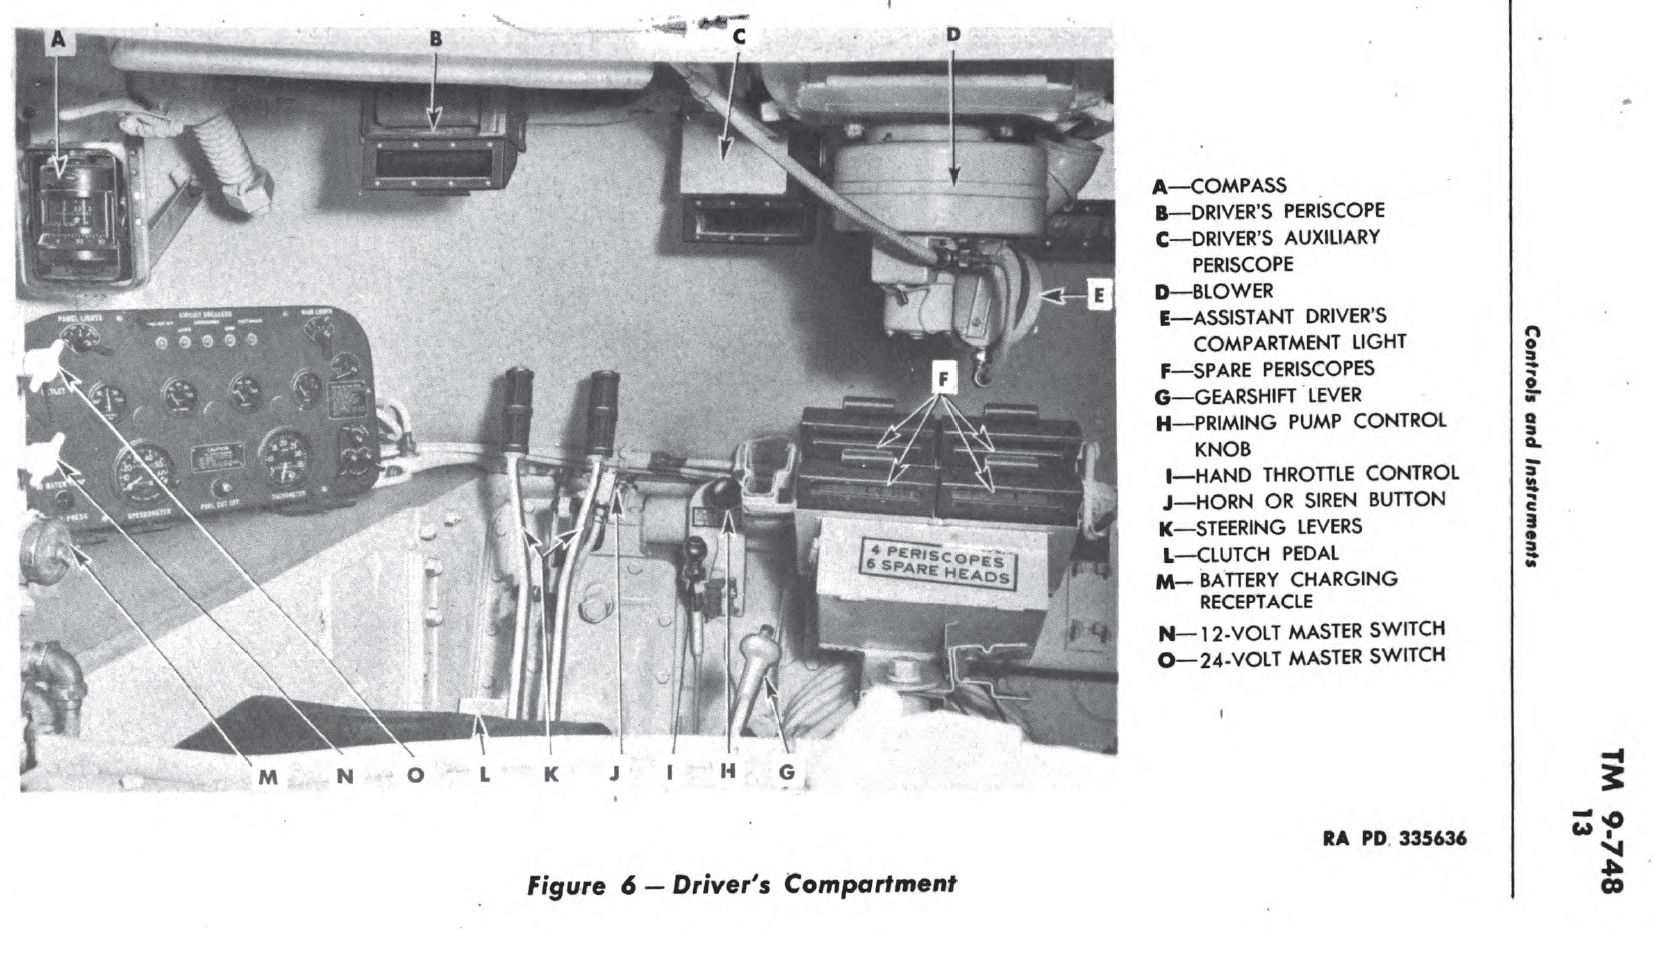
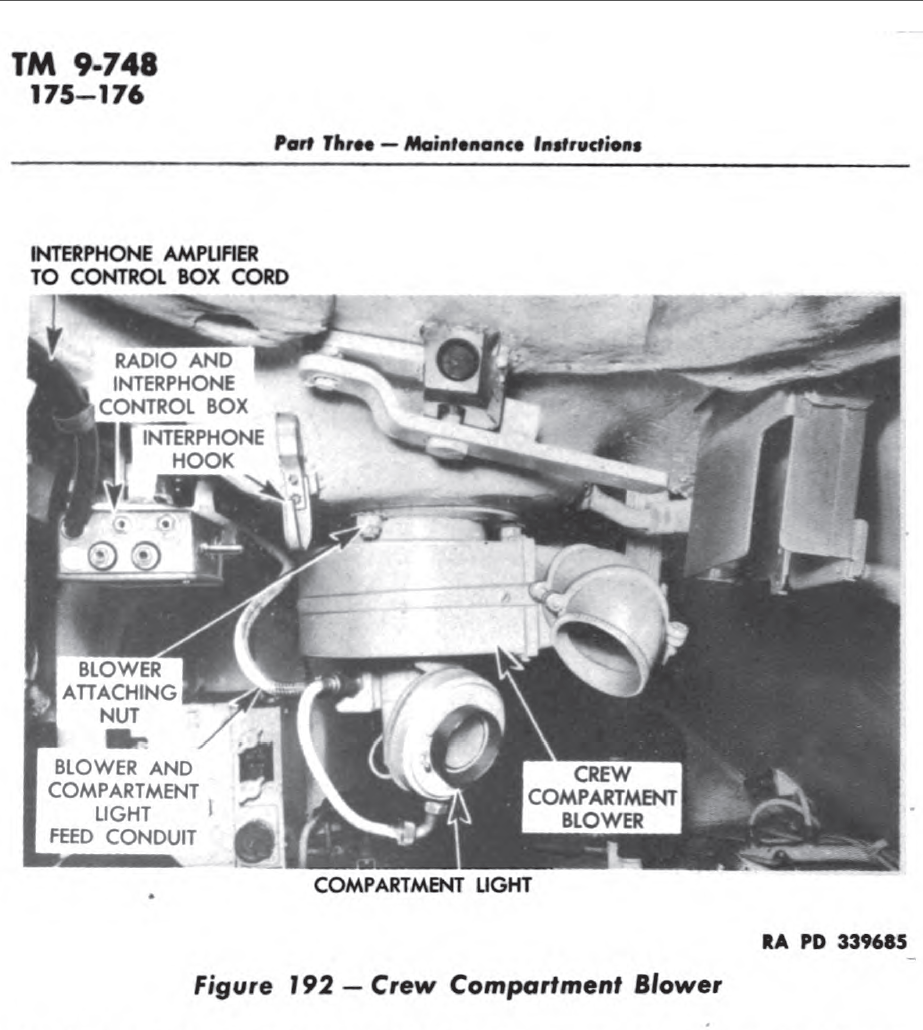
You can see the co-drivers light mounted on the blower in this diagramA better view of the light market E in the above diagram
Early Sherman interior lights were white light only, but later ones had a red light as well to help with night vision. The lights are all in series with the master battery switch, so it must be on for them to work. Think 70s car dome light for brightness levels. There was also a third interior light type, used only on 105 Shermans, that didn’t look the same, but I do not have a picture of it at this time.
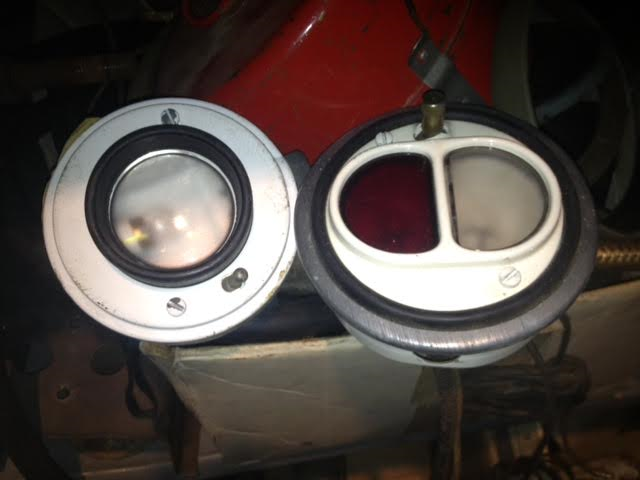
Exterior Lights: The Sherman Tank Had Those Too!
The Sherman Tank had to drive on roads, sometimes in traffic, and at night. To facilitate this, the tank had removable headlights and taillights. The later model Shermans also had provisions for an amiable, removable spotlight mounted on the top of the turret.
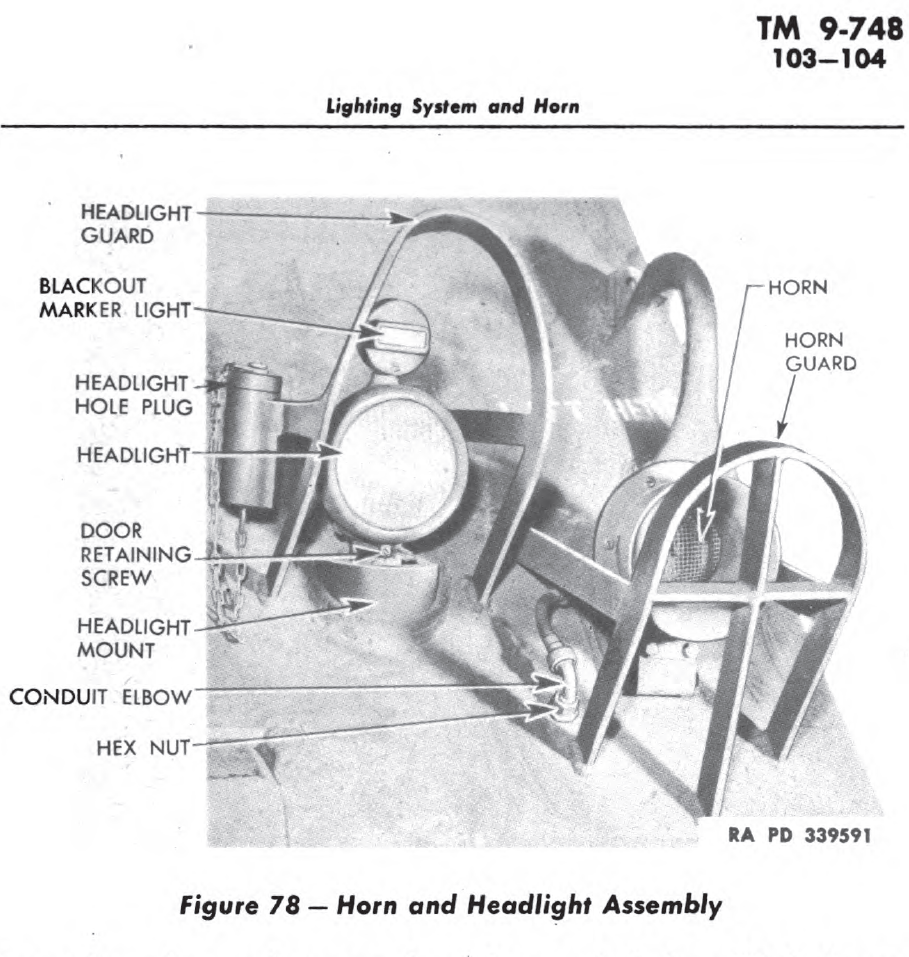
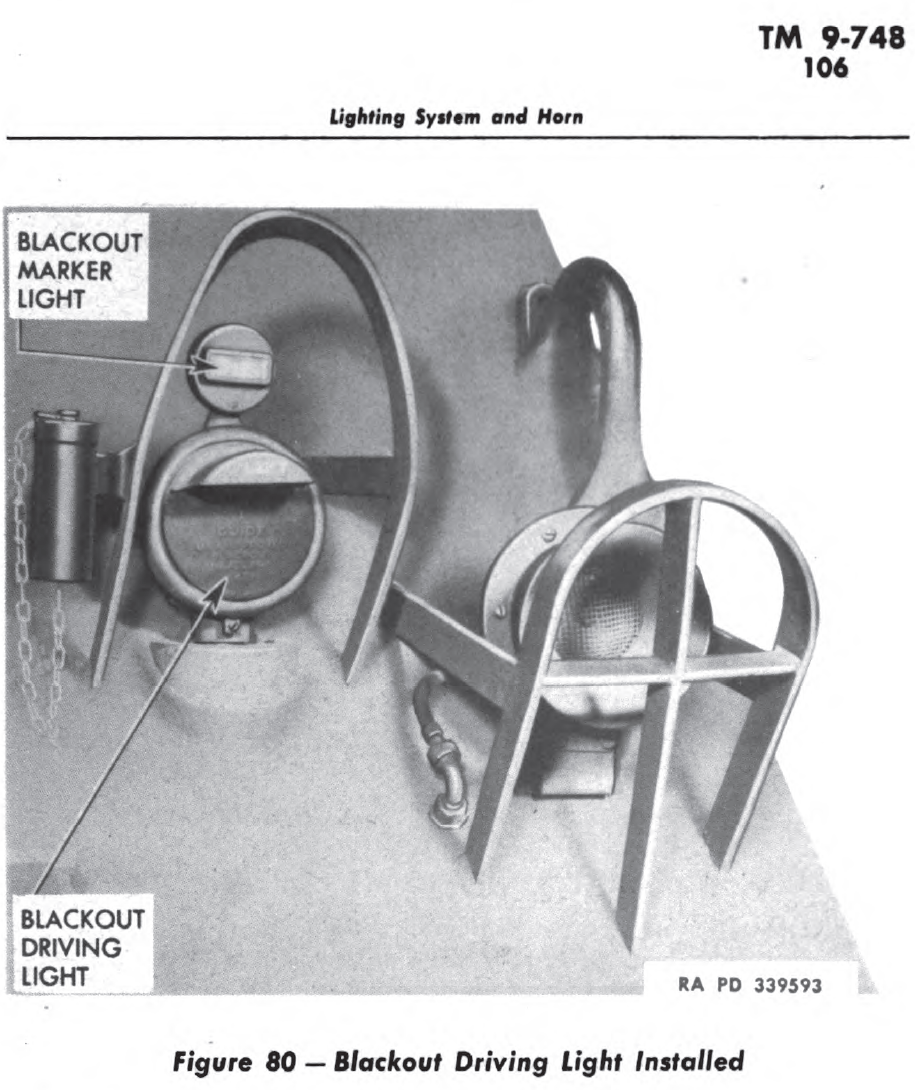
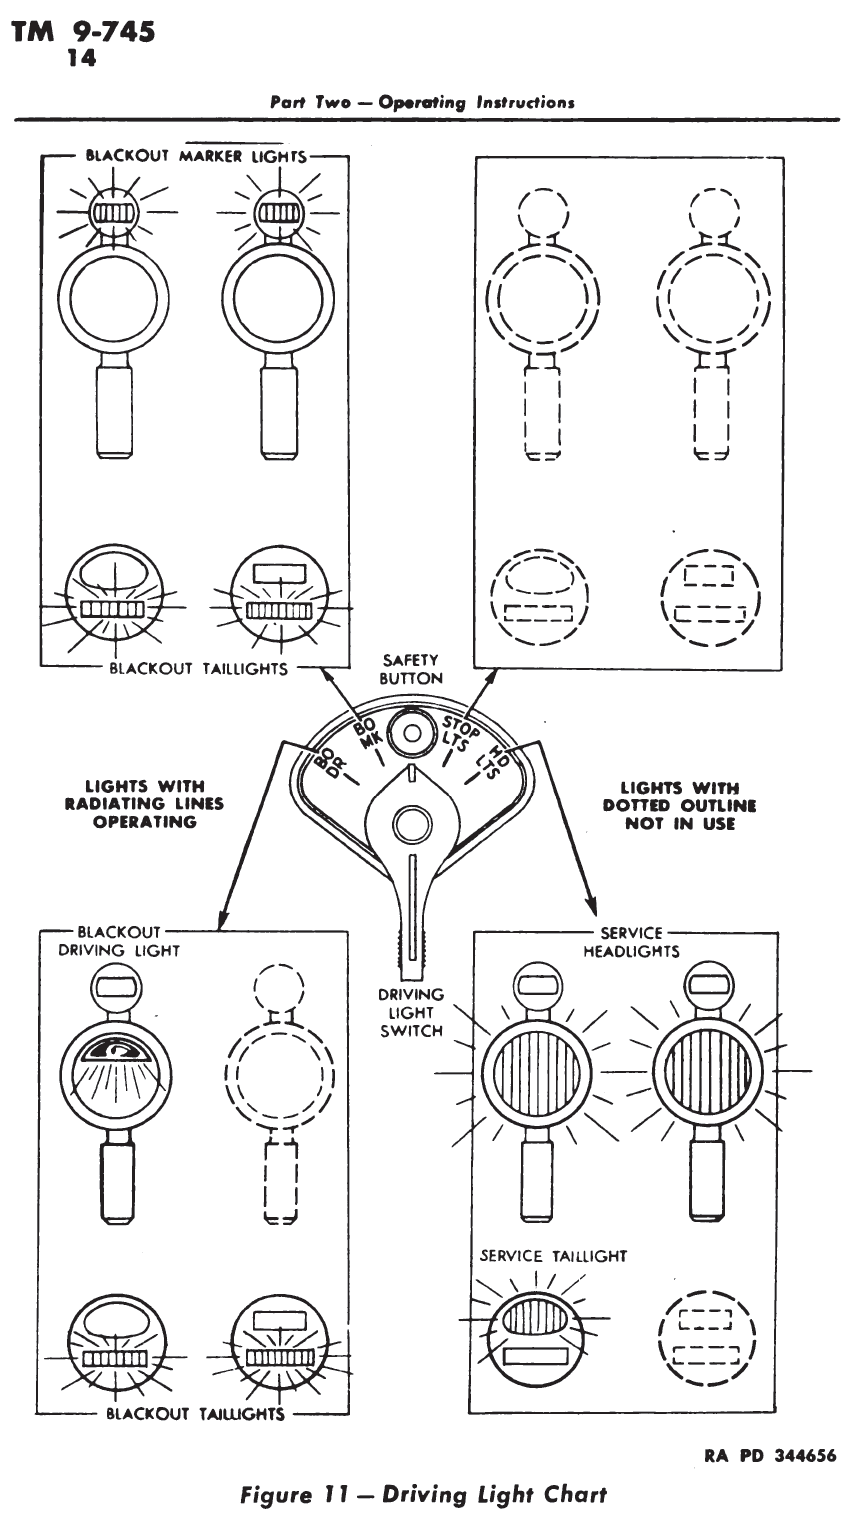
The Headlights came in two varieties, a regular headlight, and a blackout headlight, both had blackout markers. They would use the normal headlights anytime being observed at night was not important. If there was any chance of enemy observation, then just the blackout lights would be used. In extreme cases, just the black-out markers could be used.
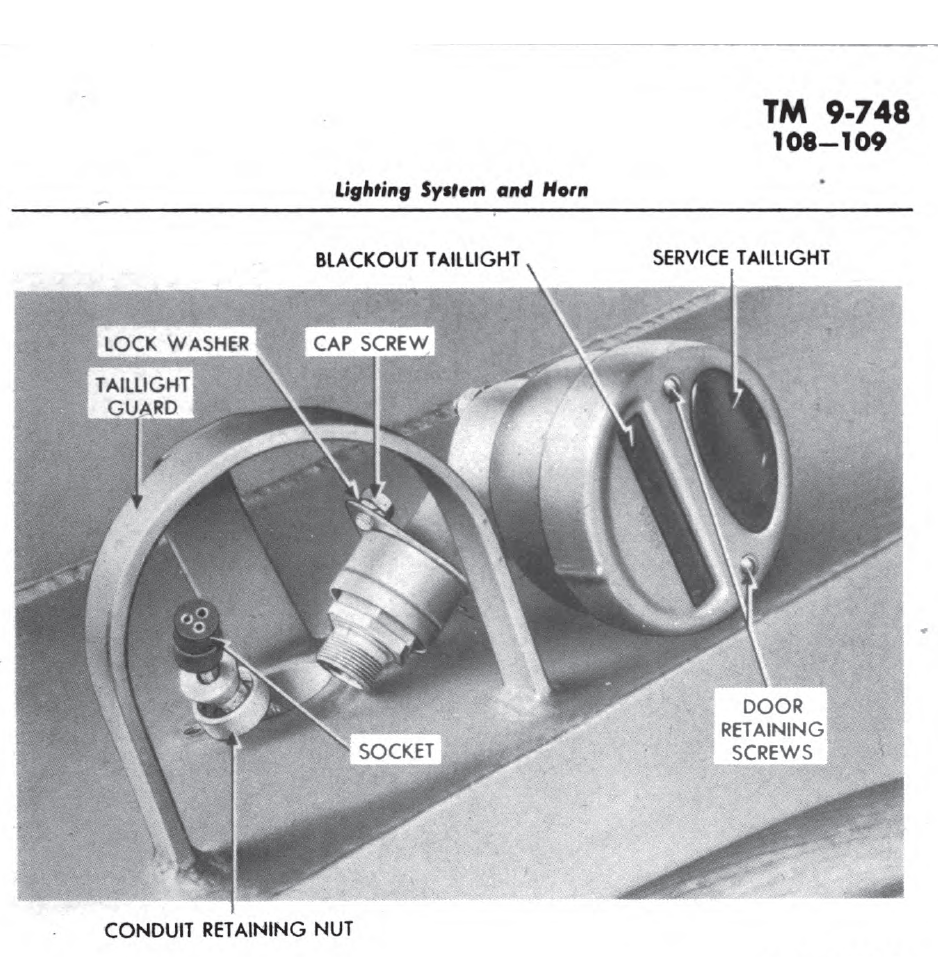
The tail lights were smaller than the headlights, and there was only one service taillight, and a pair of blackout taillights mounted in a pair of housings on the rear hull.
Mid to latish production turrets and most 76mm turrets had a removable, paintable from the inside, spotlight added to the top of the turret. Many early Shermans that didn’t have the turret roof spotlight mount had it added during overhauls.
You can just make out the turret spotlight in this photo
The headlights and taillights were controlled from the driver’s panel by a four position switch. All the lights were removable, so they wouldn’t be damaged when the tanks went into combat.
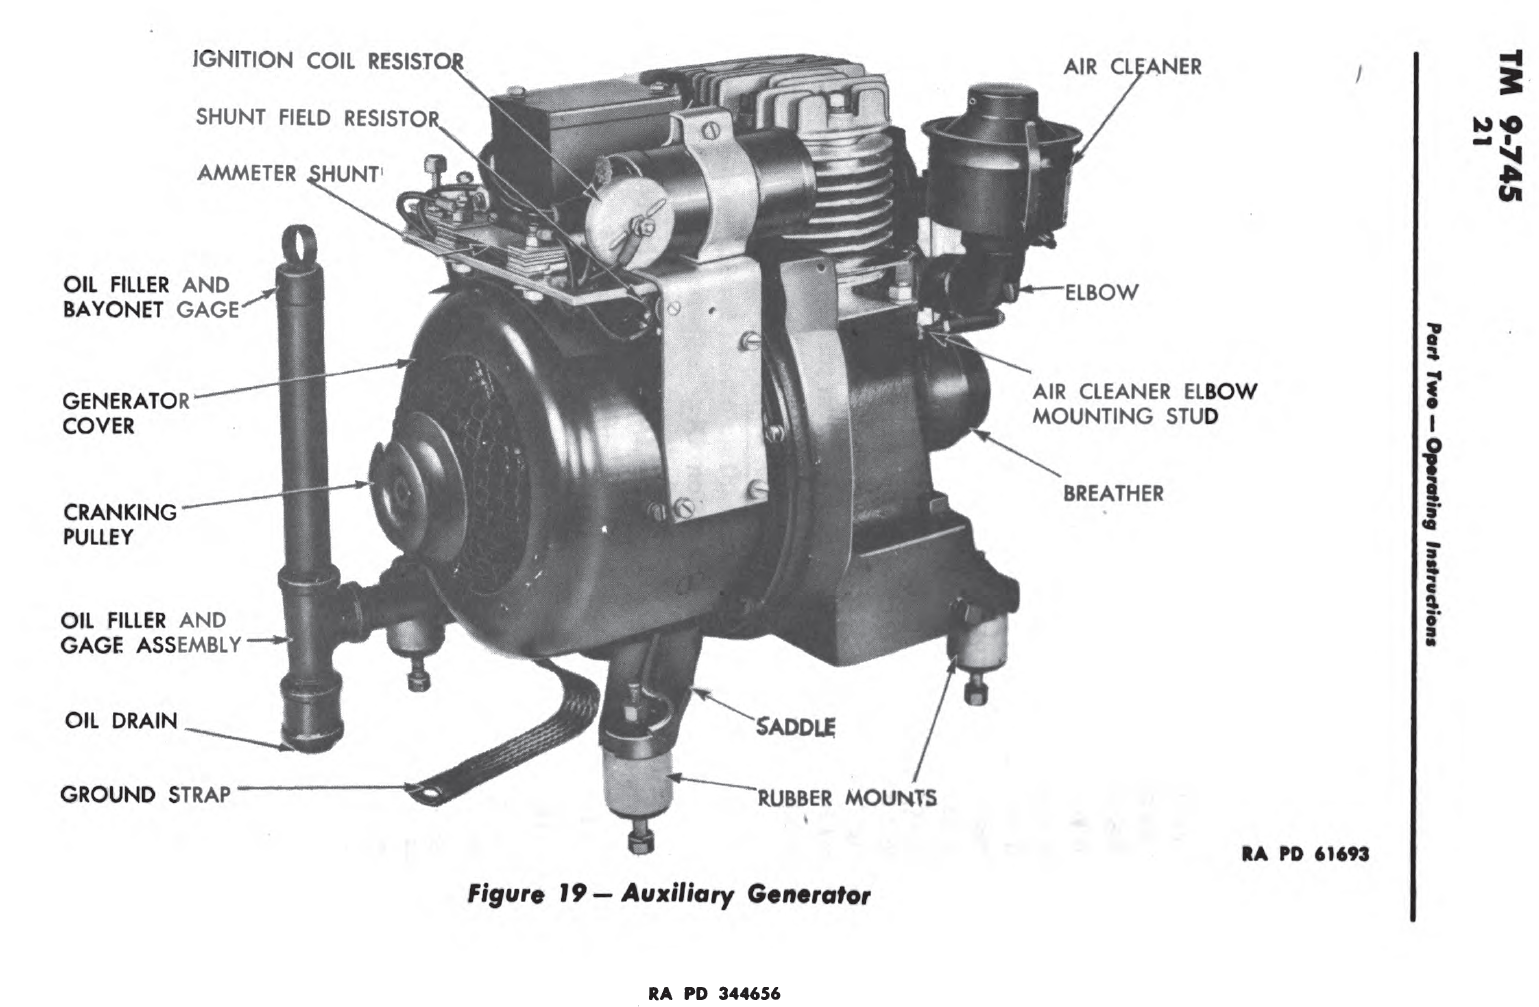
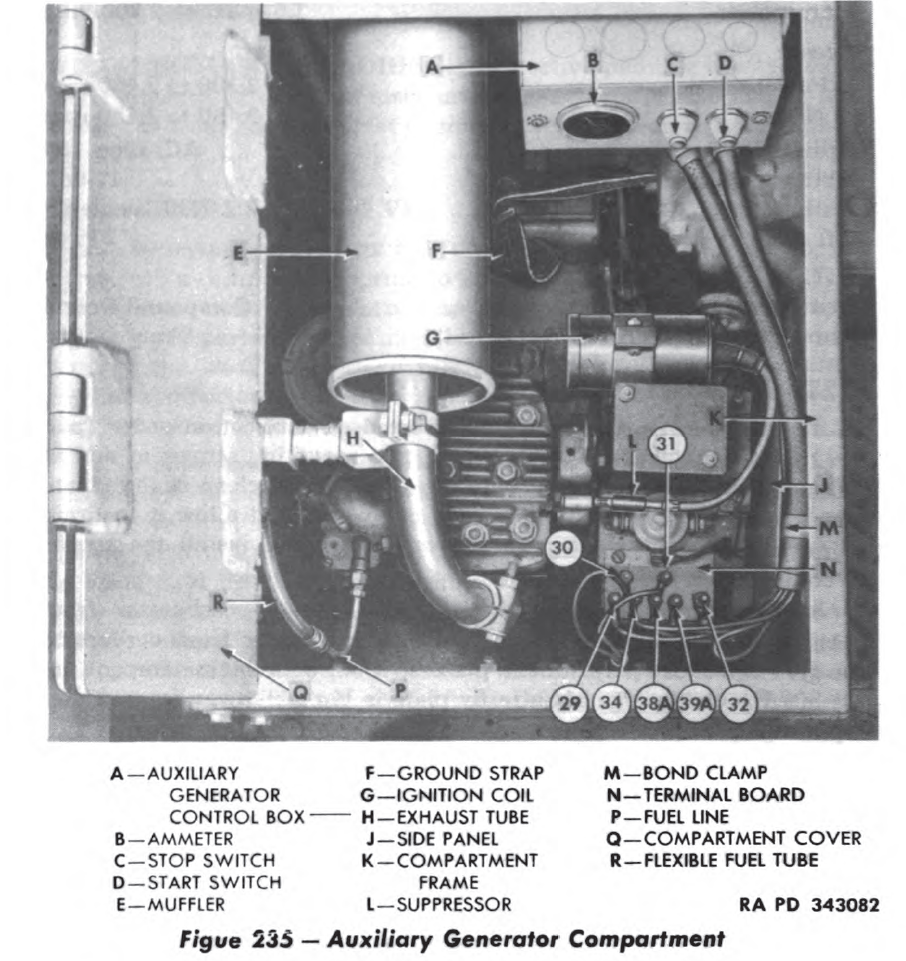
The Auxiliary Generator: All Shermans Had One, Even the TDs and ARVs, but they were not always the same unit
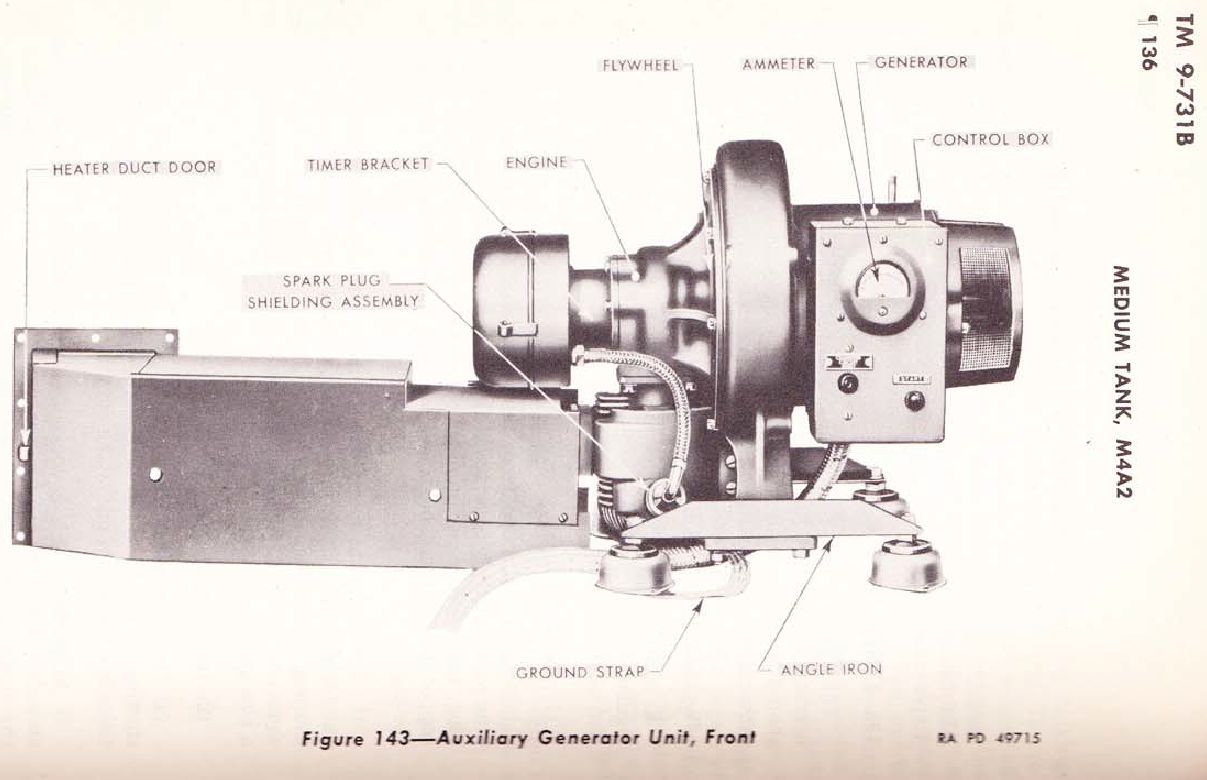
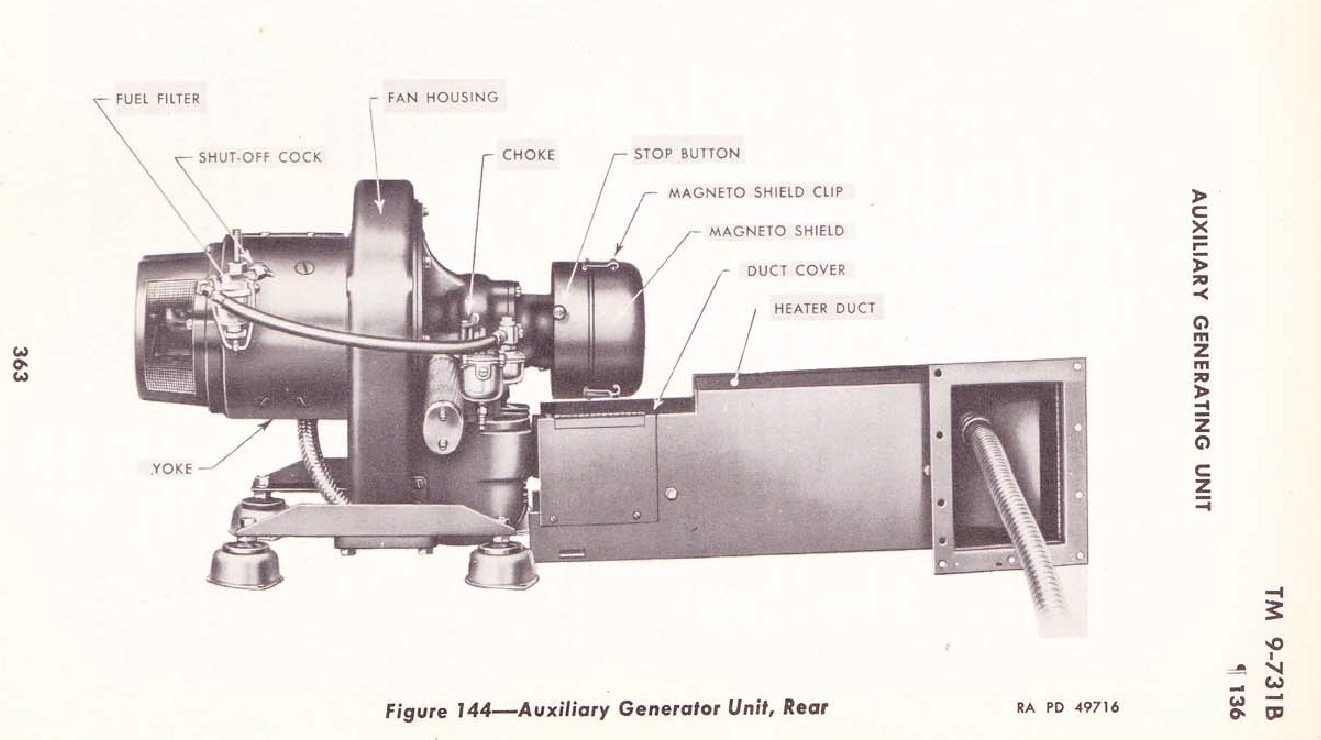
The Homelite Model HRUH-28: Was the exact model used in most Sherman based Tanks and TDs; the Army used this Aux Gen well into the 50s. Homelite also made other models for aircraft use, and they may have sold them commercially. There were a few differences in the installation, on early production Shermans, it was installed with a simple muffler that had an outlet at the rear of the vehicle, and the heat generated by the use of the generator was called an added feature, and was the tanks ‘heater’. Later versions had a ducting system that vented the heat into the engine compartment to help pre-warm the engine in cold weather or vented into the crew compartment to heat it. The ducting added about 15 pounds to the unit, for a total of 140 pounds.
The motor that powered it was gas powered, even on the diesel tanks, and was a single cylinder, air-cooled, 2-cycle with a 2 3/8 inch bore and 2 1/8 inch stroke. It operated at 3400 to 3700 rpm and burned half a gallon of gas, mixed with oil for lubrication, an hour. It could be run on gas 80 to 100 in octane, used a magneto ignition and a forged rod, crank, and piston. The Generator could be started in two ways, if the tanks batteries had enough juice, it could be started by motorizing the Generator with the battery, or manually, with a supplied rope with a handle, on the starting plate.
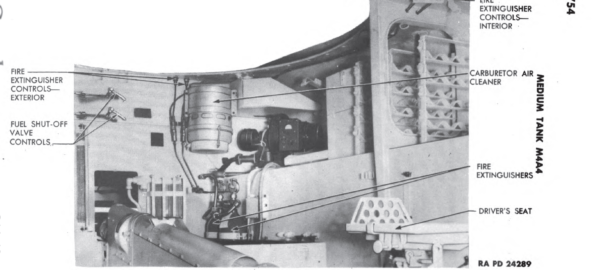
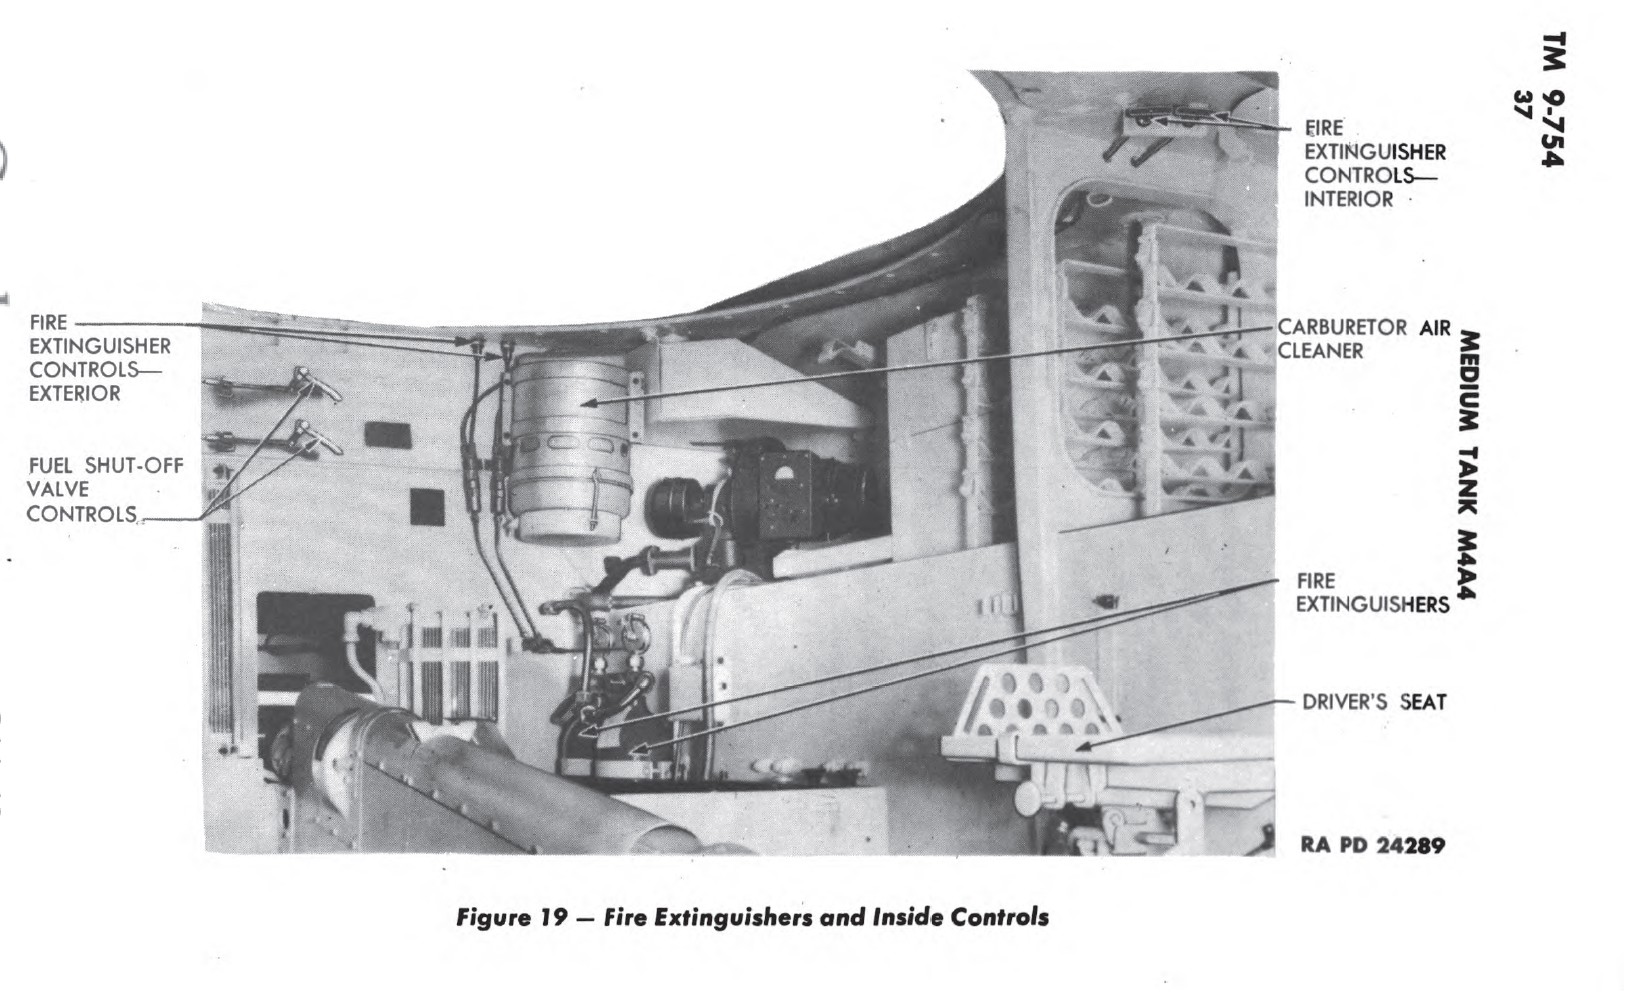
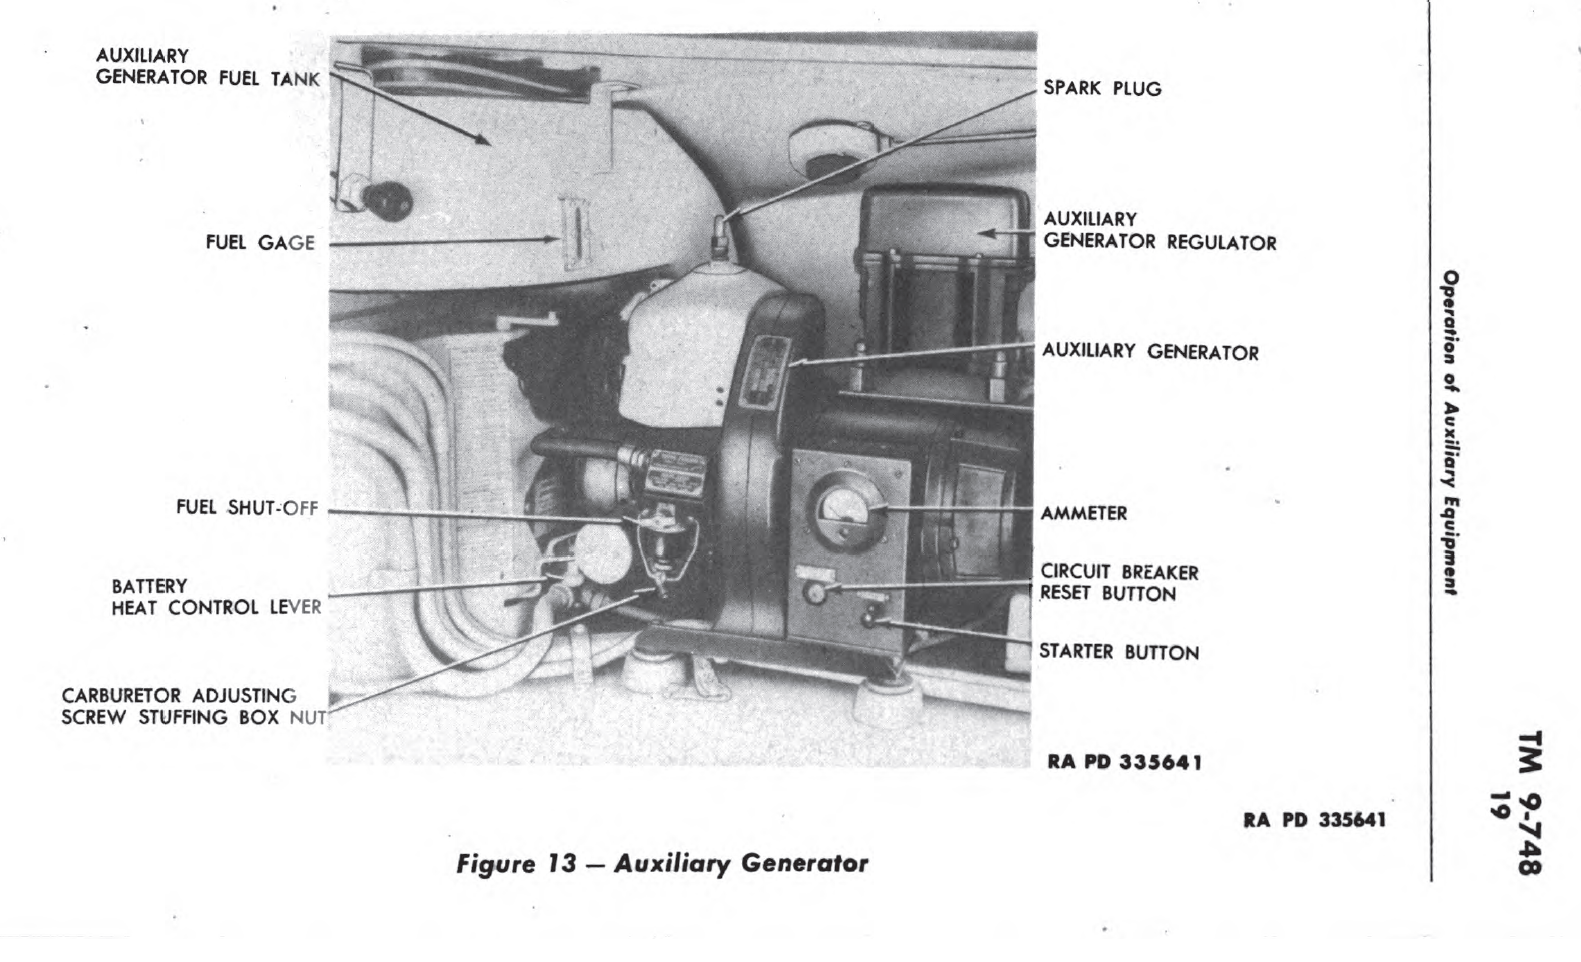
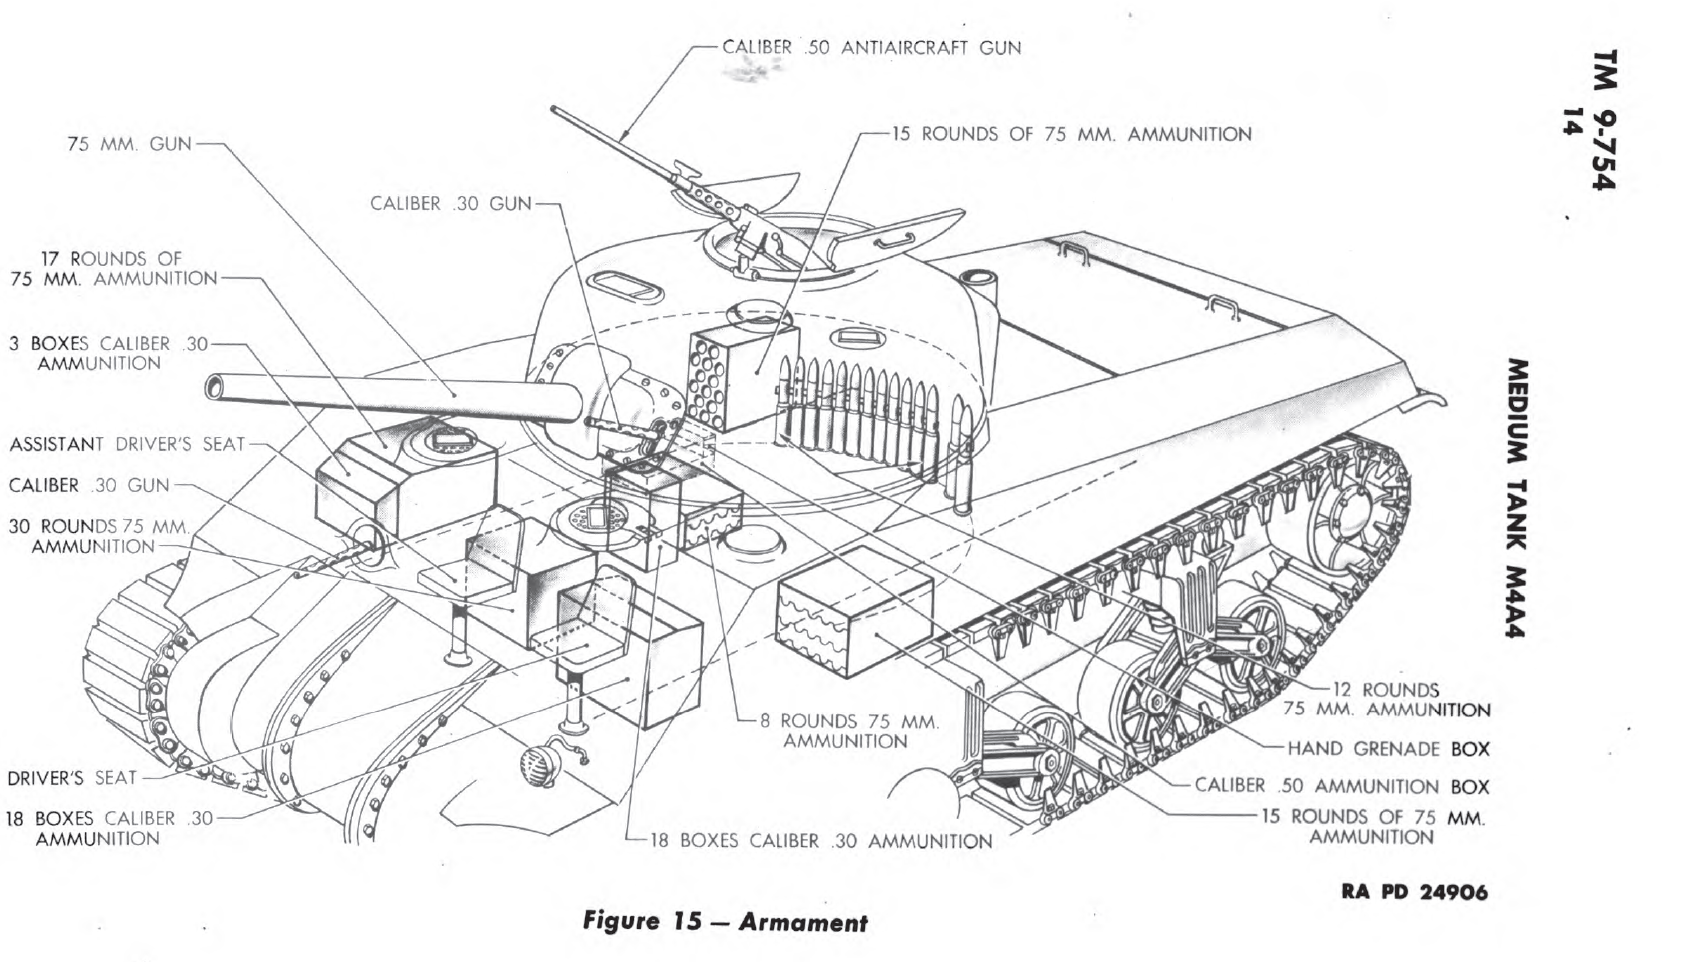
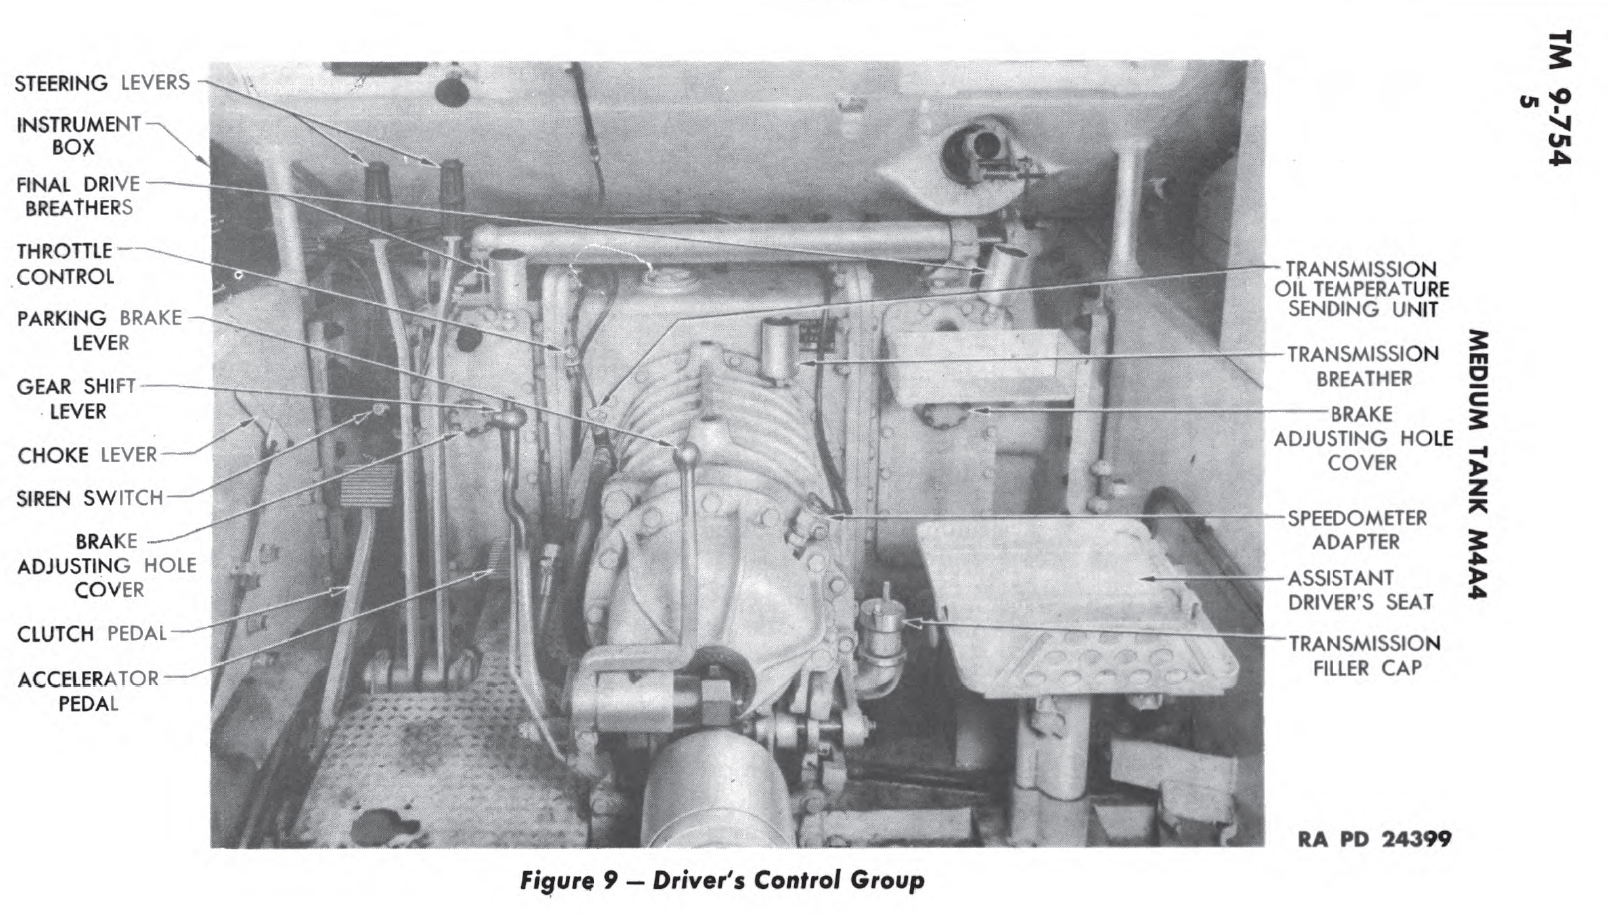
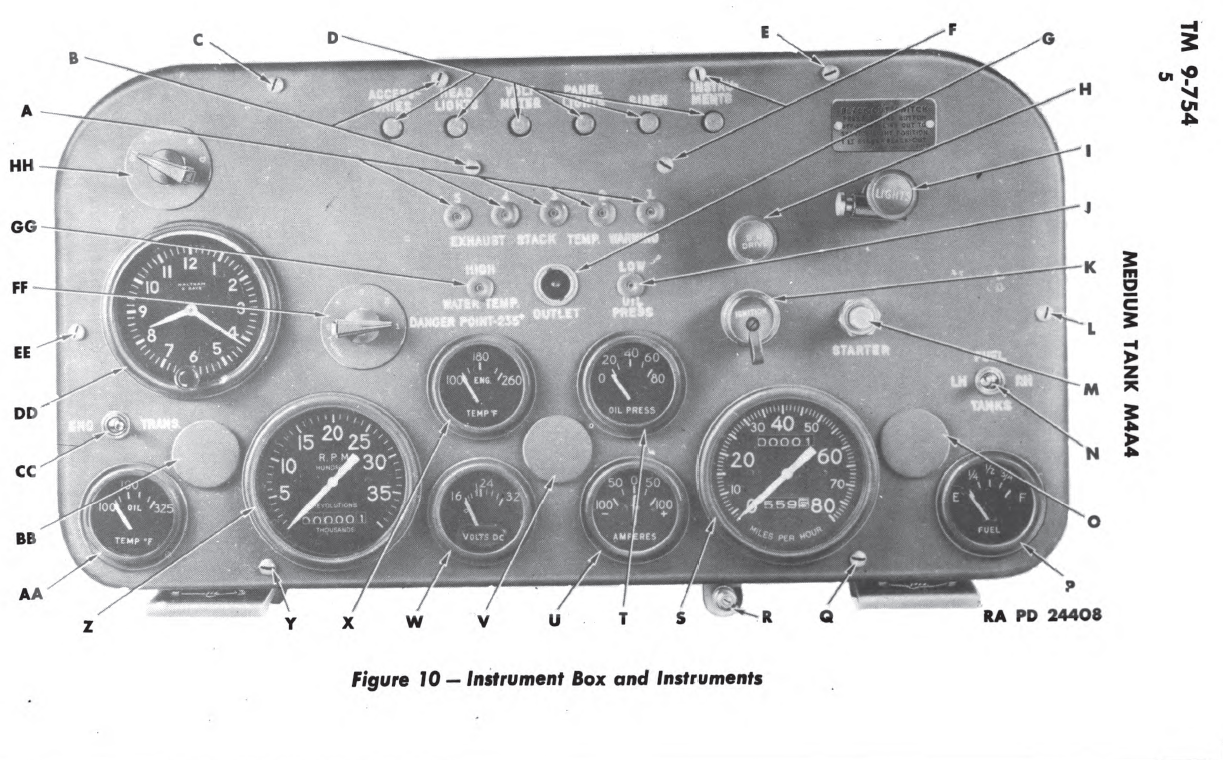
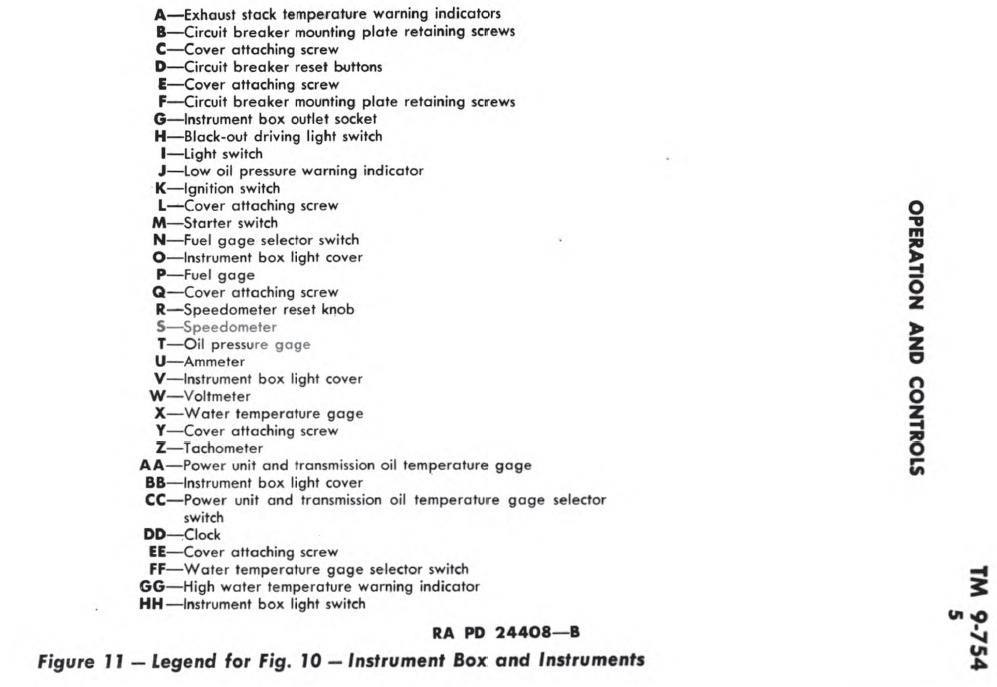
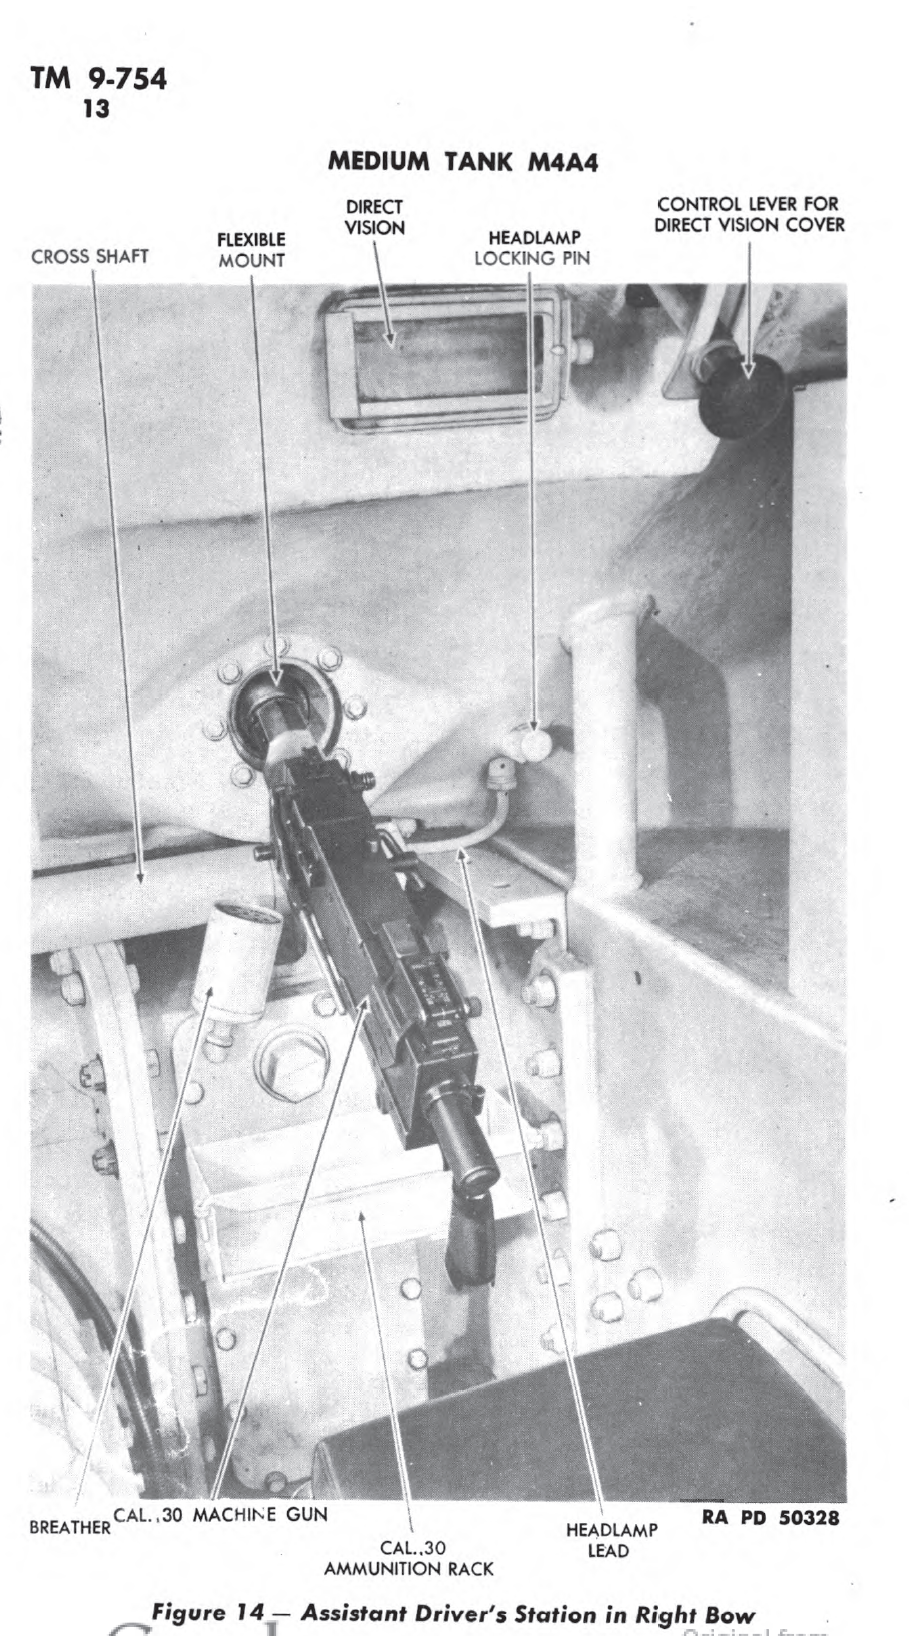
In this interior shot of an M4A4 from TM9-754, you can see the Homelite auxiliary Generator tucked into the corner
The Generator portion of the unit generated 1500 watts, DC, 30 volts. It was shunt-wound for battery charging. The Armature had a high-quality steel core and was laminated, impregnated and backed to give high resistance to oil, moisture, and dust. The field coils were made the same way as the Armature The whole unit, motor, and generator, used ball bearings throughout.
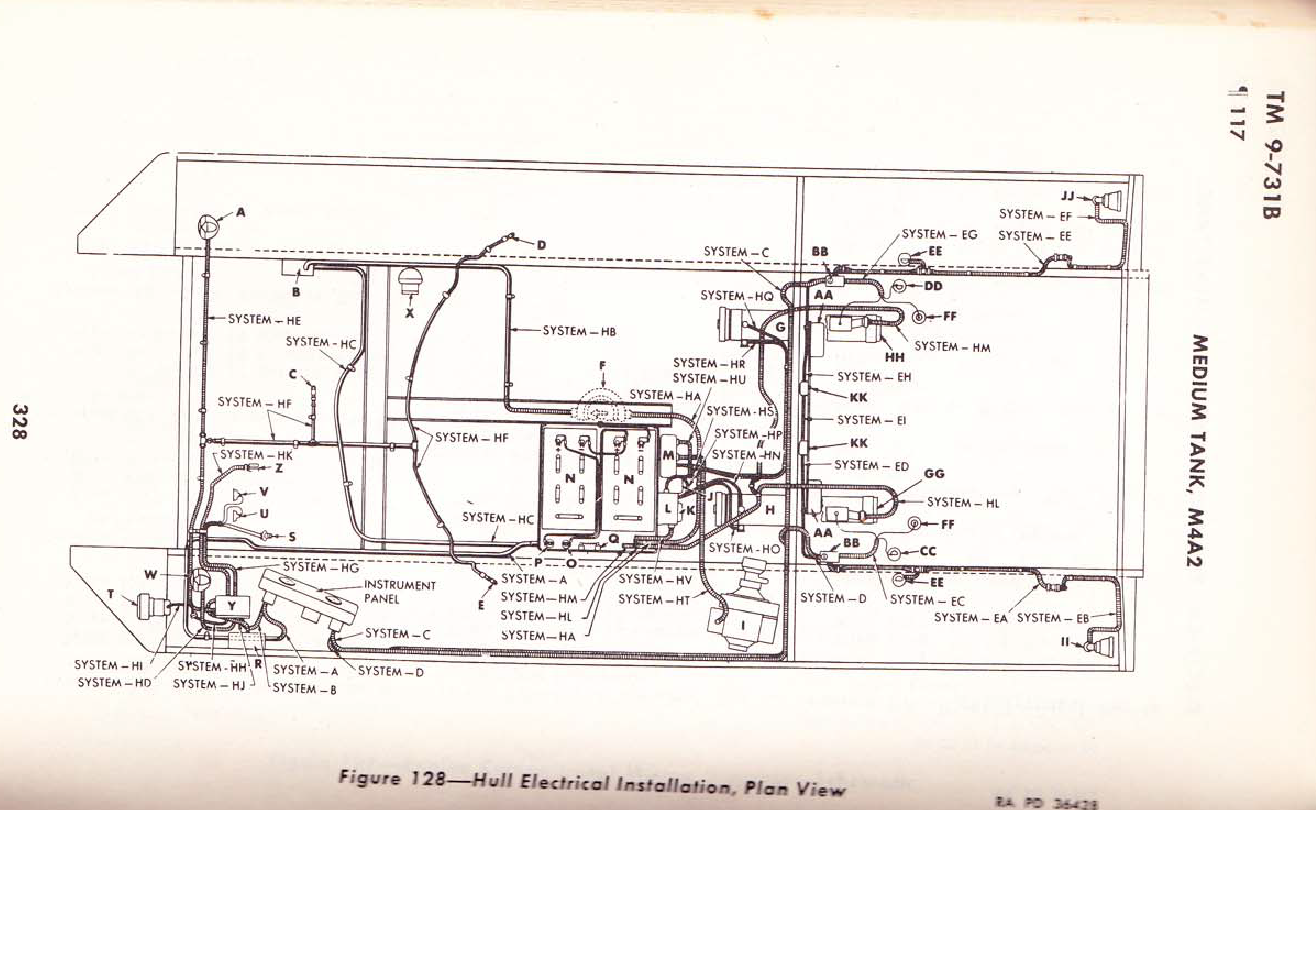
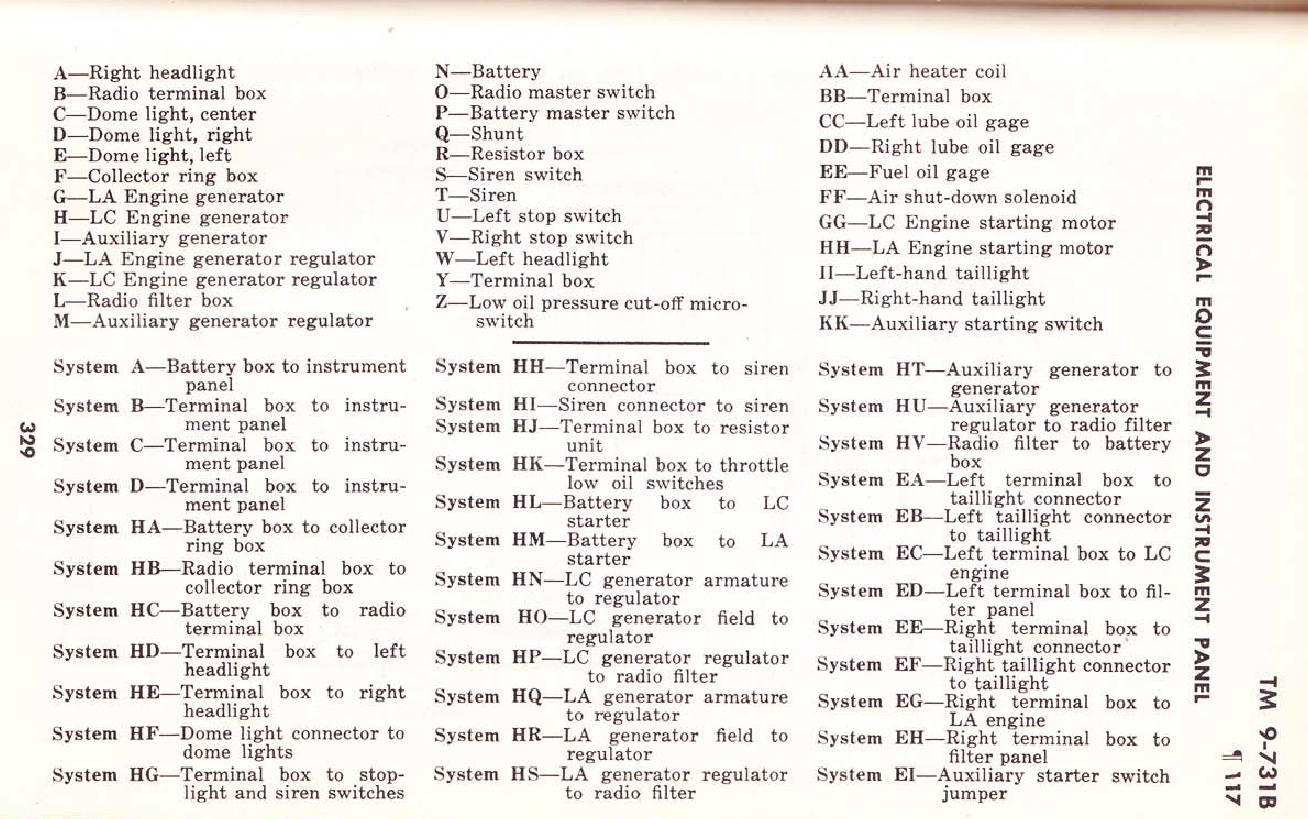
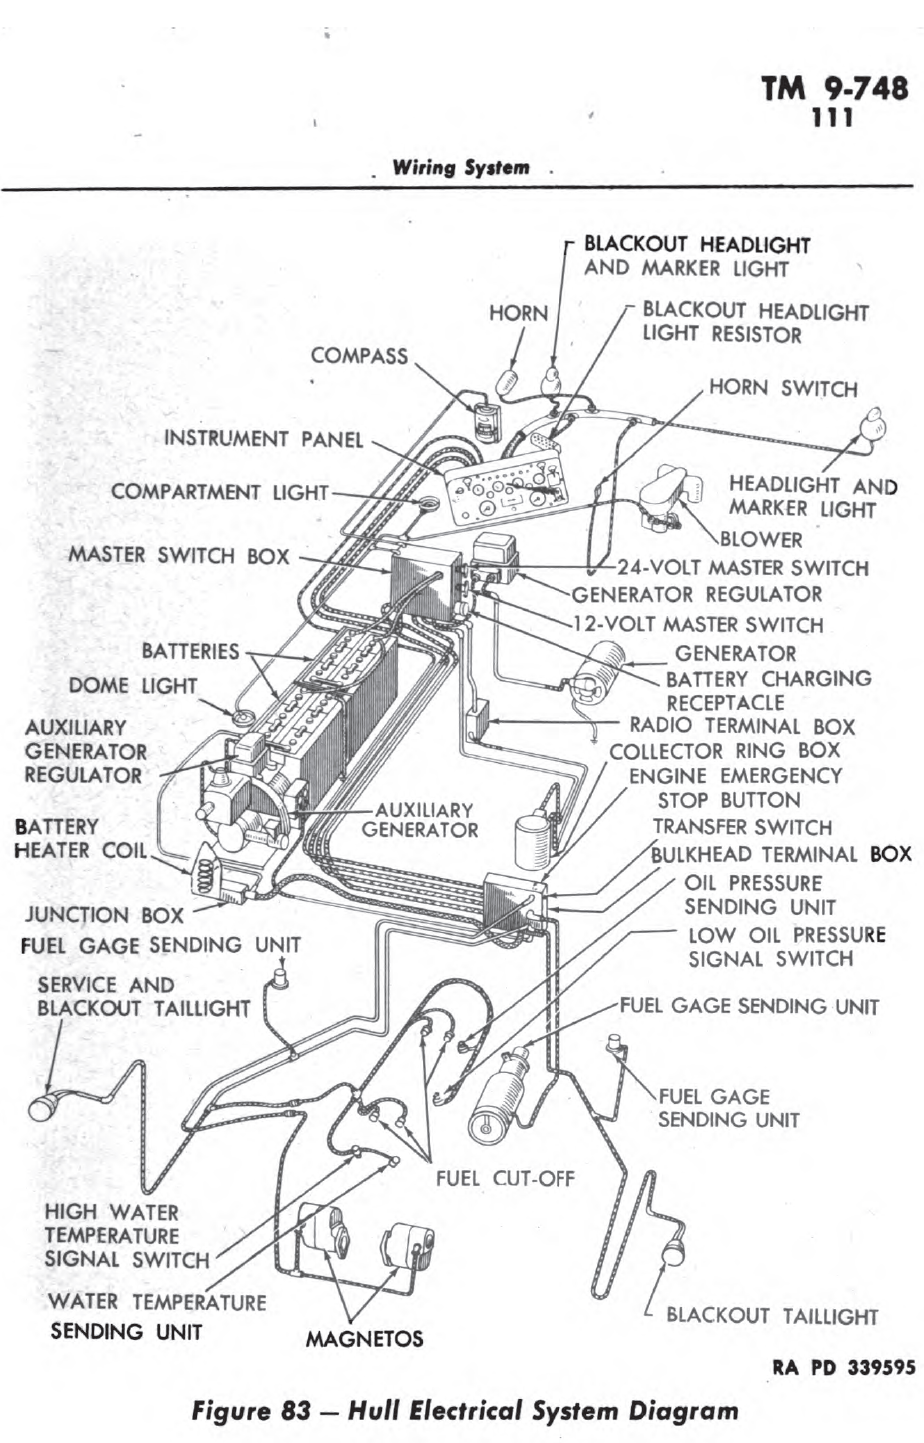
M4A2 hull wiring diagram showing Homelite installKey for the above image.
There was a short 10 item list of things the tank crew could do to maintain the auxiliary generator, and the final one removed it and put the new one/refurbished one in. looking over the technical manual for the generator (TM9-1731K), and reviewing its construction, it was both heavy duty in construction and designed to give long trouble free service. The unit took the up rear part of the sponson on the driver’s side and had a dome light right near it on most Shermans.
. . .
The four-stroke mystery auxiliary generator
The Mystery Auxiliary Generator: When I was going through all the Sherman Technical manuals looking for info on the lights and Aux Gen, I found a few references to a model not made by Homelite. What’s interesting about this is, the Homelite tech manual is listed as a reference in most of the Sherman TMs that use it, but the mystery Aux Gen is not. I found most of the specifications for it but not everything and I found a few good pictures in the manuals, though one manual was useless in that area because it’s a horrible scan.
As you can see this is a more compact installation
The Motor was a single cylinder like the Homelite, but it was a 4-cycle motor, the Homelite was a 2-cycle. The bore was 2 5/16 inches and the stroke was 2 1/4 inches. It ran between 2300 and 2550 rpm and made 1.6 HP at 2300 rpm.
M4A4 hull wiring diagram showing the location of the more compact unit
The Generator was 6 pole, and compound wound for starting, and shunt wound for generating. I assume it put out about the same amount of power as the Homelite unit, but the technical manuals I have do not state what it produced.
The whole unit appeared to take up less space and maybe the aux generator they used in some wet ammo rack hulls. If anyone has more info on this Auxiliary Generator, please contact me!
Both units had small fuel tanks in the engine compartment with their own filler caps. In some installs, the gas tank may have been partially mounted inside the crew compartment. I’m not sure if this version had an oil tank or was like the Homelite, that needed oil mixed into the fuel for oiling. I’m not sure why they used two different unit, the size probably had something to do with it, but it also could have been a supply issue, maybe like with the turret traverse systems, one maker couldn’t keep up?
. . .
A little note on the Technical Manuals, you would think they would be standardized, and in some ways they are. The early manuals, like the ones on the Lee tank, and early Shermans seem to be much shorter than the later versions, and none seem to cover the tank in the same way. They all seem to have an inventory of what the tank should come with, and it’s really huge, and a section on how to drive and maintain the tank. They all seem to have an electrical section, but what it actually covers varies. The M4A4 tech manual has a huge section on the motor, but nearly nothing on how to use the main gun. They do seem to get better as the Sherman aged, but the only late model manuals I have are for the M36B1 (TM9-748, TM9-745) and B2, and a horrible scan of the M4A3 manual(TM9-759). I have much better manuals for the M4A4 and M4A2 though. I really need a high-quality 9-759!
The Life of a Sherman Tanker: The Crew the Tank, and How They Lived With it, Babied it, Loved and Hated it.
This section is about the crews and their life in the Sherman tank. It will cover the responsibilities of each crew member. It will try and cover the day-to-day routine of a tank crewmember. No man facing war in the modern world has it easy, and the men who fought the Sherman fit this category, but the claims of bad writers aside, the crews of Sherman tanks had a better chance to make it through the war than your average dough. Tankers faced dangers regular infantry didn’t, but overall, being a tanker was more comfortable, safe, and less likely to get you killed than being a grunt. No man who had to face down Nazi Germany, or Imperial Japan, had it easy.
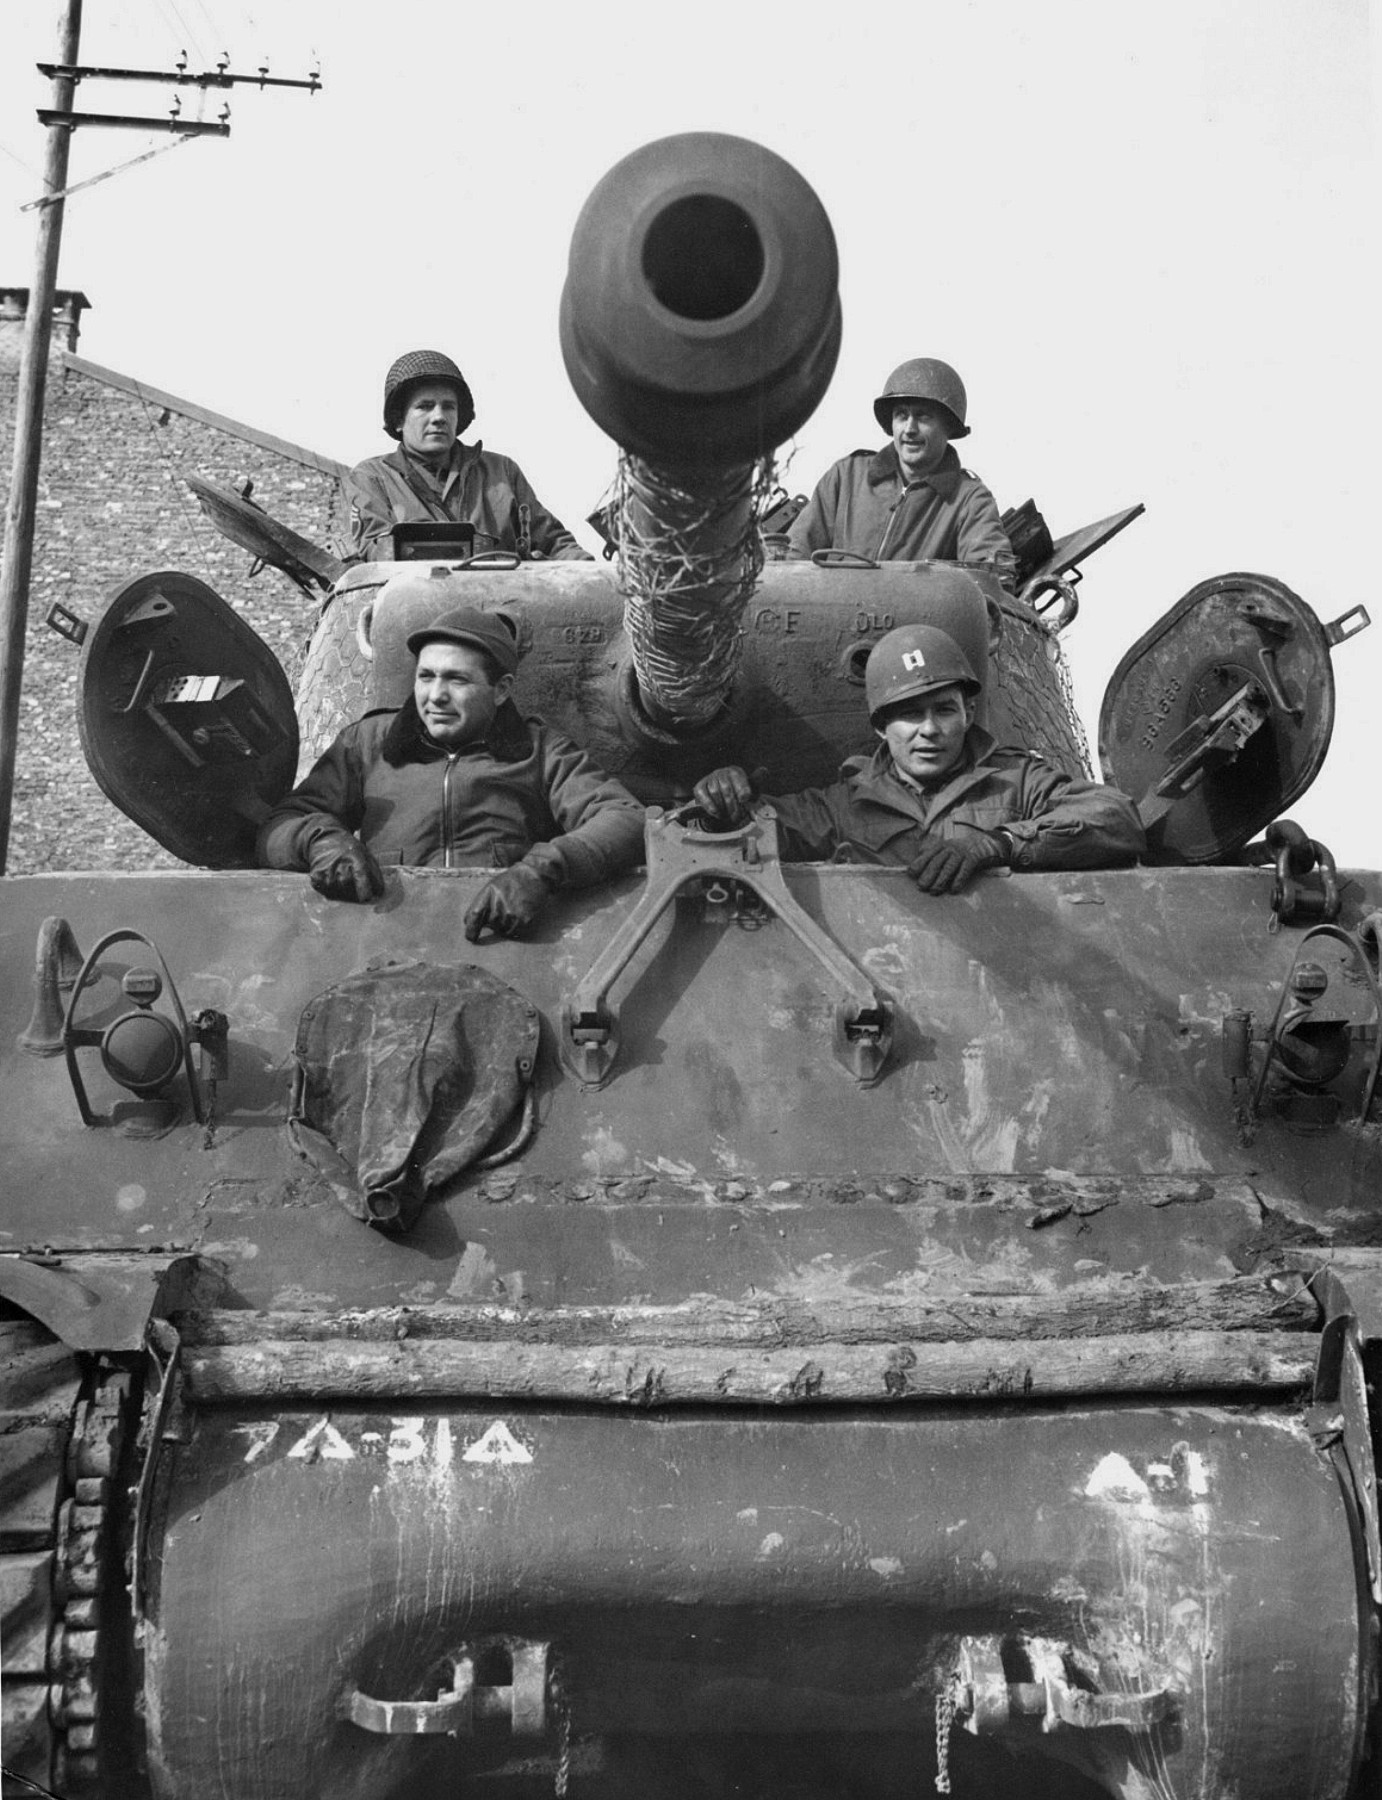
M4A3(76) 31st Tank Battalion 7th Armored Division
In most cases the crews loved their tank, this point was really driven home in a recent Chieftain’s hatch, he mentioned how he was interviewing an American tank crewman from WWII, and the crewmember loved the Sherman because it protected him from all the stuff he saw kill the infantry around his tank. When any kind of artillery fire comes in, the tankers can just close their hatches, buttoning the tank up, and wait it out. The exterior cargo on the tank is going to get some holes but the crew was safe, and even a direct hit, unless it was a really big gun, probably wouldn’t hurt the crew. The doughs around the tank had to find any cover they could, and lots of infantry died to mortar and artillery fire. The tankers also didn’t have to worry about machine guns, AP mines, grenades, and bayonets either.
Being a tanker has its own set of dangers and horrible ways to die, but overall, it was a lot safer to be in a tank, than to be any kind of grunt. Sure, the beast you live with, service, and fight can hurt or kill you if you are not careful, ripping off a carelessly placed foot as a turret rotates or losing fingers to hatches can suck, but training can minimize those, no training can save you from an artillery barrage as grunt if you didn’t have time to dig a hole and it’s flat. The gruesome ways tankers could die in combat are somewhat offset by the things he can stash in the tank to make life more comfortable. Booze and non-army food were popular items for tanks, plus, you’re not walking around with a heavy pack all the time.
Drills: Monotonous Training, because ‘Second Nature’ means it’s easier to do under fire!
Along with the Technical Manuals that the crew received on the radios, guns, tracks and suspension, and more, there were Field Manuals that the crew used to drill on the tank. The main one for the M4 gun tanks was FM17-67 Crew Drill and Service of the Piece, Medium Tank M4. This was a 132-page book that contained instructions on the crew composition, and on foot formations, crew control, drills, serving of the piece, mounted action, dismounted action, removing wounded from the tank, inspections, sight adjustments, and destruction of the tank and its components. Training means practicing these things over and over.
The idea behind the Field Manual was to give the tank commanders and platoon leaders a set of standard instructions to teach their men so they were all trained to do their jobs the same way, to make everything about the tank and using it as familiar as possible, so it could be used in combat effectively, even under the most terrifying conditions, and still accomplish its mission. The commands being standardized meant the crew members could be moved around and know the standard way things are done, even in another tank, with an unfamiliar crew.
Now let’s talk about what drilling is all about, because unless you’ve been in the military (I haven’t been, but you can learn about this stuff without having served, and that’s the idea here), you may not really know what drilling means, and it doesn’t involve power tools. Sportspeople will have some idea, drilling on something is doing it so often, exactly the same each time, hundreds of times or more, to make the drill second nature. So when a tank commander yells abandon tank, no one thinks about it, they just do it, and they’ve done it so many times, they do it flawlessly and fast because they practiced over and over knowing their lives could depend on it later.
Here’s a list of some of the drills: Do Something Over and Over until it bores you to Tears
Each of the drills would be called out by the commander as a verbal order, and each crew member including the commander would carry out a series of actions to accomplish the order. For example, Drill/Order Dismount would be called out, each crew member would have specific instructions for what they were expected to do. Starting with disconnecting their headset intercom cable, then standing on the seat and climbing out, the open hatches order would already have been given.
Prepare to mount the Medium tank; Mount/Dismount: The order/drill for getting in or out of the tank.
Closeall doors/hatches openDoors/hatches: The order/drill for Opening or close the hatches on the tank.
Prepare to dismount through escape hatch; Dismount: The order/drill for the whole crew prepares to leave the tank through the belly escape hatch.
Pep Drill: A drill, made by making a series of drills into a command to be carried out. for example, Commander orders; IN FRONT OF YOUR TANKS, FALL IN; MOUNT; DISMOUNT; FALLOUT SERGEANT; ON THE LEFT OF YOUR TANKS, FALL IN; FORWARD, MARCH; TO THE REAR, MARCH; MOUNT.
Prepare to fire; Various Fire orders: The orders for shooting the guns at various things, including the main gun AA gun and CO-AX.
Secure Guns: This was all the actions taken to secure the guns, including unloading them and lowering the periscopes.
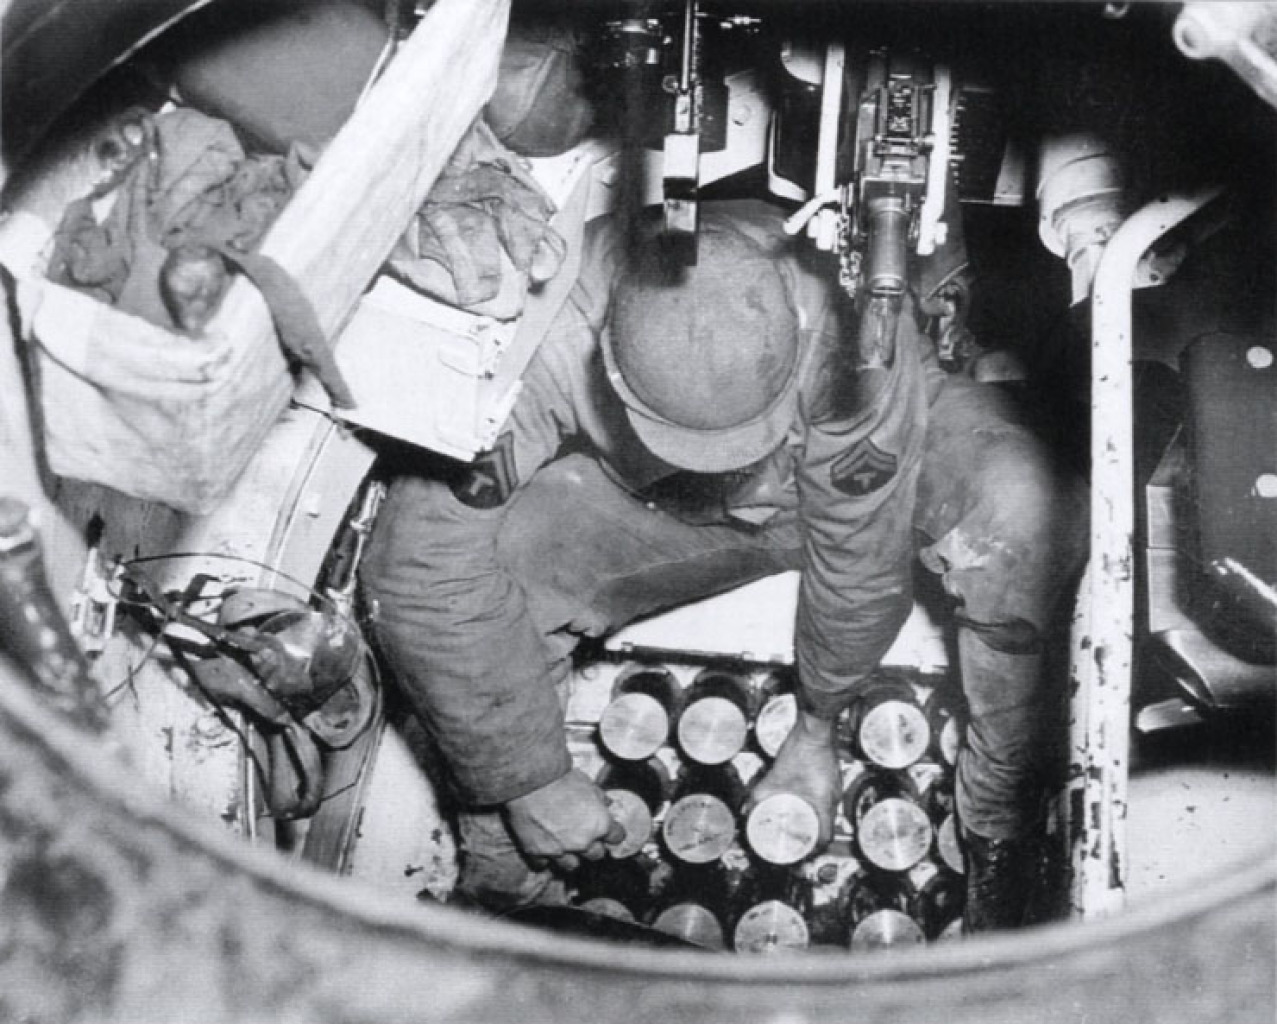
Restow Ammo: This order/drill was for re-stowing the hard to reach ammo so the loader could reach it better by restocking the ready racks and racks nearest him that were depleted by firing.
Load Ammunition: This is the command/drill for loading the tank up with fresh ammo through the hatches. Main Ammo came in 2, and 3 round crates or tubes, so the crew would have to unpack it all then load it into the tank.
Prepare to fight on Foot; Dismount: This is the order/drill for the crew to get their personal weapons ready, and prepare to exit the tank and fight on foot.
Out of Action: This is the order/drill to get back in the tank after fighting on foot.
Engine Fire: This is the order/drill for what to do when the tank’s engine is on fire.
Air Horn Fire: This one is similar to the one above, but for a specific type of fire that only happened on the tanks powered by the R975.
Perform halt inspection: This is the drill/order for doing all the inspections involved with maintaining the tank on a road march.
This list is just a sample, there are many more in the crew drill manuals, and the drills vary a little depending on the vehicle. There were a series of drills specific to the various models of Sherman I didn’t list along with numerous inspections related and maintenance related drills too. If there was a common action or job to do on a Sherman tank, there was a Drill involving it. Once in a combat theater drilling would be a lot less common, unless they were refitting and training a lot of replacements or in a rear area for a long period of time.
Inspections drills involved inspecting parts for wear and tear, and were not the same type of inspection officers would carry out to makes sure all men and gear were present and working. There would be those as well, but they are not really a drill.
Another responsibility of the crew that was covered in FM17-67 is destroying the tank if it is disabled in an area likely to fall into enemy hands. If they had a good chance of escaping capture, they were to take the periscopic and telescopic sights, if not they were to be smashed. Then basically, what was destroyed was based on what you had the most time to do. If you had very little time to get away, you might only disable the main gun, machine guns, and stabilizer, with more time the gun recoil mechanism and or the whole tank. The manual gives instruction on methods to destroy everything from the machine guns and main gun to the tank itself. The Army has refined this over the years, and now the tanks have charges just for destroying them as part of the tanks gear.
Now let’s go over each man of a Sherman crew and the things he was responsible for and what his job involved.
Commanders position: The Boss, the Man in Charge, the Big Cheese
The commander sat in the back right side of the turret directly behind the gunner. His job was to command the tank. This meant he took the orders from the platoon leader or company commander and made his tank perform the tasks he’d been given to accomplish the missions he was on. He had the radio in the bustle of the turret to his rear to help him communicate with the rest of the tanks in his unit. To do this he could stand on his seat with his head and shoulders out of the tank, and direct the crew over the intercom. Only he could transmit on the radio, but the other members of the crew could listen. They could all talk to each other on the intercom. On early M4s, when ‘buttoned up’ or when the tank was all closed up with its hatches closed, the commander only had his rotating copula periscope. Later versions of the Sherman had an all-around vision cupola, discussed earlier, that provided a much better view around the tank for the commander. As some of the charts show in the data section, this was the most dangerous crew station. The commander spent a lot of time with his head stuck out, when the rest of the crew was buttoned up, it made him a prime target for basically anyone and anything being shot at the tank.
His job in combat was to call out directions to the driver and call out targets for the gunner. He had a sight vane mounted on the roof of the turret to use outside, by using it and his turret override; he could put the gunner roughly on target by rotating the turret. If he was the platoon leader or company commander, he would be calling out directions to the other tanks and trying to sort out what everyone was doing and keep things under control, or in the company commander’s case as much control as he could over the tanks in his company. He would be depending heavily on the platoon commanders to run their platoons and keep him informed of what was going on.
He was responsible for the tank up to a point and had to make sure the crew kept up on all the required maintenance to keep the tank in proper running order. He was also responsible for the well-being of his crew. The commander was for obvious reasons, the most experienced man in the tank in most cases, as well. Crews that had that belonged to the platoon, company, and battalion commanders were often short a man on tank maintenance since the officer would be off doing officer stuff, like planning and thinking, sometimes the tanks had a sergeant who stood in for the officer when he wasn’t using the tank as well.
The commander’s position was the only spot open to officers under normal operations. The most common officers would be 2nd lieutenants, and lieutenants as platoon leaders, captains as company commanders, and lieutenant colonels as battalion commanders. You might find a major or two in there as well. NCOs of various ranks from the lowly buck sergeant to staff sergeants and maybe higher on rare occasions would be the enlisted side of the tank commander scale. All the other positions in the tank were filled with lower ranking NCOs or PFCs.
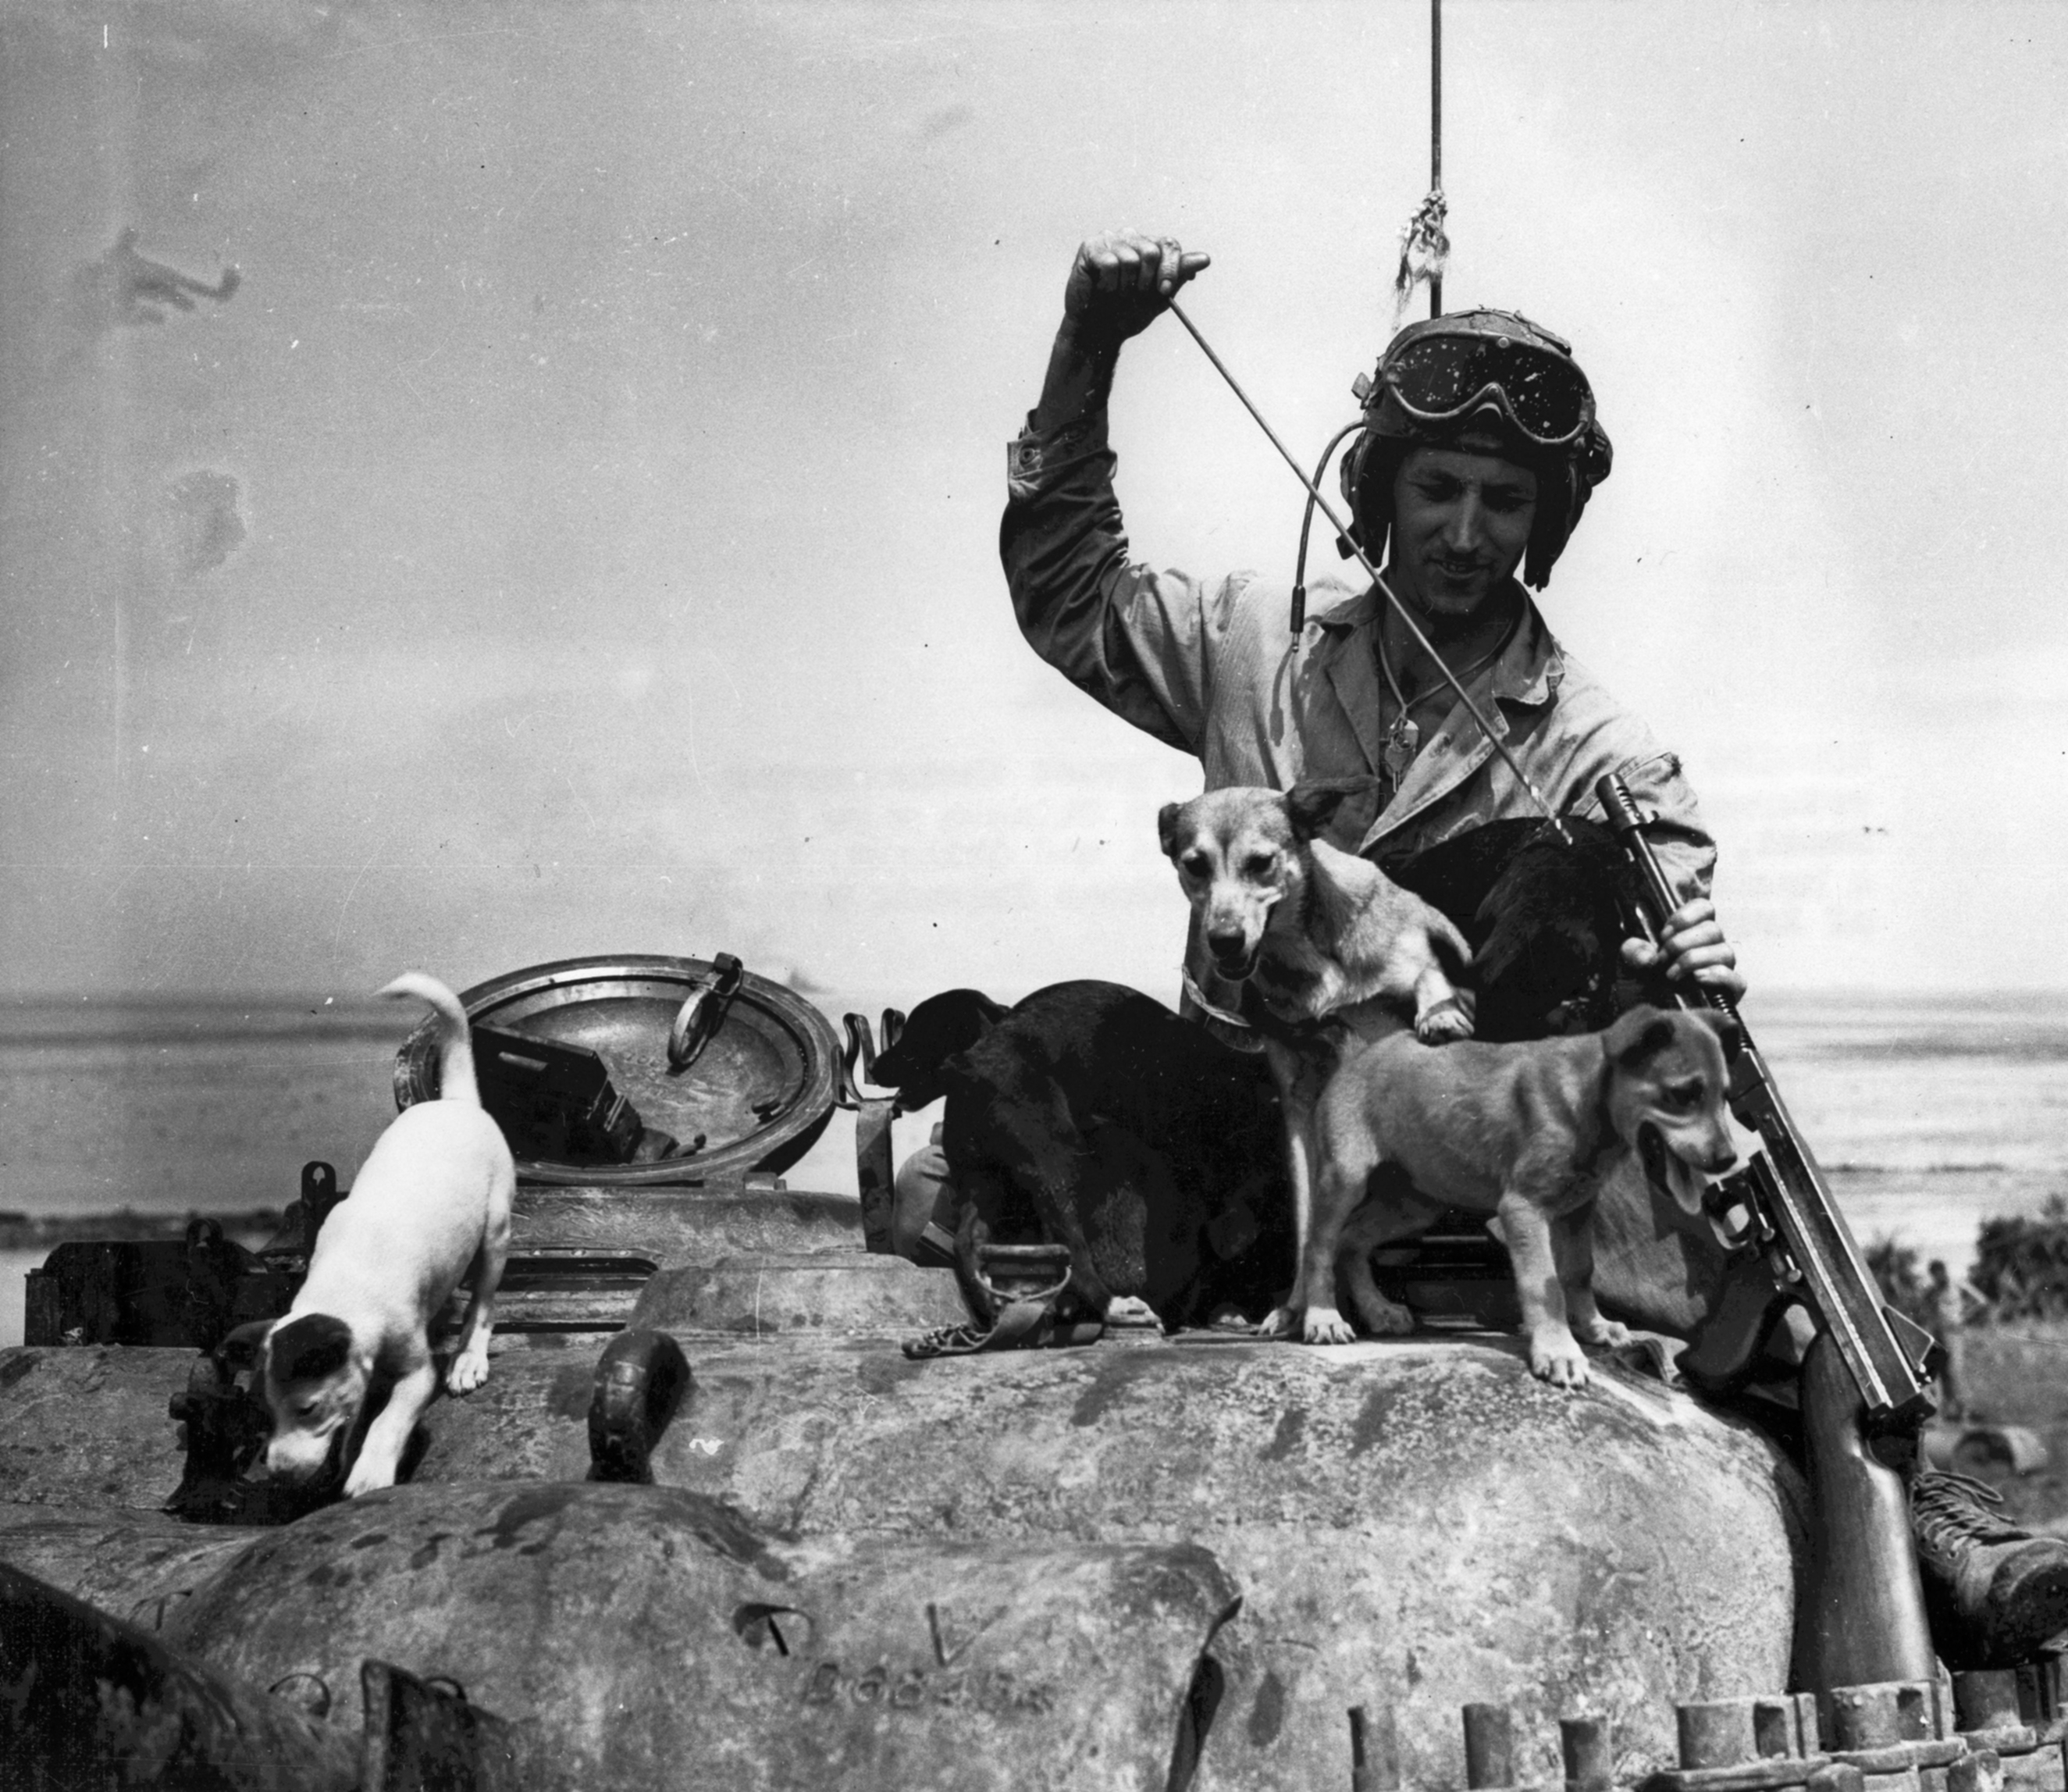
M4 Commander and his cute puppy crew!
Gunner: The Man behind the gun Big Gun and the Co-Ax.
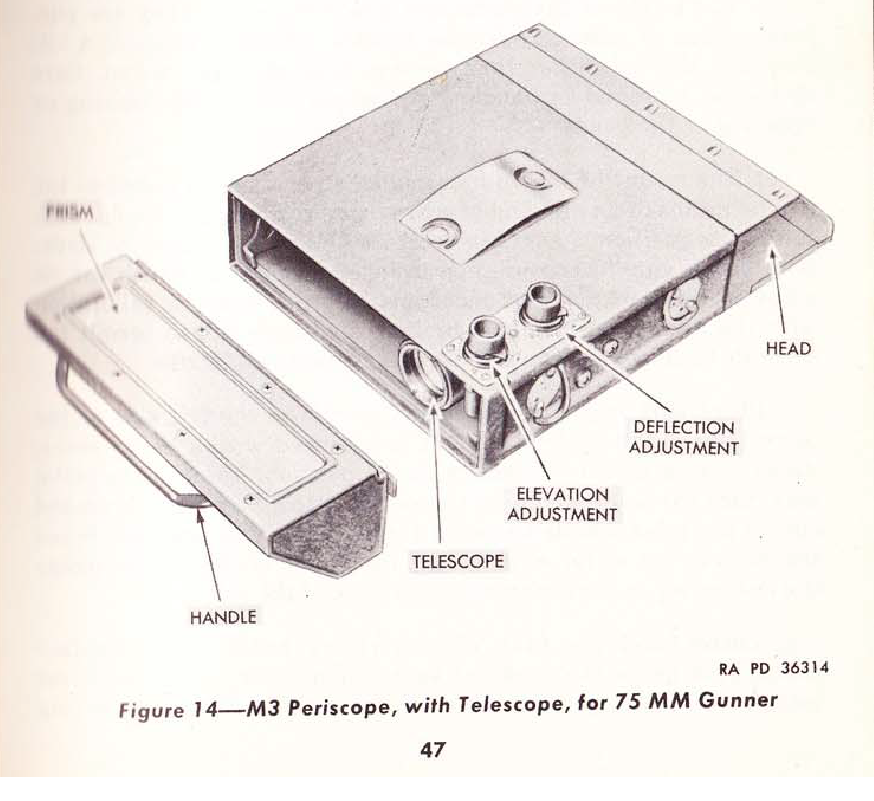
The gunner was usually the next senior man in the tank. He sat right in front of the commander and used the commander’s hatch to get in and out. He had his own set of turret controls, and only he could control the elevation of the main gun. Along with the gun controls, he had all the controls for the stabilizer in front of him. In early Shermans, he only had a periscope with a reticle, it had a fixed 6x power zoom, but also could be looked through with no zoom. Later gunners had the periscopes and a direct view scope. He was dependent on the commander to get him near a target and then took five to six seconds for him to pick up the target. This took a much longer time on German tanks like the Panther, with gunner target acquisition times in the minutes, not seconds.
The gunner controlled the main gun, and the coaxial mounted M1919A4.30 caliber machine gun, though he was still following the commander’s orders on what to shoot. Each weapon was fired with a footswitch on the gunner’s footrest, and a manual lanyard for backup use. The gunner controlled the turret either with a hydraulic system independent of the tank’s motor, and a manual system that just used a crank and gears. You would think the gunner would have the best view out, but in tanks, most of the time, at least in the older models, their view was very limited, but for the era, the Sherman was better than most other tanks. A good gunner working with a good loader in the 75mm armed Sherman could get off, two or three aimed shots in a very short time, a very big advantage in tank combat.
A Tank gunner also had to be able to shoot, like all other WWII tanks, the Sherman lacked any kind of aiming aid for the gunner other than his scope and periscope. Limited range finding could be done with the reticle in the sight, based on the known height of something, but it was not very exact. The gunner’s brain was really the tool that did the correcting based on experience, skill, and innate ability and feedback from the commander on fall. Modern tankers have it much easier in this area, since modern tanks have laser rangefinders, and sensors to check for windage, temperature, and barrel wear, and a computer to use all the data to compute the aiming corrections for the gun. That was something that probably couldn’t even be dreamed of by a WWII tanker. Better rangefinders were right over the horizon though.
This is the all-electric Westinghouse Turret drive, the least popular of the three units used.
Loader: The Man Who Feeds the Hungry Beast!
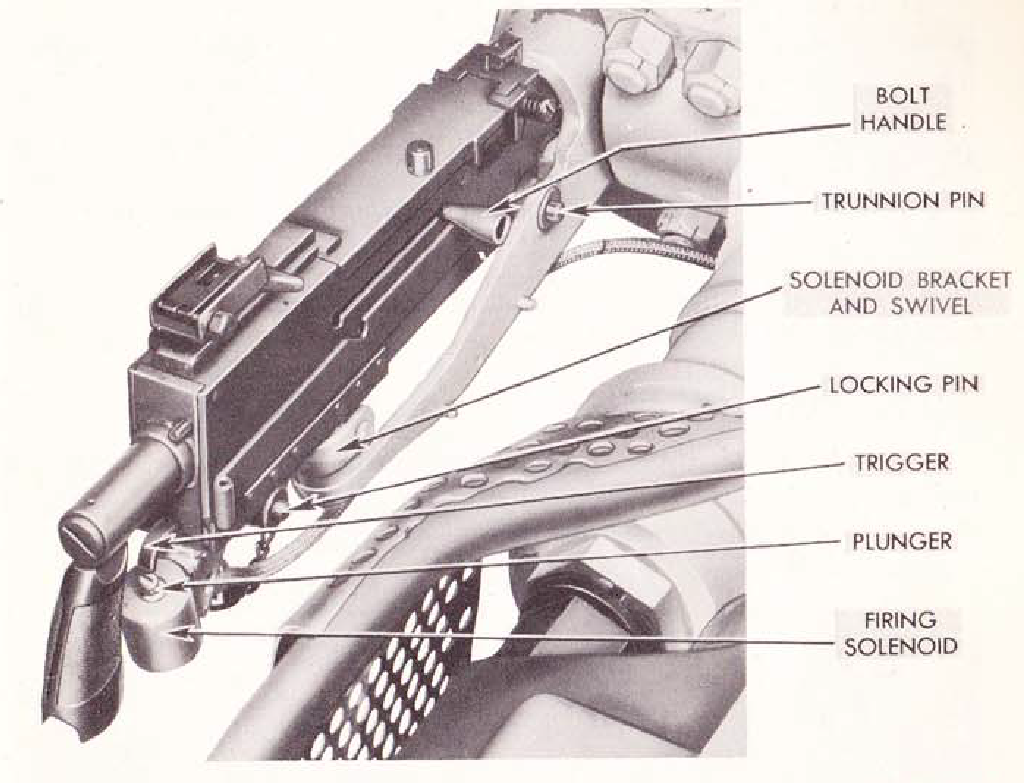
The loader’s job was to service the 75mm M3 gun and the coax .30 caliber machine gun. The commander or gunner would call out the ammo type for the main gun, and the loader would load the gun and yell “Up!” and the gunner would know the gun was ready to fire. The loader was supposed to watch the belt on the coax and make sure the gun didn’t run dry. He was also supposed to be trained on how to clear a problem with the main gun or machine guns. Even canons can have duds, or shell problems, or even just break. There were a small number of spare parts kept in the tank for the common things that failed on the guns.
The loaders station was on the left of the gun, opposite of the gunner. He had a lot of space to move around compared to other tanks of the time, and a fold-up seat. He also had a fully rotating periscope on the roof above him for his viewing pleasure. In early Shermans, the loader had twelve ready rounds around the base of the turret basket, with another eight in a ready rack at his feet. This was the primary reason so many early Shermans burned, anything that penetrated the turret or the hull and hit those exposed rounds would set off a chain reaction of the propellant in all the ready rounds igniting, destroying the tank, and often killing most of the crew. This problem was figured out pretty fast and the twelve exposed rounds were deleted and an armored four-round ready rack replaced it and an eight-round ready rack was used on improved models. Later armor was added to the inside and outside of the sponson ammo boxes as well, before removing them completely for the wet ammo installations in later improved hulls floor.
If a lot of firing was taking place, the loader was a very busy guy, on early Shermans the sponson racks, even without all the turret ready ammo, he had a fair number of easy to get to ammo racks for the main gun, but since the turret basket was screened, he could only get to them with the turret at certain bearings. With the switch to all ammo but the ready ammo in the floor of the hull, his job got much harder. On the wet ammo rack tanks, he would have to pull open doors in the bottom of the turret basket, then open an armored box and pull ammo from it. He had to know what was in all the ammo boxes, and was responsible for what got loaded into where, and remembering it all.
The loader on some models also had a 2-inch smoke mortar to load and fire at the commander’s desire. It was a short-lived feature. It protruded into the loader space and was not well-liked by that member of the crew. Part of the crew drills for the Sherman involved almost the whole crew, during combat, if the tank wasn’t moving, the co-driver and driver helped the loader by handing him ammo from harder to reach ammo racks near them, and in lulls, in the fighting, the whole crew would help, so the loader could re-arrange the ammo racks getting hard to reach ammo into the easier to reach racks.
After spending some time as a co-driver, a crewmember may be moved up to loader. A good loader was important, the 75mm and later 76mm guns were capable of very fast rates of fire, but only if the loader could keep up. When he wasn’t scrambling around the floor of the turret opening armored doors in the floor to find ammo to feed the gun, he was another set of eyes. On early tanks using his periscope, on later ones he could stick his head out of his own hatch. Many crews mounted extra machine guns to the roofs too, and if there was one on the loaders hatch it would be his to shoot. Some units would put the M2 .50 mount in front of the loader, and put a .30 Cal M1919A4 on a mount in front of the commander.
Early to well into later production 75mm gun, armed Shermans did not have a loaders hatch. This meant if the loader had to bail out of the turret through the commander’s hatch, he had to get around the main gun to do it. It would be a very hard thing to do if the tank was burning or the loader was wounded and the tank filled with smoke, but that’s why they drilled so much.
The Driver: The Man Who Drives But At the Behest of the Boss
The driver and co-driver were separate from the turret crew; they sat in the forward part of the hull. They could only climb into the turret if the turret was rotated to line up the holes in the turret basket, at least on early models, with the driver’s compartment. The transmission sat between the driver and co-driver and only the driver had a set of controls. Only the driver had any instruments as well. On early tanks, the drivers and co-drivers hatches were oval-shaped and small and required the man to twist sideways to get through. On very early tanks the driver had a rotating periscope in his hatch and a direct viewport with an armored cover. The viewports were removed from production and extra armor was added over them. This was done very quickly at most factories when it was found bullet splash could get through even a closed port. They were also a big ballistic weak spot in the armor.
The driver needed to be able to drive the tank, often without knowing what he was driving into, trusting the eyes of the other crew members and commander to keep him out of trouble. He needed to know what his tank could drive over and climb, and what it couldn’t. Getting your tank stuck in the mud was an embarrassing thing to do. If the tank was really stuck, it might require more than one tank to pull it out, if the resources in your platoon couldn’t do it, you had to call in other help. The crew would get a lot of heat for that type of thing.
Driving the tank was important, and the driver had to work well with the commander. A savvy co-driver could be moved into this spot, or a good loader would be given a shot. The position was roomy and fairly comfortable as tank positions go. He had a good view forward from a fixed periscope and rotating one built into the driver’s hatch. The seat could also be adjusted up, and the tank driven with the driver’s head stuck out. In the movie Tank with James Garner, you get a lot of shots of him driving the tank with his head stuck out a small hatch M4A3.
As tanks go the Sherman was reputed to be pretty easy to drive, the R975 powered models the hardest, the GAA the easiest, with the diesel and A57 powered models being almost as good as the GAA when in fine working order. Learning to drive the Sherman was the easy part, where and how to drive it in combat and just over what terrain it could go that was the real challenge. The Sherman tank’s mechanical toughness made it easier for the driver to worry about the important parts of t his job and not breaking the tank.
Air blower for the crew mounted between the driver and co-driver, not the light mounted on it
The Co-driver: The BOG, the Low Man On The Pole
The co-drivers position was on the right front of the hull and has its own hatch. The position had no controls or instrument panel. This position had a .30 caliber M1919A4 machine gun, aimed by tracer through the periscopes. This gun had a very limited fire arc and wasn’t very effective, but the extra crew member was nice to have around to help keep the tank up and running.
This was the position most new tankers started in. As they learned how the tank worked they got moved around. Not all crew changes were due to losses. You could have a man transfer out or be sent to the rear for a disciplinary situation, to leave, or some other reason. Crew members could be moved from tank to tank. If another Sherman lost its commander and no one in it was ready to replace the man, a really good gunner or driver might get pulled out of another tank to take it over. Crews were kept together for as long as practical. The co-driver was the closest to the escape hatch built into the floor of the tank; it was right behind the seat and would be the best way for the driver and co-driver to get out of the tank in some cases, or the only way if the turret was in the wrong place.
The BOG would be ready to help the loader re-store ammo when needed in combat or would be the crew member the commander asked to get out and check something. On command tanks, he would have an extra command radio mounted in the sponson next to him and he would assist the commander in its use.
Living with the Beast: In the Field, the Tank was Home
The five men of the crew were responsible for keeping the tank running. This meant keeping up on a long list of daily chores from checking track tension and adjusting it, to tightening the bolts on each end link on both sides of the track run, to checking the oil and radiator fluids, or the batteries. There were also numerous things that had to be hit with a grease gun, others that had to be adjusted. Depending on the motor type various engine maintenance tasks had to be done, and they all needed their air cleaners cleaned often. Plus cleaning and maintaining the main gun, and all the machine guns, loading ammo and fuel. The radios would require constant attention to keep working reliably. That’s just how everyone’s radios were, and US Radios were better than most.
The lubrication chart for the M4A3 is just one page. There was another for the mechanical stuff that wasn’t related to the powertrain or motor too.
Getting food and eating, and other person chores all had to be done as well, and sometimes the crews ate while they worked on the tank. Many tanks ended up piled with extra gear to help make the tanker’s lives easier. They only had to keep the tank up to a point, if it needed major work, like a new transmission or engine; a company or battalion level maintenance crew would come and help, ideally, or a replacement tank would be issued if too much work was needed.
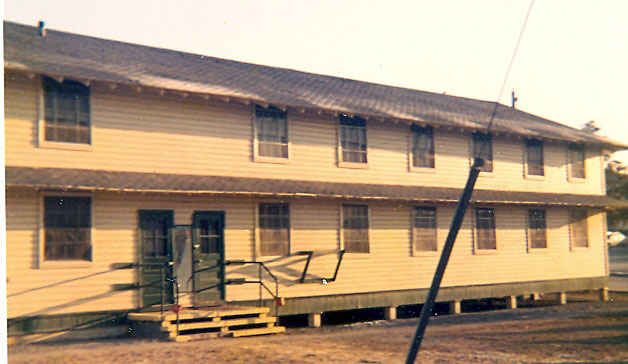
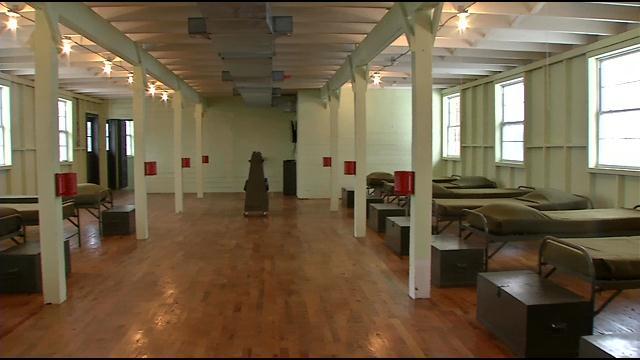
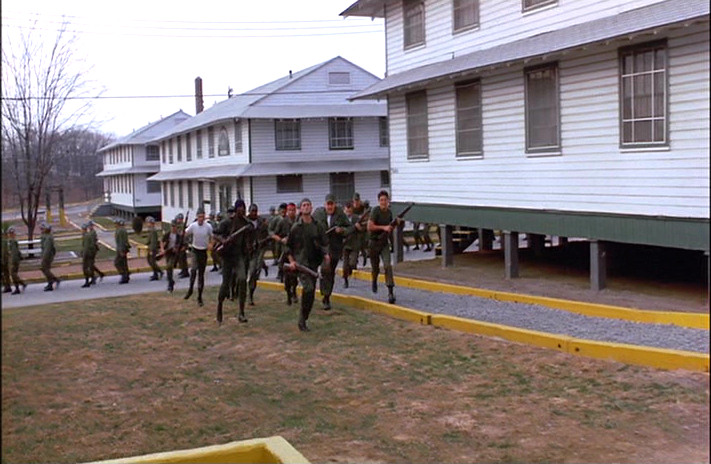
Fort Knox Barracks Building Circa 1972.The inside of the Fort Knox Barracks above.
Daily life at a major base or rear area base in a combat theater would be similar to the infantry or the other combat arms. On a major base, they would be living in heated barracks, their tanks in a tank park somewhere, with an area set aside for maintenance. They would be living in barracks organized the same way as their units, though if in the US some men could be living off base. There would be mess halls and bathrooms with plumbing and hot water. Daily life would be drilling, cleaning and maintaining the tanks, drilling on the tanks. Practicing on the tanks, driving it around, using the weapons, fixing it when it broke, or getting it unstuck when it got stuck. Generally learning how the tank worked and how to use it, with field training and bigger exercises mixed in. There would also be a lot of cleaning, the tank, the barracks, the area around the barracks, and probably KP duty and other watches or duties. Tanker probably didn’t spend as much time running or doing calisthenics as the infantry either. One of the most common training drills would be getting in and out of the tank fast under various circumstances.
Another picture of Fort Knox Barracks, this one from much later. Hmmm, odd-looking soldiers…
In a combat theatre rear area, life would be like a stateside base with more tents, and fewer amenities, and worse food. They would also be spending more time training on the tanks and later in the war, training with the infantry they would be working with. They would be spending their time training new people or replacements, and getting ready for their first combat or going back in combat.
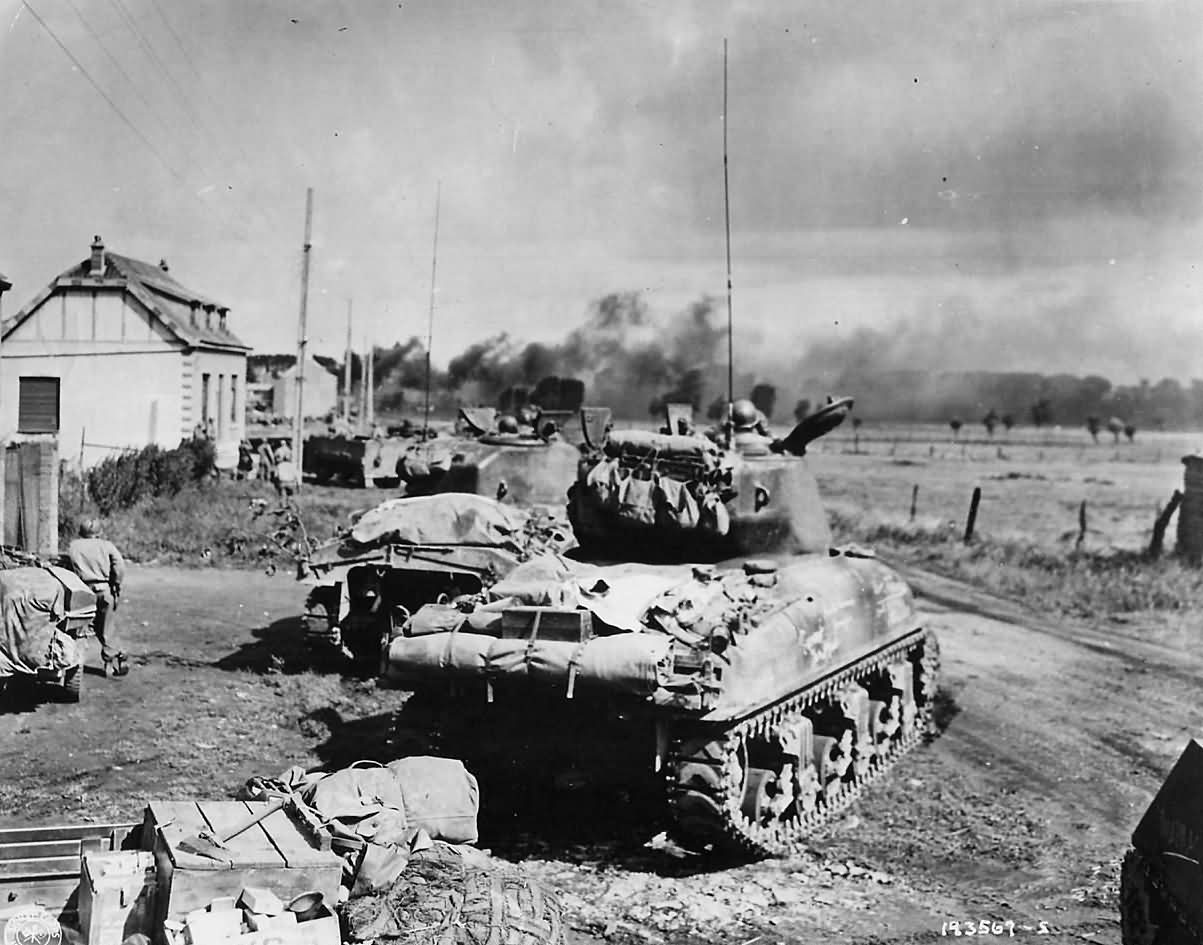
M4A1 and M4 tanks loaded with a lot of stuff on the back deck. Extra food and ammo were common fare, along with things to make life a little easier.
Once out operating things would be different, though much time would still be spent not fighting, working on the tanks, eating, and generally being bored. The living conditions would be worse, the men would be sleeping under tarps hung from the sides of the tanks as makeshift tents, and sleeping on the ground or another tarp on the ground or cots if they could steal them somewhere and they didn’t get shot up while fighting, since they would be tied down somewhere on the outside of the tank. Once free of the daily grind that base life was, free from junk on the bunk, or tarp in the tank inspections, tanks start to look more like something out of the movie Mad Max than tanks from a military unit. Tankers collected all manner of junk to haul on their tank, logs were common, maybe for the added stand-off armor value against AT sticks, or for the value in getting the tank unstuck from the deep mud. It was really up to the officers and senior NCOs to stay on top of the crews to keep the tanks in running condition, and it was common in badly run units for daily maintenance to stop on the tanks once the fight started.
Tank crews like any other soldiers look for things to make their life easier when stuck out in the field and at war. Tankers have the advantage of being able to stuff things in the nooks and crannies of the tank, or just strap it on the outside. Things including extra food, and small arms ammo, water, gas and oil cans, stuff pilfered from abandoned homes or occupied ones once the Army made it into Germany. It’s really no surprise the US Army liberated goods from the Germans, after having to fight them and seeing what they did in the camps, it seems no one really cared as long as US Soldiers didn’t shoot the Germans while taking their things. Tankers could haul a lot more loot than an infantry grunt could. I will not judge allied troops for taking things from the Germans; the Germans did a lot of stealing themselves, and most stood by while the Gestapo shipped 12 million people off to their deaths, so having their stuff, often stolen property itself, taken by troops who didn’t want to be there in the first place doesn’t bother me. It surprises me the Allies didn’t slaughter more Germans outright after seeing their ghastly inhuman crimes though.
Another key difference is, in anything but the most desperate situation, Army or Marine Corps tanks withdrew to the rear, not far, but far enough to not be in the line, at night. Tanks are blind during the day, at night they are almost cripplingly so and tanks were rarely used in night attacks, no countries experimental night vision systems were good enough for that. Holding the line was left to the grunts, at night the tanks would spend their time getting their tanks reloaded, refueled, and repair any damage, on top of all the normal day to day maintenance a tank still required. This was done before eating, and sometimes under harassing artillery fire. In the few cases, tanks were forced to be part of a line at night and an attack happened, they often ended up alone since they had little chance of noticing their infantry was pulling back without them. This left the tanks very vulnerable to infantry close assault.
Infantry always had mixed feelings about armor. They complained about it when it drew artillery fire, and it often did. When the ground pounders ran into something really dug in, even something like a light machine gun, if their ability to maneuver to flank and take it out was hindered, they really liked tanks. If there was even a hint or rumor, of enemy armor in the area, the infantry loved the tankers and their steel mounts. A tank-infantry team, working together like a well-oiled machine, was hard to beat, as Germans and Japanese found out.
One thing the tankers were advised to do, is once an objective was taken, they needed to withdraw out of view of the enemy and off the objective so the infantry could reorganize and prepare for the standard German counter-attack. If they stayed on the objective, the amount of fire they drew, both direct, and indirect, made it harder for the infantry to reorganize, so the tanks would pull back and rearm and refuel and wait somewhere out of sight until they were needed again. If they could not get out of view completely, they would have to do maintenance, under harassing mortar or artillery fire.
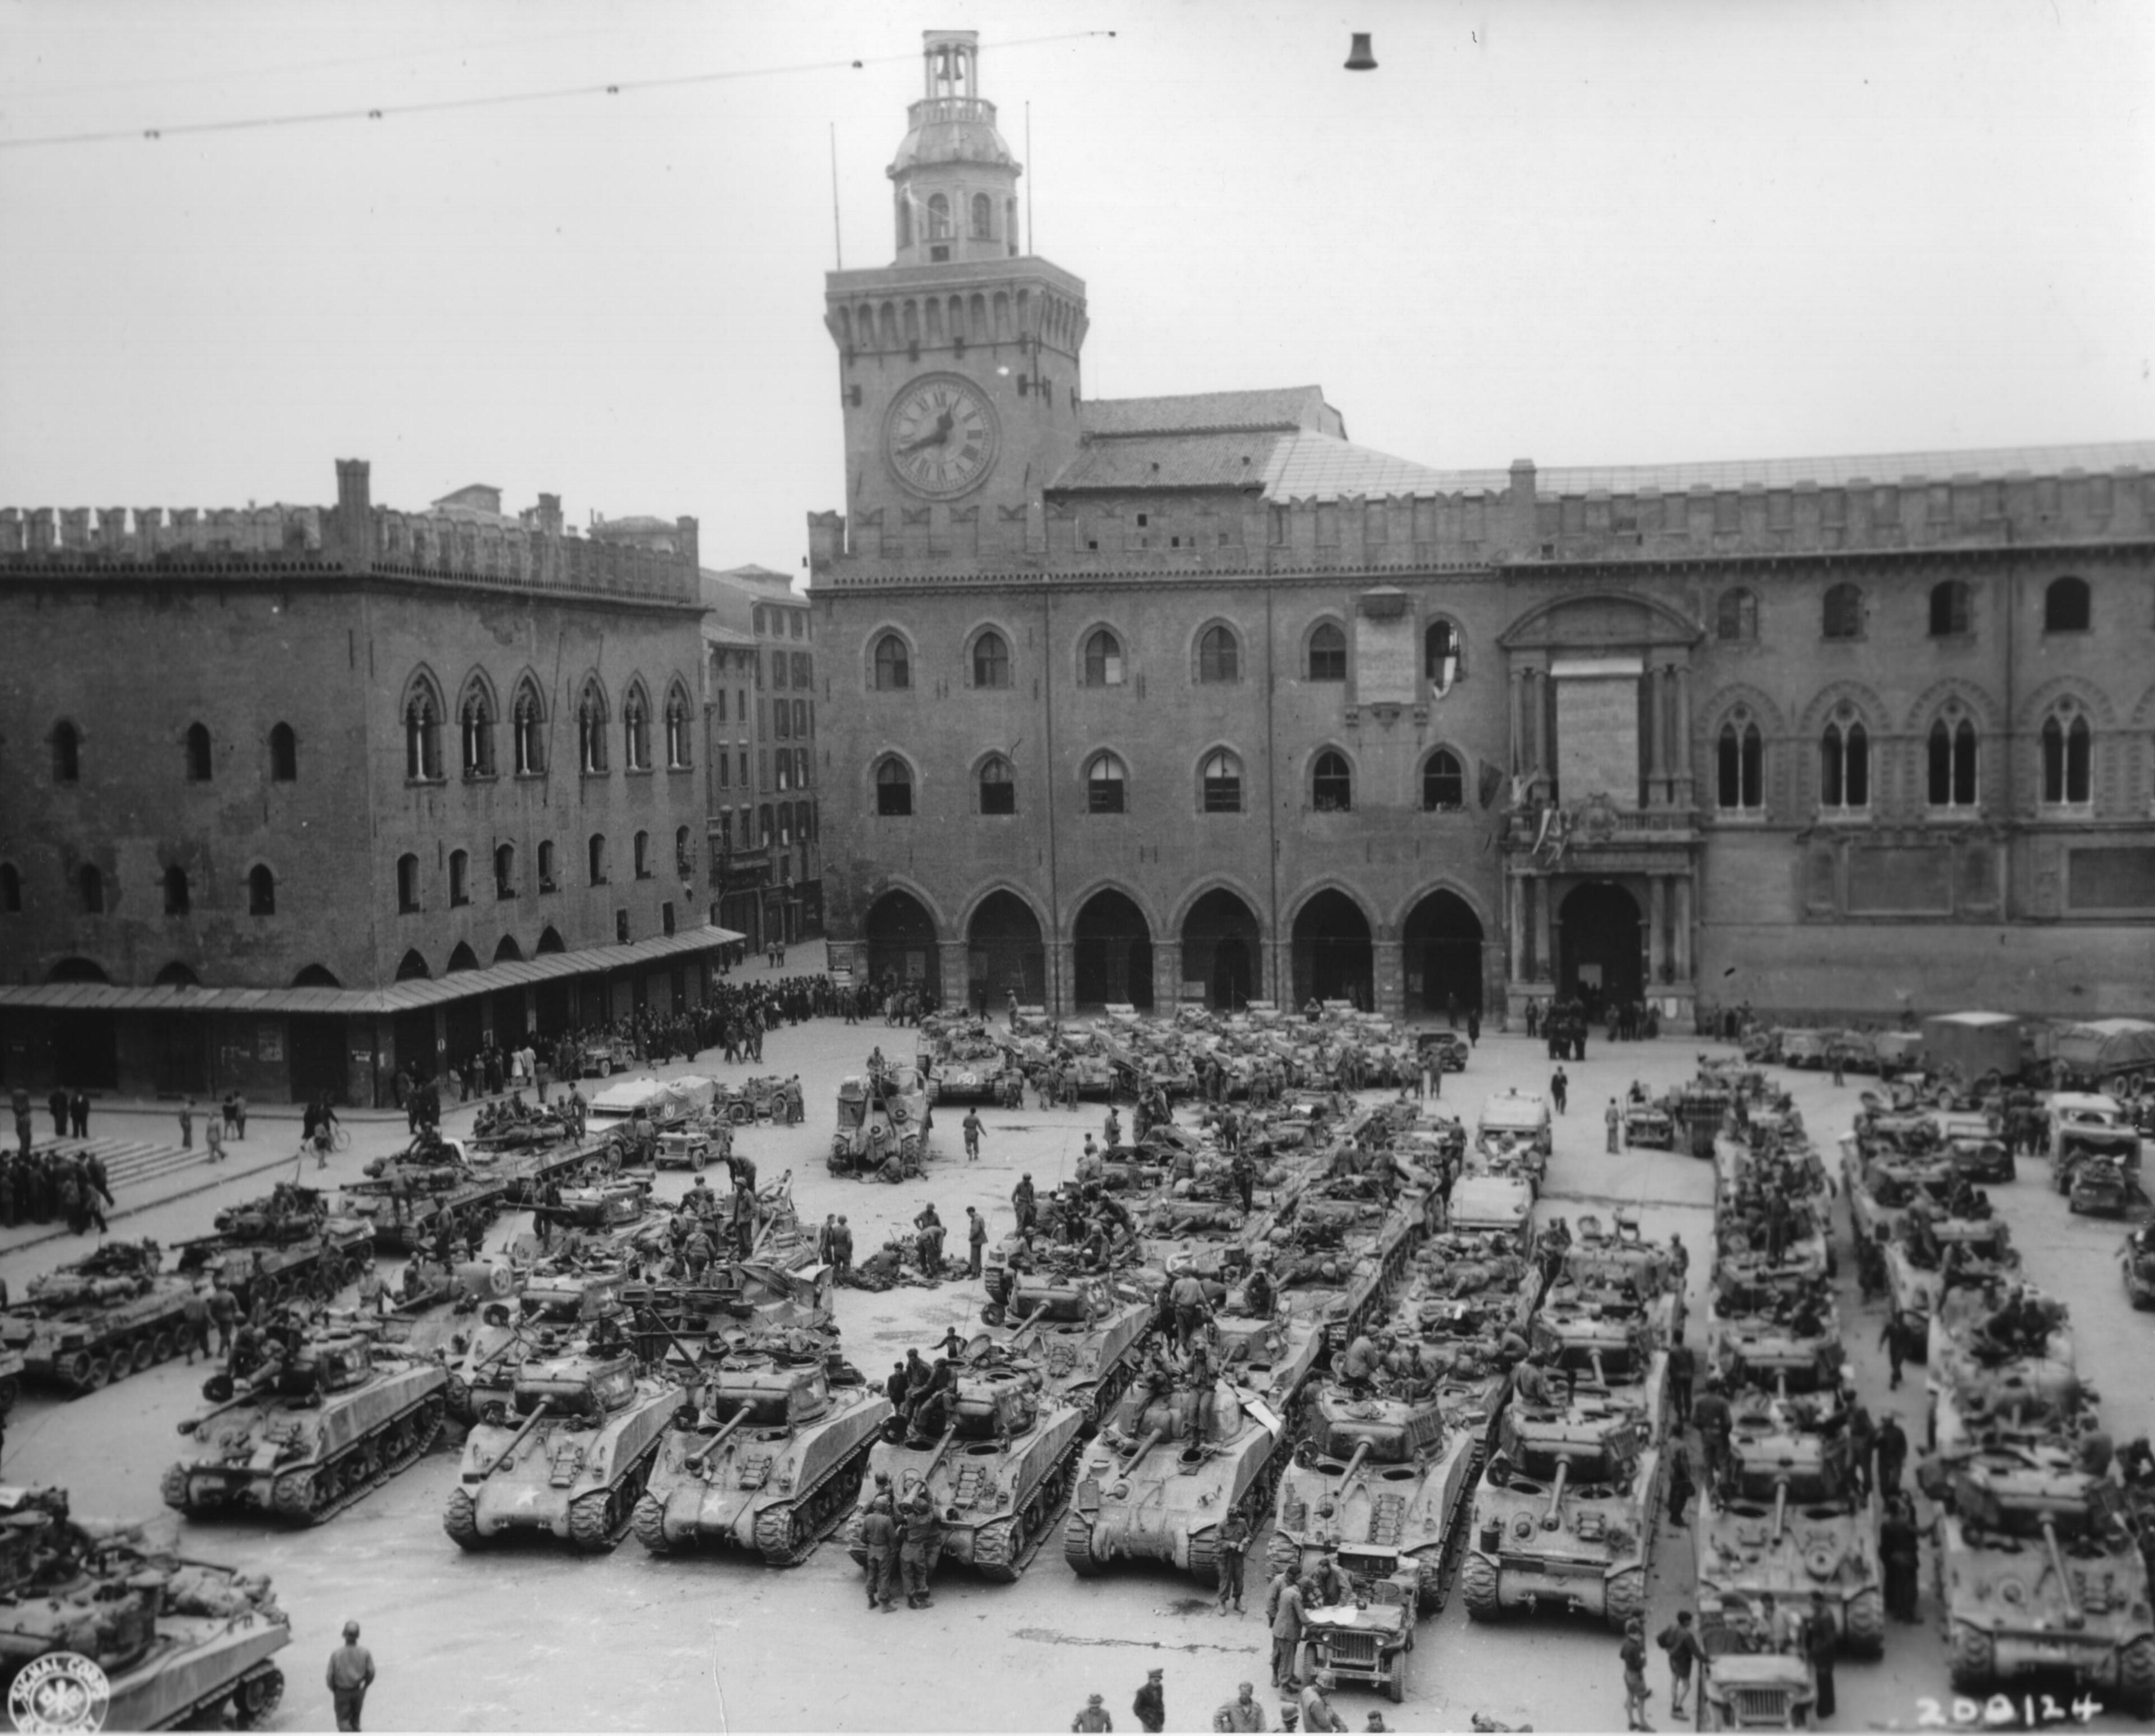
Several Companies of Tanks parked in a town square. A large mix of M4 types. The crews are probably living in the surrounding buildings. This is a really interesting photo, and I found out it’s the 752nd Tank Battalion in Italy. The location is Plaza Emanuel in Bologna. (UPDATE: We got a great comment from a reader, Tommaso Gollini, ‘the pic taken in Bologna (my hometown) is fantastic. I already saw it in other places. Our main square is called Piazza Maggiore after the end of WW2 but was called Piazza Vittorio Emanuele at the time of the pic. The members of the tank battalion weren’t lodged in the nearby buildings. The edifice on the back of the tanks is called “commune”, and was the place where the Major of the town (called Podestà during the fascism) and the government were operating. Mostly offices and such. On the left, the other edifice is called “Palazzo dei notai” and was the house of the notary corporation (also, offices). On the left of the Palazzo dei notai, not visible, there is our greatest church (San Petronio). On the other side of the pic, the left side of the tanks, there is another historical building. So it’s easier thinking the gi was just camped around spread in civilian houses, or in some other building, not in the pic’
I would say, just based on the fact a tanker rides in a tank everywhere they go, and that they get to carry more food and water and other things to make their lives easier. They also fight under armor, and though the inside of a tank may be hotter than hell, and smell bad, it was way safer than being an infantry soldier. Short of a direct hit from a large artillery piece, say bigger than 105mm, it would be safer to be inside a tank than in a foxhole. That they were not used to occupy areas also made their lives safer, but they have harder work to do. Working on a tank is hard, heavy, and dangerous work all on its own. But not having to walk everywhere is nice, and so is all that armor, and those cushy Sherman seats.
♦♦♦
In the Pacific, things were a little different. At least for the Marines, it seems like they were rarely put ashore to train anywhere they could actually train on their tanks until very late in the war, before a battle. In one case the tanks were stored on an Island, and couldn’t even really be driven around, so the crews got no training time in the tanks before the battle. After combat, sometimes there was little space for the tanks to pull back to reload and do maintenance, and out of desperation, they got used as part of the line occasionally. This would make keeping the tank running a lot harder, but the Sherman was reputed to run even after a lot of neglect and abuse, and then when they finally did have a mechanical failure, it was easy enough to fix.
In a number of battles, the tanks couldn’t pull far enough back to be safe while they tried to reload and repair the tanks. Supply was a problem, particularly early in the battles, because of a combo of loading the tank supplies too deep in the ship and losing so much cargo as they tried to get it ashore. Getting spare parts for the tanks was hard, the crews would have to search around, and going through wrecked landing craft and amphibious tractors and that was if there were parts to be had. In most cases, spares were robbed from damaged and destroyed tanks. I know of at least one case crews went through tanks that had been knocked out or swamped to get ammo for the next day’s fighting.
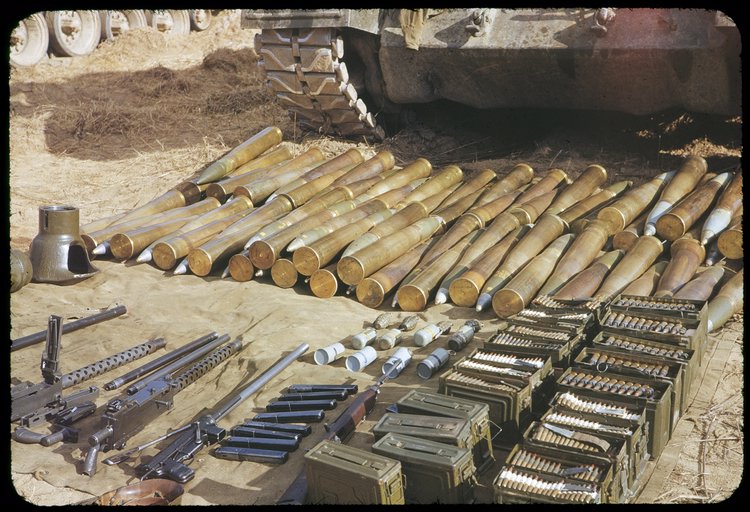
Ammo and weapons of an M46 laid out for inspection on the tank’s tarp. This was one of the few images I could find of a tank’s items out on the tarp for inspection, but it would look just like this with smaller main gun rounds!
As the war progressed, the tankers in the Pacific, Army, and Marine, learned how to use the Sherman to great advantage. After each campaign they improved their game, and as far as I can tell there really wasn’t much cross-pollination in tank tactics between the Marines and Army. In both cases tankers trained at Fort Knox, and yes the Marines sent officers through the armor courses the Army taught there, seemed to try and shoehorn standard armor tactics into the war in the Pacific, and in most cases, they just didn’t work. The Marines also put together their own Armor school eventually.
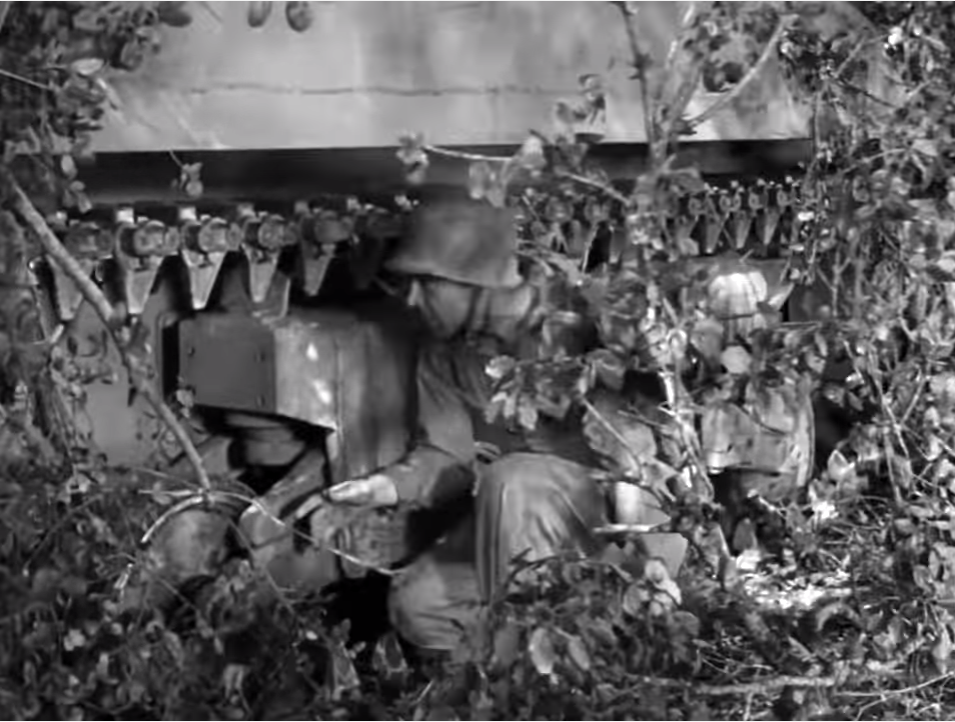
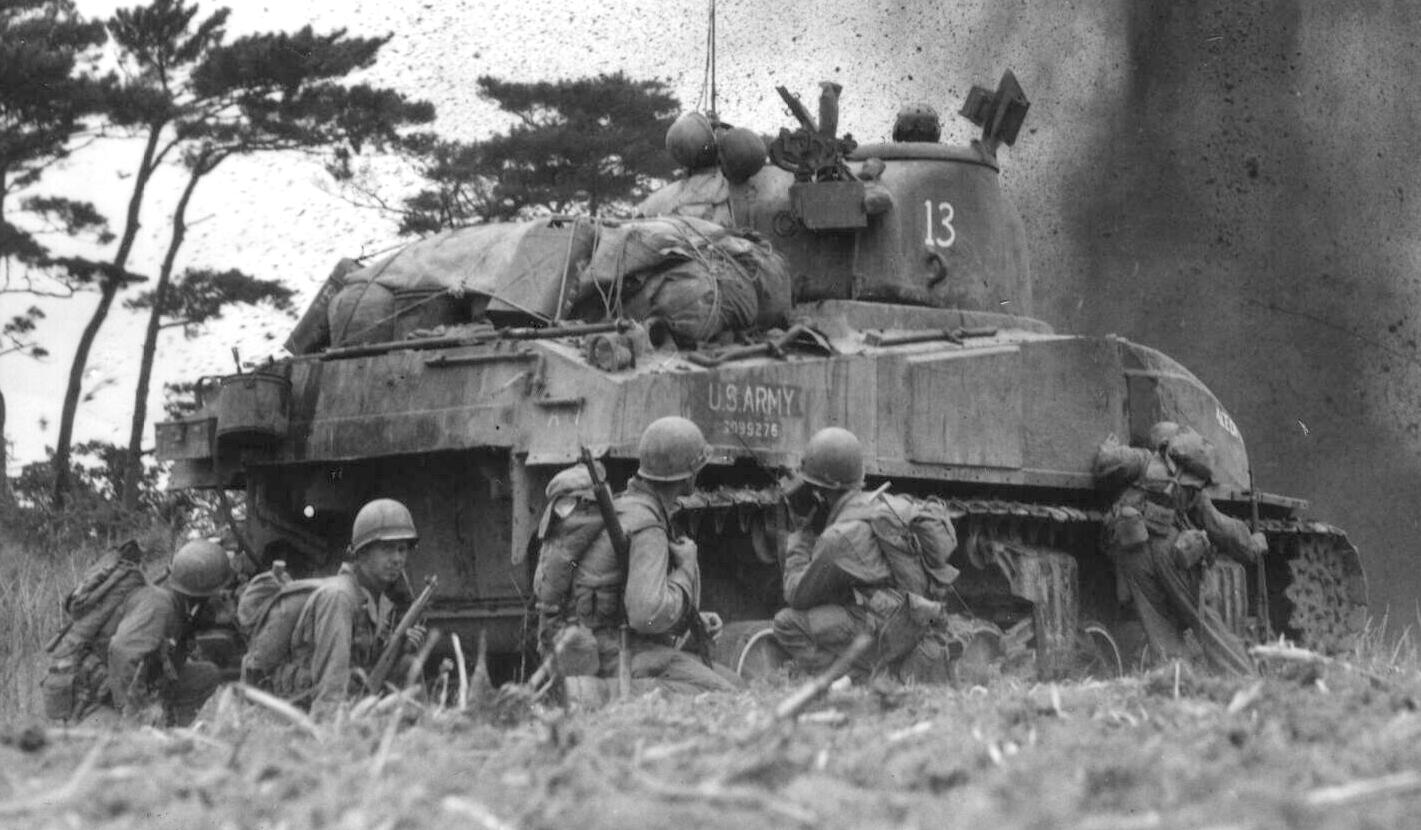
The threats the tanker in the Pacific faced were very different. Since they rarely could pull far enough back, they faced the real risk of Japanese night raiders attacking them. As a counter, they came up with a system of digging a trench under the tank and putting sandbags around the suspension and they would even go so far as setting up one of the M1919 machine guns in a sandbagged nest right in front of the tank. They could back out of these positions and then return and pull right in after they were done for the day.
The Pacific tank had no tank versus tank worries, in the extremely rare cases of US tanks running into Japanese tanks, the Sherman dominated. Japanese tanks were not well armed, well armored, or very common, and a Bazooka was a very serious threat to any of them. The real threat to the Sherman in the Pacific was the 47mm AT gum, any and all large-caliber artillery the Japanese may have had around, mines, though not seriously until late in the war, and Japanese Suicide squads with pole mines and satchel charges.
This M4 hybrid is loaded down with a lot of stuff. Probably in the Philippines.
The climate of the various campaign locations in the Pacific was pretty diverse. Early on, in the SWPAO, places like New Guinea, Bougainville, and Tarawa are pretty close to the equator and hot and humid, the Philippines are also in the tropics. Fighting inside a tank in these areas was not pleasant, and it wasn’t unheard of for crewmembers to pass out from the heat and smoke inside the tank. The environment offered almost as much danger to the Pacific tanker as combat since there were several diseases the caused mass casualties, the main being malaria. The US was very aggressive at controlling the malaria problem, issuing preventive medication and spraying massive amounts of DDT to kill mosquitoes. Later in the war, the battles had left the tropics and were much like the battles in European climate-wise and the malaria risk fell off.
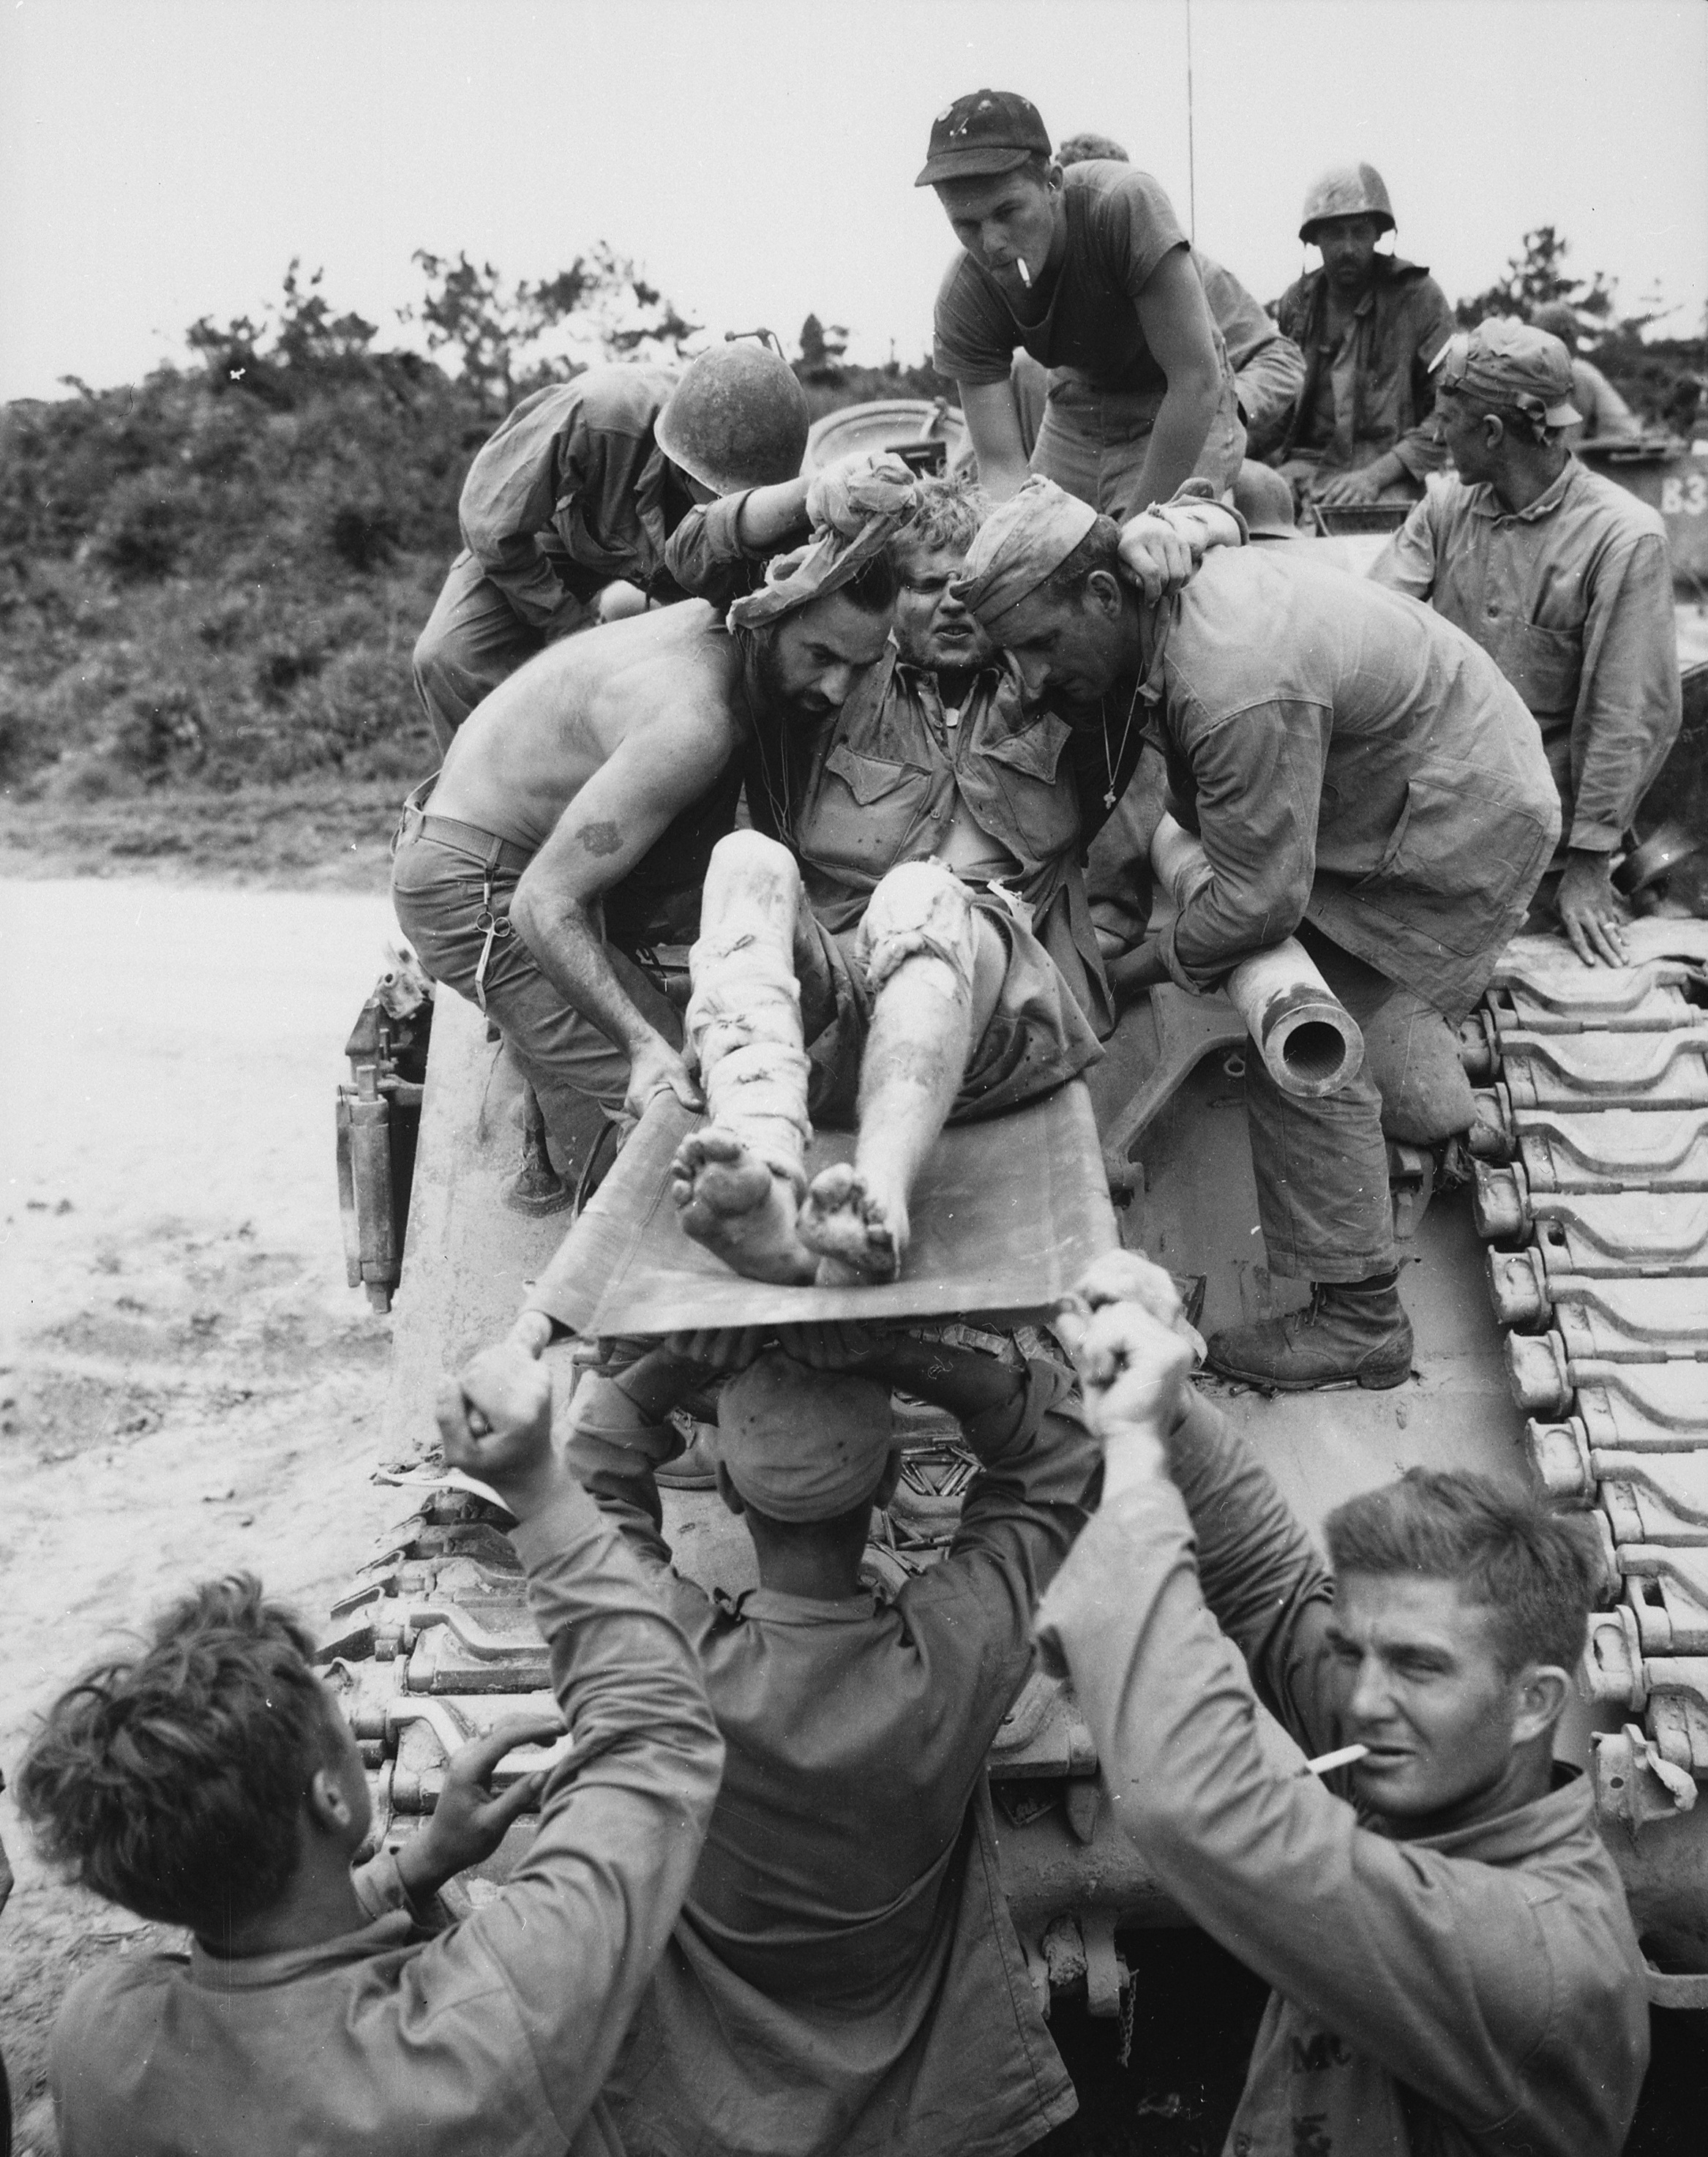
Wounded crewmember being helped out of a damaged M4
Sources: Armored Thunderbolt by Zaloga, Yeide’s TD and two separate tank battalion books, Sherman by Hunnicutt, Combat Lessons, The Rank and file, what they do and how they are doing it 1-7, and 9. Archive Awareness, Oscar Gilberts, Marine Tank Battles in the Pacific, M4 Sherman tank at war by Green, Tanks are a Might Fine Thing by Stout, the Lone Sentry, TM9-731b, TM9-752, TM9-754, TM9-759